Understanding Support Debugging Tool Logging Modes

This is the first in a series of articles that are designed to help you understand how the Support Debugging Tool works and how you can leverage its different features. In the past, I have described features without explaining how these features can be used and what the differences between different modes is. With this series I hope to remedy that situation.
History
The Support Debugging Tool was originally created for Microsoft Business Solutions - Great Plains version 8.0 in September 2006 to solve a particular case. That case had a situation which could not be reproduced on demand, but the resulting incorrect data could be seen in the tables. The basic concept of the tool was to combine logging with triggers and scripts. Below is the high level flow:
- Start Logging after logging in.
- Register triggers on event, such as table being saved.
- When trigger event occurs run a script which looks for the error.
- If error has occurred, keep logs and notify user.
- If error has not occurred, delete logs and start logging again.
When the tool was deployed on site, it took 4 days before the error occurred. The tool provided the support team with the logs leading up to the error occurring. This allowed the script to be identified and the cause of the error to be found and fixed.
Types of Logging
Most consultants know that Microsoft Dynamics GP can create a log of all communication between a Dexterity based application and SQL Server. This is the DEXSQL.LOG file which can be enabled using settings in the Dex.ini configuration file (KB 850996).
If you are a Dexterity developer, you will know that the Dexterity Script Debugger can create a log of all scripts executed with their parameters and hierarchy. Also Dexterity can create a profiler document containing all scripts executed and table access performed, with performance statistics such as number of times executed and length of time taken. These files have the default names of Script.log and Profile.txt. The Script Debugger can be enabled in runtime to make these logging features available (KB 850487).
The Support Debugging Tool takes advantage of the fact that all three of these types of logging can be enabled programmatically without changing the Dex.ini file or using the Debug menu (KB 850498). These three types of logging have been available since the Support Debugging Tool was first created.
With the release of Build 16 of the Support Debugging Tool, SQL Profile Tracing (activity at the SQL Server, including statements inside stored procedures) and Macro Recording (user activity at the Graphical User Interface) were added as new types of logging. These extra types of logging need to be enabled before they can be used. Once the initial setup is completed, they work just like the other types of logging.
In summary: The Support Debugging Tool supports the following types of logging:
- DEXSQL.LOG - Communication between the application and SQL Server
- Script.log - Dexterity scripts executed with parameters
- Profile.txt - Dexterity script and table performance data
- Trace.trc - Activity at the SQL Server
- Macro.mac - Activity at the User Interface
Now that we have all the background information covered we can discuss the main topic of this article.
Logging Modes
The Support Debugging Tool supports three logging modes:
- Individual Logging Control
- Manual Logging Mode
- Automatic Debugger Mode
The following sections will explain the differences between the logging modes and when and how they should be used:
Individual Logging Control
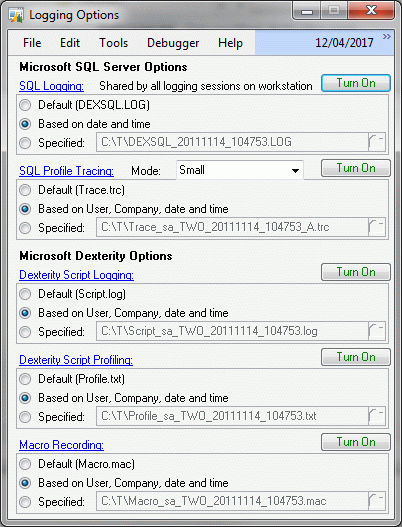
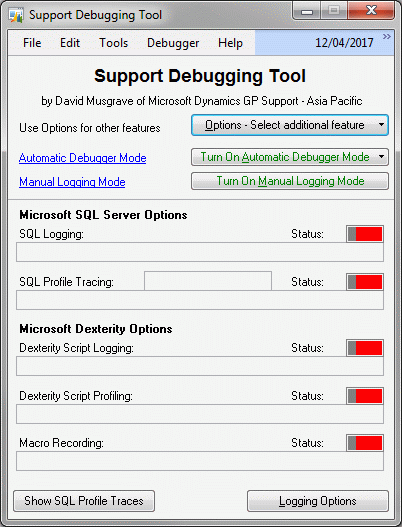
Individual Logging Control provides the ability to turn on and off the individual logging types separately and to specify the paths for the logs. It was created as part of the development process towards the other logging modes and is really only still available as it is useful when developing and testing the Support Debugging Tool. With build 16 of the Support Debugging Tool, the controls for Individual Logging Control were moved into a secondary window (click Logging Options from the main Support Debugging Tool window) as this is not the recommended method of using logging within the tool.
Note: Individual Logging Control is only provided for development and testing purposes, and is not recommended for normal usage. This functionality might be hidden entirely in the future.
Manual Logging Mode
Manual Logging Mode expands on Individual Logging Control, by allowing the logging to be turned on and off with a single mouse click, menu selection or key press. The logs are automatically User, Company, date and time stamped and are stored in a central location. Manual Logging Mode can be turned on and off from the main Support Debugging Tool window (available from the application level or window level Tools menus, or by pressing Ctrl-D).
Manual Logging Mode can also be turned on and off from the application level or window level Tools menus or using Ctrl-Shift-F9 and Ctrl-Shift-F10.
Manual Logging Mode should be used when you wish to capture the logs for a specific event or process. Simply get to the point just before the process or event and start the logging, then turn off the logging as soon as possible after the process or event.
This mode of logging is great for capturing the events that cause an error message, performance problem or data error. It also has the additional benefits of not needing to exit the application to turn on logging, not needing any changes made to the Dex.ini file (so it works well on Terminal Server/Citrix environments) and only capturing the minimum amount of data to be analysed.
Note: Selection of which logging types are used with Manual Logging Mode is made from the General Tab of the Administrator Settings window. Advanced Mode Features must be enabled from the Dex.ini Settings window to access the Administrator Settings window.
Automatic Debugger Mode
So what happens when you don't know what process or event is causing your issue? How do you know when to start and stop the logging?
This is where Automatic Debugger Mode comes into the picture. Remember the basic concept from the start of this article? That concept is implemented in the Support Debugging Tool as Automatic Debugger Mode.
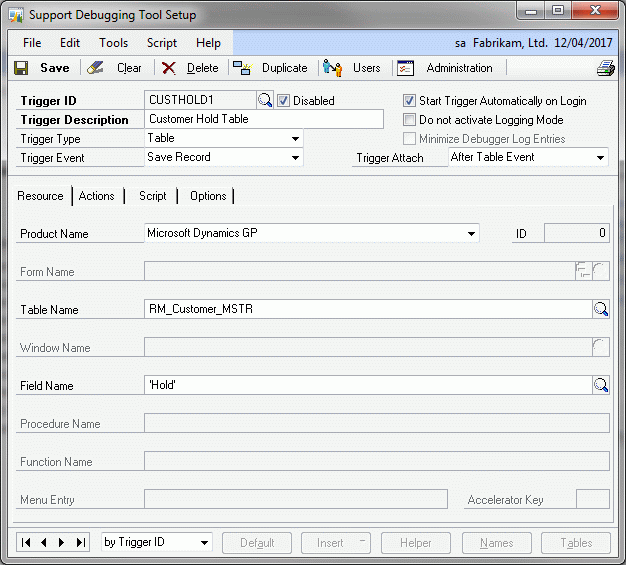
With Automatic Debugger Mode you create Triggers. These triggers can be based against almost any event in the application: Table events, Function, Procedure and Script events and more...
The trigger has a Conditional Script (Dexterity sanScript) which is executed when the event occurs and the trigger fires. The script can perform whatever commands are needed to confirm if the error condition we are looking for has occurred.
If the error condition has occurred, the logs are stored and various actions can be selected.
If the error condition has not occurred, the logs are erased and the trigger waits for the next occurrence of the event.
Automatic Debugger Mode is designed to help find those non-reproducible issues where you can see the result of something happening but are not sure of the steps to make it happen.
Summary
- Use Manual Logging Mode when you want logging for a known event.
- Use Automatic Debugger Mode when you want logging leading up to an unknown event.
- Don't use Individual Logging Control.
In the next article we will discuss the different ways to turn Manual Logging Mode and Automatic Debugger Mode on and off.
David
Comments
Anonymous
June 17, 2012
Posting from Mark Polino at DynamicAccounting.net msdynamicsgp.blogspot.com.au/.../understanding-support-debugging-tool.htmlAnonymous
June 17, 2012
The comment has been removedAnonymous
July 14, 2012
Excellent explanation for the various logging options.


