[Sample of Mar 14th] Printing Windows Forms DataGridView
 |
 |
|
 |
 |
|
Sample download: https://code.msdn.microsoft.com/CSWinFormPrintDataGridView-75864c45
Today’s code sample demonstrates how to print a Windows Forms DataGridView. The sample shows you the granularity as to print a single cell too.

The sample was written by Nandeesh Suhas Swami.
 You can find more code samples that demonstrate the most typical programming scenarios by using Microsoft All-In-One Code Framework Sample Browser or Sample Browser Visual Studio extension. They give you the flexibility to search samples, download samples on demand, manage the downloaded samples in a centralized place, and automatically be notified about sample updates. If it is the first time that you hear about Microsoft All-In-One Code Framework, please watch the introduction video on Microsoft Showcase, or read the introduction on our homepage https://1code.codeplex.com/.
Introduction
The code sample demonstrates how to print a DataGridView. The sample shows you the granularity as to print a single cell too.
The Code contains:
Two forms,
1. Main form which contains DataGridView.
2. One more form to give an option to customer if he wants to print any of the Columns
The code is mostly in below events
private void printDocument1_PrintPage(object sender, System.Drawing.Printing.PrintPageEventArgs e)
This contains most of the logic as to which row or column is to be printed.
private void dataGridView1_CellContentClick(object sender, DataGridViewCellEventArgs e)
This contains an important line of code which confirms which column is to be printed.
Running the Sample
After executing the code or double clicking the application, you will get:

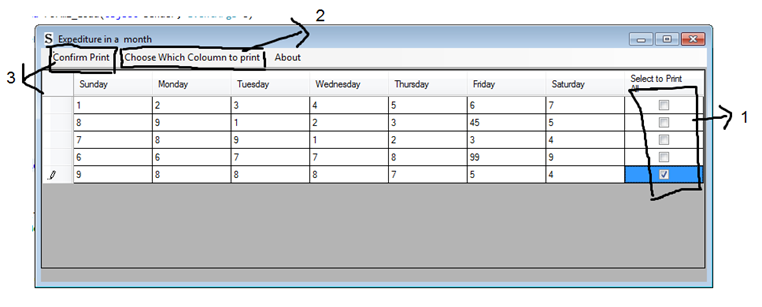
1. Select to print: After entering all the data, we can select which Row to print by selecting the check boxes.
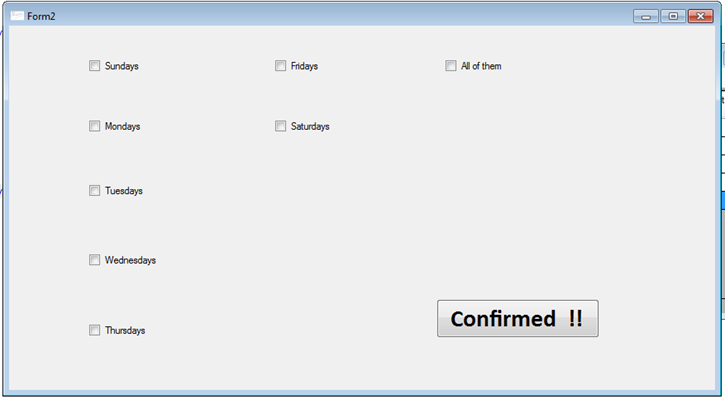
2. Choose which Column to print: This will open one more form like below.
Here you can choose any one of the columns to be printed. If you want all of them select “All of them”

Please note if you select in “Select to print” only the first and second row and in the columns to print if you select all of them. It will print the first rows completely.
Let’s say you just wanted to print first entry of Sunday .You need to select only the first row in “Select to Print” and Sundays in Choose Which column to print.
In any case you can select the entries you want to print, but you need to give an option in both Columns and Rows.
3. Confirm to print: This will open a print Dialog from which you can select a printer and print it.
Using the Code
1. In printDocument1_PrintPage , I am first printing all the days using the below code
 // Please note this is where I am Printing Sunday , Monday , Tuesday.... We can also move rowCounter to
// the maxRowcounter loop where we are printing below
for (z = 0; z < dataGridView1.Columns.Count - 1; z++)
{
    e.Graphics.FillRectangle(Brushes.AliceBlue, realwidth, realheight, width, height);
    e.Graphics.DrawRectangle(Pens.Black, realwidth, realheight, width, height);

    e.Graphics.DrawString(dataGridView1.Columns[z].HeaderText, dataGridView1.Font, Brushes.Black, realwidth, realheight);

    realwidth = realwidth + width;
}
Iterating through each day and drawing a rectangle and further what is the content in each column.
2. After this I move to printing the contents of the individual cells. I have used the below logic:
 while (rowCounter < dataGridView1.Rows.Count)
{
    realwidth = 100;

    if (columnsToPrint[rowCounter] == true)
    {
        if ((f.checkBox8.Checked == true) || (f.checkBox1.Checked))
        {
            if (dataGridView1.Rows[rowCounter].Cells[0].Value == null)
            {
                dataGridView1.Rows[rowCounter].Cells[0].Value = "";
The first while loop is for the count of no of rows and rowCounter is considered as an index further.
columnsToPrint[rowCounter] is an array of bools . As per which ever Row is selected in the first form at “Select To Print”, the loop will be entered for printing.
The drawing goes on for each row and further selecting which cell to print in each row.
Now the property for the checkboxes is checked if it’s true or not. These check boxes are there in Form2. Based on which ever check box is selected it will start drawing.
More Information
https://msdn.microsoft.com/en-us/library/system.windows.forms.datagridview.aspx
https://msdn.microsoft.com/en-us/library/system.windows.forms.printdialog.aspx
https://msdn.microsoft.com/en-us/library/system.drawing.printing.printdocument.aspx