Call Azure Resource Manager REST APIs from your .NET Application
Every now and then, you might need to perform actions against the Azure Resource Manager REST APIs from a .NET (deamon) application.
A good example could be a probe-like application that needs to change a route in an Azure route table, shutdown or start an Azure Virtual Machine or scale up or down instances. Anyway, you want to consume Azure Resource Manager REST APIs from your application without a browser-based sign-in process.
This blog post shows you one of the options you have to accomplish this. It consists of the following steps:
- Create an application in Azure Active Directory.
- Grant the application permissions to the resource(s) in Azure.
- From your application, get an Access Token from Azure Active Directory.
- Execute Azure Resource Manager REST API calls.
- Try it!
Create an application Azure Active Directory.
Log on to the Classic Azure Portal at https://manage.windowsazure.com and locate the directory associated with the subscription where you want your application to touch resources. If you don’t know which subscription is linked to which directory, go to the Settings page of the Classic Azure Portal.
Open that directory, and navigate to the Applications tab. From there, click Add at the bottom of the page. Select Add an application my organization is developing and click next. Give the application a friendly name, and select Web Application and/or Web API (even though you might be creating an application that you might think is a native client application).
In the sign-on url and app id uri boxes, type anything valid. I suggest you use something like “https://myorganization.com/MyApp”. This URL does not have to exist nor will it be used. Click finish.
Once the application has been created, and you applications page opens up in the Classic Azure Portal, select the Configure tab.
Next to User assignment required to access app, select “Yes”, just to be sure.
Under Keys, expand the pull down menu and select your desired validity period for the applications key. After you save you changes the actual key will be shown in this area.
At the bottom of the page, under Permissions to other applications, click Add application. Select Microsoft Apps in the Show dialog box (which is the default), and click on Windows Azure Service Management API. Click the finish button.
On you applications configuration page, where you should be now, locate the added application Windows Azure Service Management API and click on Delegated Permisssions: 0. Click Access Azure Service Management as organization users (preview) to select it.
Click save, at the bottom of the screen, and locate the (newly generated) application key for the application (what's called the key here, is the clientSecret in code).
Also note the Client Id, located a little above the key.
Grant the application permissions to the resource(s) in Azure.
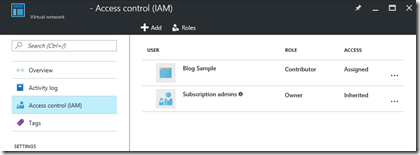
Log on to the Azure Portal at https://portal.azure.com and locate the resource that your application needs access to. From that resources page, click on Access control (IAM) .
Click on add and select the role you want your application to have. Next, type the name of your application (as you created it in the Azure Active Directory), and select it.
Now click Select and OK to save the permissions.
Get an Access Token from Azure Active Directory.
In order for your application to get an Access Token from Azure Active Directory, you need to have the following information:
- The name (or identifier) of your Azure Active Directory instance.
- The Client ID of the application in Azure Active Directory.
- The Client Secret of the application in Azure Active Directory.
Once you have this information, it’s a very straight forward process to get an Access Token from Azure Active Directory.
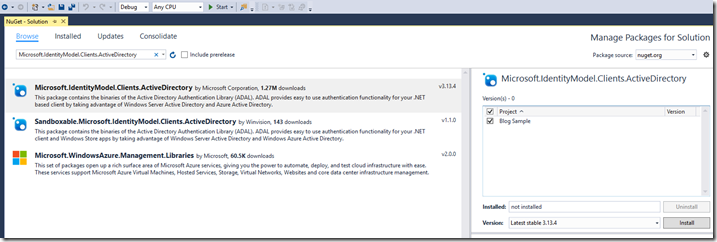
First, install the NuGet package Active Directory Authentication Library (Microsoft.IdentityModel.Clients.ActiveDirectory).
Either use “Manage NuGet packages for solution…” from Visual Studio to search for this package:
Or use the Package Manager Console to install it;
Install-Package Microsoft.IdentityModel.Clients.ActiveDirectory
After the package is installed, add a reference to it in your code:
using Microsoft.IdentityModel.Clients.ActiveDirectory;
Now, you can use the following method to get the Access Token from Azure Active Directory:
 private async Task<string> GetAccessToken(string tenantName, string clientId, string clientSecret)
{
    var authString = "https://login.microsoftonline.com/" + tenantName;
    var resourceUrl = "https://management.azure.com/";

    var authenticationContext = new AuthenticationContext(authString, false);
    var clientCred = new ClientCredential(clientId, clientSecret);
    var authenticationResult = await authenticationContext.AcquireTokenAsync(resourceUrl, clientCred);
    var token = authenticationResult.AccessToken;

    return token;
}
The Access Token returned from the method is a string that can be used to authenticate calls to the Azure Resource Manager REST APIs.
Execute Azure Resource Manager REST API calls.
In order for your application to issue calls to the Azure Resource Manager REST APIs, typically you need at least this information:
- An Access Token.
- Identifier of the Azure Subscription.
- Resource Group Name.
- Name or Identifier of the resource(s) you want to create, remove or modify.
We will use the example of updating a route in a route table with a new “NextHopIpAddress”, which would require;
- Route Table Name
- Route Name
- The IP Address
With this information, it’s a very straight forward process to execute Azure Resource Manager REST API calls. (In this case; update a route.)
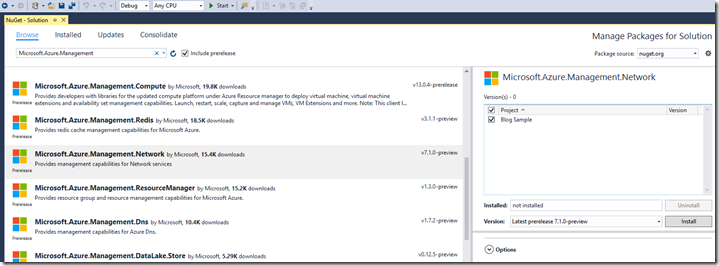
First, install the NuGet package(s) you need for your resource(s). All these packages start with “Microsoft.Azure.Management”. Since I want to update a route table in Azure, I need the “Microsoft.Azure.Management.Network” package. (I’m using the preview version.) Second, we need the package that provides us with a TokenCredential, but this package is installed as a dependency when installing the Microsoft.Azure.Management package(s).
Either use “Manage NuGet packages for solution…” from Visual Studio to search for these packages:
Or use the Package Manager Console to install it;
Install-Package Microsoft.Azure.Management.Network
After the package is installed, add a reference to it in your code:
 using Microsoft.Azure.Management.Network
using Microsoft.Rest
Now, you can use the following method to, in my case, update a route in a route table:
 private async Task ChangeRouting(string token, string subscriptionId, string resourceGroup, string routeTableName, string routeName, string ipAddress)
{
    var credential = new TokenCredentials(token);
    var client = new NetworkManagementClient(credential);
    client.SubscriptionId = subscriptionId;

    var route = client.Routes.Get(resourceGroup, routeTableName, routeName);
    route.NextHopIpAddress = ipAddress;
    await client.Routes.CreateOrUpdateAsync(resourceGroup, routeTableName, routeName, route);
}
Try it!
To combine the two methods, and fill in the gaps, this is the code we could use to get the token and execute the call:
 var tenantName = "blogsample.onmicrosoft.com";
var clientId = "cae58962-1234-5678-abcd-84de99ecc675";
var clientSecret = "WxO+54VsAMNf2W3rbnBQZi15yTUiqpIexzBrNrNf+rQ=";

var token = GetAccessToken(tenantName, clientId, clientSecret).Result;

var subscriptionId = "1a917324-4b19-4ab2-8c17-f25e89c58715";
var resourceGroup = "Default-Networking";
var routeTableName = "routetable1";
var ipAddress = "192.168.100.10";

ChangeRouting(token, subscriptionId, resourceGroup, routeTableName, routeTableName, ipAddress).Wait();
(Please note that I’m using .Result and .Wait() for my Async methods since this code ran in a console application. Typically, it is not recommended you use .Result or .Wait() Simply await the methods!)
Also, try to modify another resource in Azure, and see if your application has permissions to do so. In my example, let me try to get the details of a Virtual Network.
I’ve replaced this line:
await client.Routes.CreateOrUpdateAsync(resourceGroup, routeTableName, routeName, route);
with this one:
client.VirtualNetworks.Get(resourceGroup, "MyVirtualNetwork");
And here’s the exception I got;
The client 'cae58962-1234-5678-abcd-84de99ecc675' with object id 'bd69d824-3c1e-4406-a1da-ea0fc085b0e7' does not have authorization to perform action 'Microsoft.Network/virtualNetworks/read' over scope '/subscriptions/1a917324-4b19-4ab2-8c17-f25e89c58715/resourceGroups/Default-Networking/providers/Microsoft.Network/virtualNetworks/MyVirtualNetwork'.
Good! So the application does not have permissions to resources that it doesn’t require access to.
Comments
- Anonymous
February 27, 2018
I am getting access token, i have clientid, clientsecret, subscription , tenantid, i want to restart "web app" , in c# , what to do.- Anonymous
October 02, 2018
You can call this REST method to restart all web apps in a Service Plan: POST https://management.azure.com/subscriptions/{subscriptionId}/resourceGroups/{resourceGroupName}/providers/Microsoft.Web/serverfarms/{name}/restartSites?api-version=2016-09-01Or use this to restart an individual app: POST https://management.azure.com/subscriptions/{subscriptionId}/resourceGroups/{resourceGroupName}/providers/Microsoft.Web/sites/{name}/restart?api-version=2016-08-01
- Anonymous


