Enabling Bitlocker with an SCCM Task Sequence
Companies are starting to take a look and utilize Bitlocker more often now. I have had many customers ask me about Bitlocker and what the easiest way to deploy it companywide would be. Usually when I am having discussions with people, it is during an upgrade, hardware refresh, or a new build out, so in my opinion, this is a key time to deploy. If you are already utilizing SCCM to do your OS builds, upgrades and refreshes, it is not too much to add a step that will enable Bitlocker. You just have to note a few key items which are listed below.
- Bitlocker requires at least 2 disk partitions. One un-encrypted and one or more encrypted partitions.
- The unencrypted partition has to be a size of 150MB or greater.
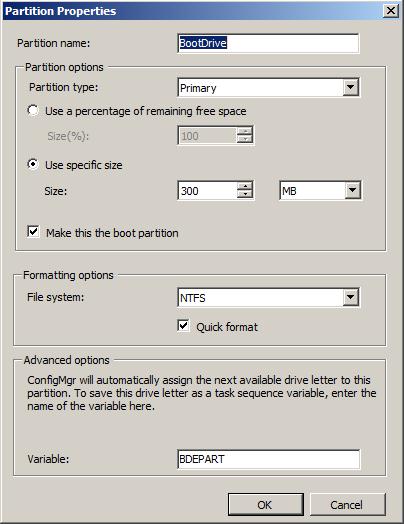
Now, if you already have an existing task sequence, and in this scenario we will assume you do, there are a few lines that need to be edited. The first piece to be edited is the “Format and Partition Disk” task. In my case this step is called “Partition Disk 0” which is also the default if you created it using the task sequence wizard. You can choose to remove all volumes and recreate them or edit the existing ones. No matter which you choose, your task sequence step should look like the below.
- Partition 1
- Partition name: This can be anythingyou choose. In my case I just named it BootDrive.
- Partition options: Use specific size of at least 150MB or more. I used 300MB because it is a standard.
- Make this the boot partition: Checked.
- Formatting options: File system = NTFS. Quick format = checked (You can choose not to check this option, but without it, your format process can be incredibly slow depending on your hard drive size).
- Variable: BDEPART (This can also be whatever you want).
Once you are finished with this part, your partition screen should look like this:
Figure 1: Boot Drive
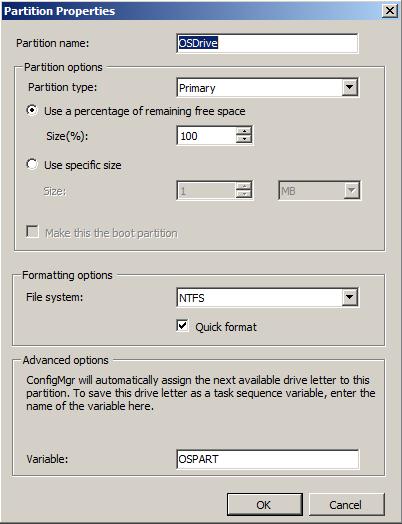
- Partition 2
- Partition name: This can be anything you choose. In my case I just named it OSDrive.
- Partition options: Use a percentage of remaining free space; size(%) = 100. Again you can change this depending on how many partitions you want to end up with.
- Make this the boot partition: Greyedout.
- Formatting options: File system = NTFS. Quick format = checked (You can choose not to check this option, but without it, your format process can be incredibly slow depending on your hard drive size).
- Variable: OSPART (This can also be whatever you want, however it is incredibly important to remember this because you are going to reference it later).
Once you are finished with this part, your partition screen should look like this:
Once you are finished with both of these sections, your final product for this section should look like this:
The next step requires you to move to the “Apply Operating System” section in your task sequence. In this next section will be the section that you will need to reference the variable name that you entered in “Figure 2: OS Partition”. What you need to do is change the destination location of where the operating system image will be applied to.
All fields in the section can remain default with the exception of the 2 sections underneath the “Select the location where you want to apply the operating system” field. Edit the 2 sections below to match:
- Destination: Logical drive letter stored in a variable.
- Variable name: OSPART (This is the part where you will enter the variable from the above figure).
Once you are finished with this part, your screen should look like this:
Figure 4: Apply OS
The last question I get asked many times is where to place the final step of enabling Bitlocker. The logical location is to place it at the very end of the task sequence. As seen in the above figure. I just recommend that inside that final step, you leave the check box that says “ Wait for the Bitlocker drive encryption process to complete on all drives before continuing task sequence execution” unchecked, especially when placed at the very end. This will allow the task sequence to complete while the machine continues the encryption process.
I do want you all to keep in mind that this is just a basic configuration of Bitlocker. There are some other action variables that can be included. Some of those variables can be found at the below link:
https://technet.microsoft.com/en-us/library/dd252736.aspx
As always, questions and comments are welcome! Happy Bitlocking!
Check back for the next 2 pieces of this set which will include:
- Enabling Bitlocker: Bypassing the partitioning process
- Enabling the TPM using SCCM
Comments
Anonymous
April 09, 2013
Excellent Chuck, Really helped me out!!!Anonymous
May 06, 2013
Anybody know where "Enabling Bitlocker: Bypassing the partitioning process" is?Anonymous
June 03, 2013
Good read, but as with Noel, I can't find the information for the next stepsAnonymous
September 10, 2013
Looking for the next two parts.... any help?Anonymous
May 01, 2014
Looking for "Enabling Bitlocker: Bypassing the partitioning process"


