Step-By-Step: Upload your Own VHD to Add to the Gallery in Azure
Hello Folks,
Yesterday I wrote about customizing a Gallery image and re-inserting it in the Gallery as your own. But what if you’re looking to migrate a workload from your datacenter to Microsoft Azure and you want to be able to create new VMs from that workload? You can sysprep, generalize and shutdown that workload and put it in the gallery.
In this article we will run through the process of creating your own image by uploading a .vhd file with an operating system you've installed and generalized. And we’ll do it without even accessing the Azure Portal. (Well… we will go there twice. Once to show that the images is not there, and once to show that the image has been added to the Gallery).
This is a PowerShell driven step-by-step.
First things first! The newer VHDX format is not supported in Azure. You can convert the disk to VHD format using Hyper-V Manager or the convert-vhd cmdlet or use Hyper-v manager to convert the VHDx to a VHD.
The next 2 screen captures show the VHDs and disks that are already in the portal.
Ok let’s start.
1- Prepare the access to your subscription
the next few command will import the Microsoft Azure PowerShell in our PowerShell session, login our Azure subscription and select the one (if you have more than one) is going to be our default subscription.
 # Import Windows Azure PowerShell Module
$env:PSModulePath=$env:PSModulePath+ ’
    ";"+"C:\Program Files (x86)\Microsoft SDKs\Windows Azure\PowerShell"
Import-Module Azure
 # Login to Windows Azure subscription
Add-AzureAccount
 # List Available Windows Azure subscriptions
Get-AzureSubscription | Format-Table -Property SubscriptionName
# Set default Windows Azure subscription
$subscription = "Windows Azure MSDN - Visual Studio Ultimate"
Select-AzureSubscription -Default $subscription
2- Connect to your subscription using the certificate method
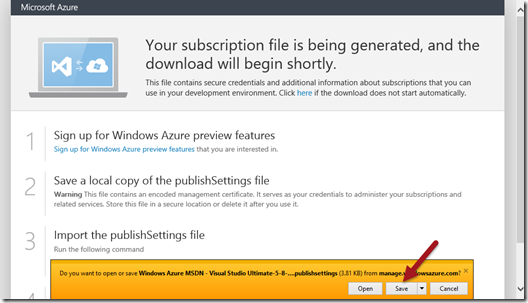
This step will download a file from azure portal and then import into azure PowerShell. The file downloaded contains an encoded management certificate that serves as the credentials to administer your Windows Azure subscriptions and services.
Important: We recommend that you delete the publishing profile that you downloaded using Get-AzurePublishSettingsFile after you import those settings. Because the management certificate includes security credentials, it should not be accessed by unauthorized users
the first command downloads the files and the second command imports the file in our PowerShell session.
Get-AzurePublishSettingsFile
 Import-AzurePublishSettingsFile –PublishSettingsFile `
    "C:\azurecert\Windows Azure credentials.publishsettings"
3- Identify the Storage Account and Container
The next few command will identify the storage accounts you may have. Pick one (I picked jrprlabstor01 on my end) and once you’ve set it as your default, use the Get-AzureStorageContainer command to identify the blob end point that we will use to upload the VHD.
# Get default Windows Azure Storage Account.
Get-AzureStorageAccount | Format-Table -Property Label
 # Set default Windows Azure Storage Account
$storageAccountName = "jrprlabstor01"
Get-AzureSubscription | Set-AzureSubscription –CurrentStorageAccountName `
     $storageAccountName
#Identify the URL for the container in the storage account
# we set in the previous command.
Get-AzureStorageContainer
4- Upload the VHD
This section will set the location of the VHD to copy, the target location and perform the upload.
# Identify where the VHD is coming from and where it's going.
# note: the URL was retrieved using Get-AzureStorageContainer
$LocalVHD = "D:\w2012r2-custom2.vhd"
$AzureVHD = "https://jrprlabstor01.blob.core.windows.net/vhds/w2012r2-custom2.vhd"
Add-AzureVhd -LocalFilePath $LocalVHD -Destination $AzureVHD
5- Add the VHD to the “My Disk” section of the Gallery
Now that we have the VHD uploaded. We will use the next command to add it to the Gallery.
 # Register as an OS disk
Add-AzureDisk -DiskName 'Windows-2012-R2-Custom-Disk' -MediaLocation $AzureVHD `
    -Label 'Windows-2012-R2-Custom-Application' -OS Windows
Done!
Try it for yourself. You can start by setting up a trial Microsoft Azure subscription. Use the Step-By-Step: Creating a Windows 2012 R2 Lab on Windows Azure for help on how to setup your lab.
Cheers!
Pierre Roman | Technology Evangelist
Twitter | Facebook | LinkedIn


