Hyper-V: Clustering & Resiliency. Step 7: Virtual Machine Configuration
Hello Folks,
In our “From The Ground Up” series, we have setup a SCVMM managed Hyper-V Failover Cluster. From the storage all the way to the clustering. Today we we’ll look at creating a virtual machine on our cluster via the GUI and later, using PowerShell.
If you feel like doing it and getting your hands on Hyper-V and SCVMM you can download Windows Server 2012 R2 and Hyper-V Server 2012 R2, setup your own lab and try it for yourself. as an option we’ve actually made these labs available in TechNet Virtual Labs.
- Part 1 – Microsoft Virtualization with Windows Server 2012 R2 & System Center 2012 R2
- Part 2 – Microsoft Virtualization with Windows Server 2012 R2 & System Center 2012 R2
Here we go. Let’s create some VMs….
Create a Generation 1 VM
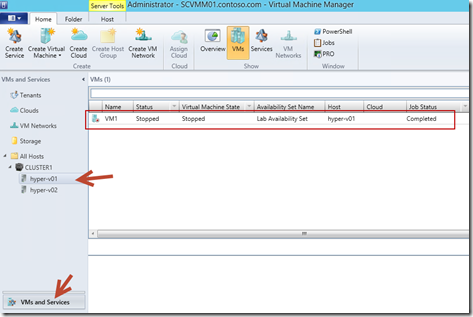
1. In the Virtual Machine Manager Console select the VMs and Services workspace and on the ribbon, click Create Virtual Machine, and then select Create Virtual Machine.
2. On the Select Source page, select Create the new virtual machine with a blank virtual hard disk, and then click Next.
3. On the Identity page, type VM01 in the Virtual machine name field, select Generation 1 from the Generation dropdown, and then click Next.
4. On the Configure Hardware page, scroll down to review the configuration options, including Processor, SCSI Adapter 0, CPU Priority, Virtual NUMA and Memory Weight. Select Memory under General in the navigation tree, in the details pane, then in the select the Dynamic radio button. Enter 128 in the Startup memory field, type 64 in the Minimum memory field, and type 192 in the Maximum memory field.
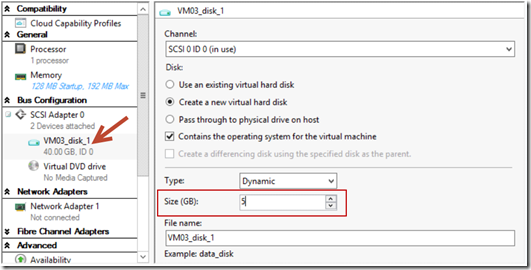
5. On the Configure Hardware page, select VM01_disk_1 under Bus Configuration | IDE Devices in
the navigation tree. Change the Size (GB) value to 5 GB. Leave all other default settings.
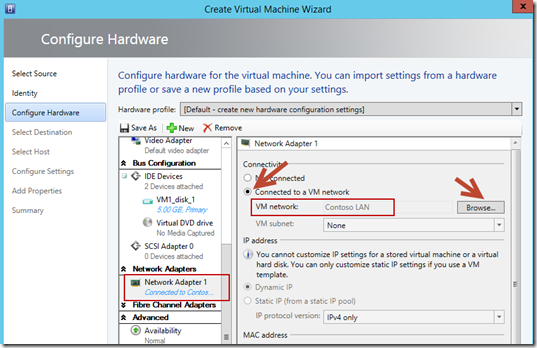
6. On the Configure Hardware page, scroll down in the navigation pane and select Network Adapter
1 under Network Adapters. In the results pane, under Connectivity, select the Connect to a VM network radio button, and
click Browse and in the Select a VM Network window, select Contoso LAN, and then click OK.
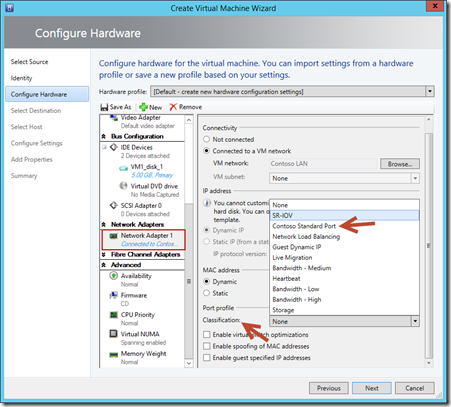
7. In the Network Adapter 1 details pane, under Port Profile, select Contoso Standard Port from the
Classification dropdown.
8. On the Configure Hardware page, select Availability under Advanced in the navigation pane, click the Make this virtual machine highly available check box. Then click Manage availability sets. An Availability Set is a group of VMs that distribute themselves across different hosts as evenly as possible. This type of anti-affinity can be used to keep VMs with identical server roles (such as virtualized DCs or guest cluster nodes) on different hosts to avoid a single point of failure. In the Manage Availability Sets window, click Create and type Lab Availability Set in the Name field, and then click OK. and click Next to move to the next configuration page.
9. On the Select Destination page, ensure that the Destination is All Hosts, and then click Next. VMM scans each host for its current resource usage across CPU, Memory, Disk and Network, and ranks each host based on these factors and the expected needs of the VM, using a feature called Intelligent Placement. On the Select Host page, select HYPER-V01, and then click Next.
10. On the Configure Settings page, accept the defaults, and then click Next. On the Add Properties page, make the following changes using the drop down lists and entry boxes:
- Select an action to perform automatically when the virtualization server starts:
- Turn on the virtual machine if it was running when the physical server stopped
- Delay start up (seconds): 10
- Action to take when the virtualization server stops:
- Shut down guest OS
- Specify the operating system you will install in the virtual machine:
- Windows Server 2012 R2 Datacenter
11. On the Summary page, then click View Script and click File and select Save As change the file name to E:\VMMLibrary\DeployVM.ps1. (we will use it in the next post) and click Create.
| NOTE : if your Hyper-v machine are virtual, ensure to NOT select the “Start the virtual machine after deploying it”.you cannot run a virtual machine in a virtual machine |
we now have a highly available VM on our cluster.
Next step will consist in using and modifying the PowerShell script we saved in order to automate a lot of this process.
Until then, keep learning.
Cheers!
Pierre Roman | Technology Evangelist
Twitter | Facebook | LinkedIn


