Adding a Hostname to your SSL certificate binding on port 443
This article has been moved to its new home here: https://benperk.github.io/msdn/2013/2013-02-adding-a-hostname-to-your-ssl-certificate-binding-on-port-443.html
I see a lot of articles and posts about being able to bind different websites on the same server to port 443. This article is my take on the subject.
It is possible to bind multiple websites hosted on the same server to port 443, but you can’t easily do it from the GUI because the Host name is greyed out as shown in Figure 1. However, if the SSL Certificate begins with a *, then it is enabled. This is likely to support wild card certificates as shown in Figure 2.
The confusion comes when you attempt to bind different SSL certificates to the different website both of which want to use port 443. That won’t work.
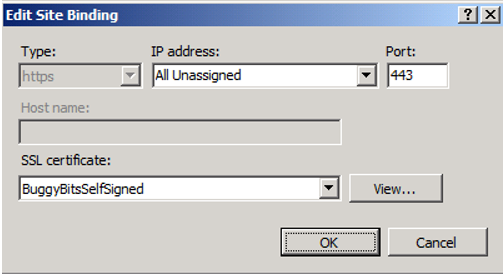
Figure 1, Host name is greyed out
I tried a hack just to test by binding SSL certificate 1 to port 443 and SSL certificate 2 to 444 from within the GUI. Then using appcmd I modified the bindings for the 2 websites so that they both used port 443 and had a different host name.
The result of this was that the certificate originally bound to port 444, SSL certificate 2, was changed to use SSL certificate 1. Meaning, the different SSL certificates being bound to port 443 where being forced to use a single SSL certificate. The SSL certificate on port 444 was being replaced with the one bound to 443.
This means that you can only have 1 SSL certificate per IP:PORT combination.

Figure 2, Host name is not greyed out when * exists
Another way to view this requirement is using the following netsh command:
netsh http show sslcert
The result will show you the IP:PORT combination settings for the installed SSL certificate. The reason this combination is required is due to the sequence of events that happen during the handshake. A pseudo example:
- CLIENT – resolve URL to IP and PORT
- CLIENT – connects to IP and PORT
- SERVER – Answers from that IP and PORT
- CLIENT – Asks for SSL certificate
- SERVER – Sends SSL certificate
- CLIENT – Compares SSL certificate name from server to name from step 1
- CLIENT – Assuming they match, begin encrypted exchange
- CLIENT – Send encrypted information to server
- SERVER – Sends encrypted information back to client
The reason that the IP and PORT combination is so important is because the server must know which certificate to return to the client in step 5. The server does not know the hostname until step 8. This is why IIS is setting the SSL certificate back to the original one bound to port 443 when it is attempted to bind it to an IP:PORT:Hostname combination.
Note that you can make some changes in the applicationHost.config file directly, however you will not be able to bind different SSL certificates to an IP:PORT:Hostname, where IP:PORT are the same. You can bind the same SSL certificate to *:443:Hostname.
Solution
IIS 8 introduces a new concept called SNI (Server Name Indication). Check it out.
Comments
Anonymous
March 24, 2015
Great post. Thanks for sharing.Just some more explanation from me on certificate starting with * in second para.That * doesn't mean that is wild card certificate necessarily.In IIS7 (on Windows 2008 R2), I saw missing hostname under 'Edit Site Binding' [your first screenshot]. That was the first SSL 443 website on that IIS server. The website was dynamicsSharePoint.domain.com and I used internal certificate server to issue the certificate for that internal Dev / Test site.I resolved the missing Hostname by opening the MMC console on the server and adding Certificate MMC for ComputerExpand Personal node under Certificates (Local Computer) on server Right click on the certificate in the list and choose properties Under General tab, change the 'Friendly Name' from dynamicsSharePoint.domain.com to *.domain.com and click OK Go to IIS Binding for the website and you should be able to add Hostname and pick the *.domain.com certificate. Verify the website and you will see certificate in browser with the FQDN / dynamicsSharePoint.domain.com RegardsFaisal Masoodhttp://www.FaisalMasood.comPMPMCSE, MOS: SharePoint 2013MCITP, MCTS: SharePoint 2010MCSA: Office 365MS: MS Project 2013MS: AzureSharePoint, Office 365, Azure, ProjectServer EPM Consultanthttp://www.softvative.comAnonymous
October 13, 2015
Hi Faisal, Thanks for the wonderful input. Worked like charm.Anonymous
October 20, 2015
Very Nice Faisal. It resolved our issue. Tank you!!!Anonymous
October 30, 2015
The comment has been removedAnonymous
February 23, 2016
Thanks for much for the '*' in the friendly name tip - it solved my issue, appreciate it.Anonymous
December 03, 2016
It is really great help. thank you very much