SharePoint Training for End Users - Part 2
Back to you with the second part of the training. In this part I will be covering document libraries. It took me a while to just try and simplify things as much as possible from an IT perspective, or as one of my colleges used to say: "Take of the technical cap and wear the business cap". Anyways it did not mean any sense to me then and now! hehehe ![]()
Document Libraries
Think of them as a repository for documents. Documents can't live anywhere else in the portal.
Creating New Documents
To create a new document click on the New menu and click on New Document. You can store various types of documents there. For this guide we are using only one document type.
Creating Folders
You can create folders and sub folders as well and store the documents in them. To add a new folder click on the New menu and click on New Folder.
Uploading Documents
You can upload documents as well. You can upload one or multiple documents.
Edit an Existing Document
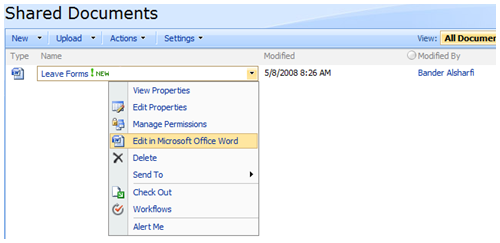
Hover over the document in the right side section and click over the small arrow on the right. Select "Edit in Microsoft Office Word".
It's Word for word documents, Excel for spreadsheets, etc.. If the document type is not one of the Microsoft Office Client Suite Products you have to add it as a new custom Content Type.
Delete Documents
Hover over the document in the right side section and click over the small arrow on the right. Select "Delete".
Document Versioning Explained
Using document versioning you can create a new copy of your document each time you update it. At the moment Document Versioning configuration by default is setup for 10 major versions and then it will start replacing.
We have 2 types of versioning: Major Versioning, which is giving the documents, fixed numbers e.g. 1, 2, 3, etc. these documents will be always published and visible for users. On the other hand, major/ minor versioning, this is giving the documents sub versions, like 1.01 or 2.6. They are called minor versions or drafts. Drafts are only visible to the other and administrators. After you're done with drafting you can publish the document directly or send it for administrator approval. When it is published, it gets a major version and becomes visible to all users.
Check Out/Check In
In order to maintain document versioning, we have to make sure that only one version is being updated at a time. Otherwise the last person who saves the changes is the one who overrides everyone's changes. It's a best practice to checkout a document before editing it.
To check out the document, hover over the document in the right side section and click over the small arrow on the right. Select "Check Out". After checking out the document you can go on and select "Edit in Microsoft Office Word".
When you finish editing and exit word, it will prompt you for check in, and ask you for comments on what changes you've made.
View Old Versions
To view and old version of the document, hover over the document in the right side section and click over the small arrow on the right. Select "Version History".
A list of documents is populated for you, each document has a Modified column which gives us an indicator when was this document edited and any comments place during check in.


