Using the first job run to optimize subsequent runs with Azure Data Lake job AU analyzer
Customers have been telling us it's hard to find the right balance between Analytics Units (AUs) and job execution time. For too many users, optimizing a job means running the job in the cloud using trial and error to find the best AU allocation that balances cost and performance. Today we are happy to introduce the AU Analysis feature to help you discover the best AU allocation strategy for a specific job. You can find this new feature by opening the job view and clicking on the AU Analysis tab in the Azure Portal or in the latest Visual Studio tools.
Watch a quick demo of the video here:
[embed]https://youtu.be/cYLMJ5gHGSI[/embed]
Find the best AU allocation for your job
A Data Lake job is billed by the number of AU-hours it consumes (specified AUs multiplied by job execution time). You may want to optimize for cost (reducing AU waste) or achieve a certain SLA in response time (e.g. hourly job should finish after 30 minutes and not take longer than 1 hour).
How can you know how long it will take a job to run at different levels of AU allocation without running it many times in the cloud? The analyzer takes the execution information gathered while the job ran and simulates how different AU allocations might impact the run time of the job.
On the AU Analysis tab, you can see two AU allocation suggestions - 'Balanced' and 'Fast' that are based on your job’s particular characteristics (e.g. how parallelizable it is, how much data it is processing, etc.). If you are looking for the most cost-effective use of AUs, where you get the maximum improvement in execution time for the least number of additional AU-hours, then 'Balanced' is the one you want. Remember that you may not always see a linear reduction in job execution time by increasing the number of AUs. On the other end of the spectrum, you may want to prioritize performance, in which case choose ‘Fast’ to see the corresponding AUs and job run time.
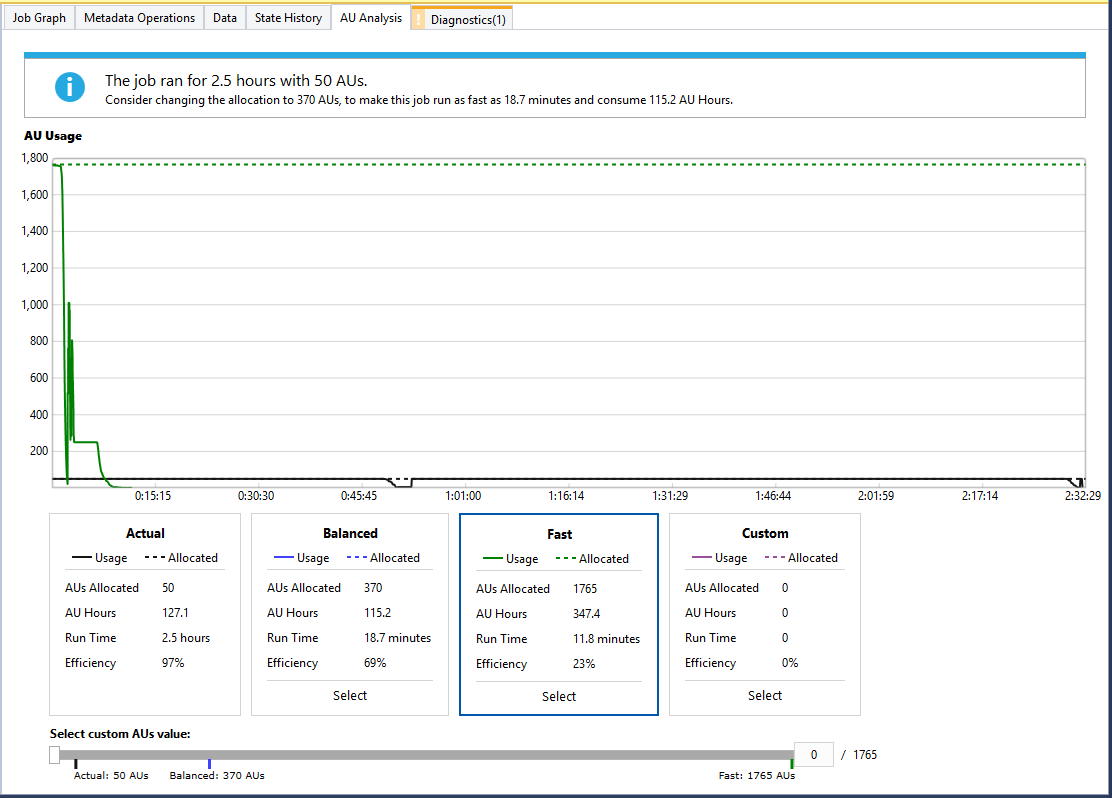
In the example job below, the job originally ran for 2.5 hours with 50 AUs allocated, while 127.1 AU-hours were used. If we choose the 'Balanced' option, you will see that the job can run 8 times faster than the original round (2.5 hours to 18.7 minutes) even with 9% percentage reduction of AU-hours (127.1 to 115.2). In the chart you can also find the simulated AU usage over time in this option.

If you want to know the best performance with a reasonable efficiency, then the ‘Fast’ option will serve you well. It shows how many AUs are needed for the best performance. As you can see in the screenshot below, allocating 1765 AUs causes the job to finish in only 11.8 minutes.

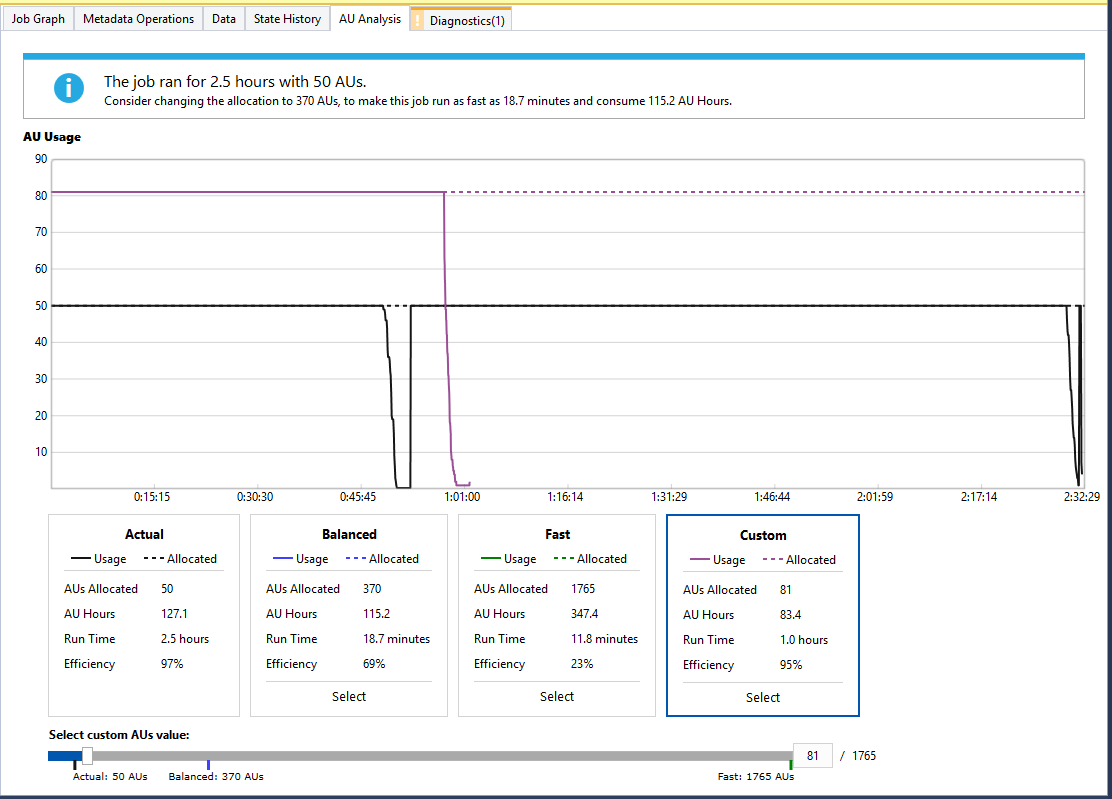
If you want to achieve a certain SLA in response time or explore other AU allocations, the AU analyzer also enables you to explore the AU hours versus job runtime by using the custom slider bar to dynamically see how the charts and numbers changes for different settings.
In the screenshot below, by selecting Custom card and moving the slider bar, we can see that you need to allocate 81 AUs to have the job finished in 1 hour (costing 83.4 AU-hours).

How accurate is the analyzer?
Basically, the analyzer uses a local job scheduler to simulate actual execution. It relates very closely to the job scheduler running in the cluster, except that it does not take into consideration the dynamic situations (network latencies, hardware failure, etc.) which may cause vertex rerun or slowness. To learn how those dynamic factors affect the accuracy of the analyzer, we tested it on several hundred production jobs and achieved correct estimates in better than 99% of the cases.
Try this feature today!
Give this feature a try and let us know your feedback in the comments.
Interested in any other samples, features, or improvements? Let us know and vote for them on our UserVoice page!
Learn more
For more detailed introduction about AU usage and job cost you can refer to the two blogs below.
Understanding the Data Lake Analytics Unit How to Save Money and Control Costs with Azure Data Lake Analytics