Packaging desktop applications with Advanced Installer Express
Other than releasing our own tools to support developers who want to package desktop applications using the Desktop Bridge (like Desktop App Converter or the Windows Application Packaging Project in Visual Studio), as Microsoft we have partnered with many popular 3rd party setup authoring tools. The goal is to make easier for a developer who already has an existing setup definition (used, for example, to generate a MSI) to reuse it in order to generate an AppX package.
Recently, Microsoft has strengthen his partnership with Caphyon, the company behind the popular tool Advanced Installer, which has led to the release of a completely free version of their main application called Advanced Installer Express.
This tool, other than providing a way to take an existing setup definition and export it as an app package, includes also a Desktop App Converter built by Caphyon itself, which provides a set of very interesting features:
- It’s based on virtual machines instead of containers. It supports Hyper-V and VMWare.
- Being a full VM, the setup of the application you want to convert doesn’t have to be silent. You’ll be able to fully interact with the UI and customize the setup process.
- A dedicated UI to customize the application and the manifest
- It generates a conversion project, so if you need to repackage again there’s no need to repeat the whole process from scratch
- It offers a GUI to easily manage the packaging and signing processes
In this blog post we’re going to see how to use the tool to package an existing installer using the Desktop Bridge.
Prerequisites
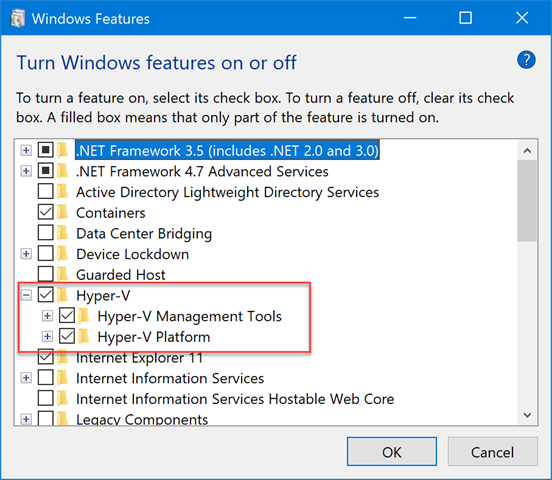
The first step is to download and install Advanced Installer Express from the official website. Then you need to create a Virtual Machine with the last version of Windows 10. The tool supports also converting an installer using your local machine as host, but it isn’t a suggested approach because of the “noise” that a production Windows 10 computer can generate (installed apps, services, drivers, etc.). It’s up to you to choose the virtualization technology which fits best your needs. Hyper-V is a great fit here because it’s built-in in every Windows 10 machine, so you don’t need to download and install a 3rd party tool. You just need to go to Settings –> Apps – > Apps & Features –> Programs & Features –> Turn Windows features on & off and install all the components under Hyper-V.
After a reboot, you will access to the Hyper-V Manager tool, that you can use to create a new VM and load a Windows 10 ISO, so that you can proceed with the setup process.
Using the Desktop App Converter
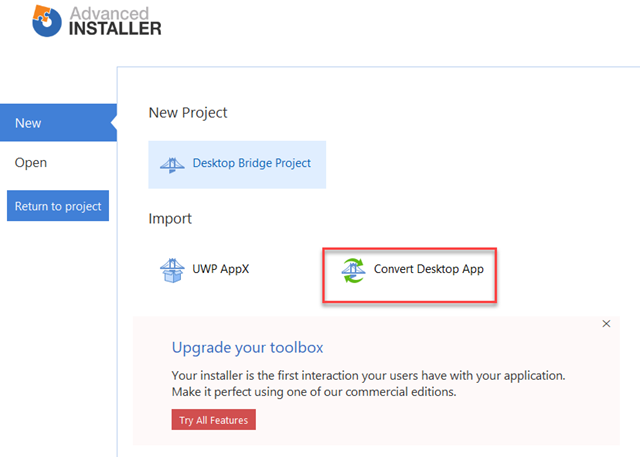
After installing Advanced Installer Express and launching it, you will notice that the tool is all about helping you to move from a classic desktop application to a Desktop Bridge project. The option we’re looking for to package our existing application is called Convert Desktop App:
Alternatively, if you have a self-executable application (without an installer, no dependencies, no registry keys created at setup time, etc.), you can choose the Desktop Bridge Project option. You’ll be able to choose the folder which contains your application and all the required files; Advanced Installer will generate for you a project which adds all the components needed to turn your application into a Desktop Bridge package (like assets and the manifest file).
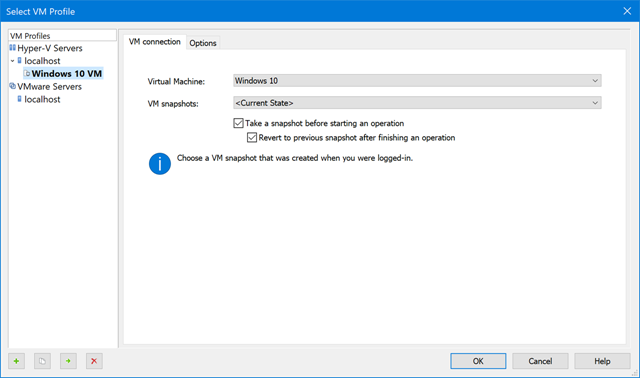
But let’s return to our Desktop App Converter! After you have clicked on the Convert Desktop App option, you will start the first step of the process, which is about configuring the environment and choosing the installer. You will have the option to start the repackaging locally, using a VM or to resume an existing session. As I’ve suggested before, the best approach is to use the option Repackage an application in an existing virtual machine. The first time you’ll use the tool you will have to press the Edit button to perform the Virtual Machine configuration:
Based on the technology you’re using, choose one of the virtualization tools on the left and press the + button on the bottom left to create a new profile. You will be asked to specify:
- The VM you want to use. A dropdown will list all the VMs you have available on your machine.
- A specific VM snapshot. By default, the VM will be started with the current state, but you can specify a custom snapshot.
You have also the option to take a snapshot before starting the repackaging operation and restore it at the end. Personally, I suggest to use this option because it helps to ensure that your VM stays clean and it’s always ready for a new packaging session, in case something goes wrong.
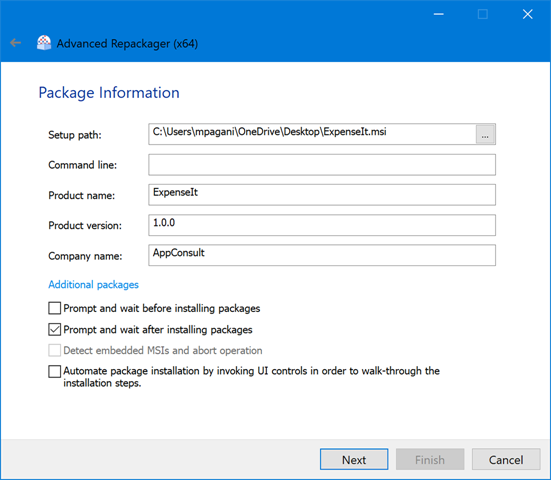
Once you have configured the environment, you are ready to choose the installer you want to convert:
The key information is called Setup path, which must point to the path of the installer you want to convert. Typically, all the other information (like Product Name, Product Version and Company Name) will be automatically filled with the data retrieved from the setup. Optionally, you can also specify one or more command line parameters using the Command line field.
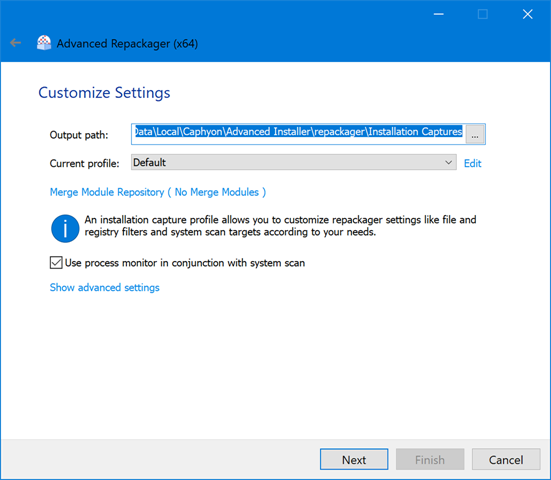
In the last step, you will have the option to customize the repackaging process upfront:
By default, Advanced Installer will try to capture every change during the setup process and to convert them into the appropriate action for a Desktop Bridge package. For example, it can detect the creation of file type associations or firewall rules and convert them in the corresponding manifest entries. If you want to customize the process (for example, by removing the parsing of a specific registry hive because you already know it’s related to a feature which won’t be supported) just press Edit.
Now you’re ready to start the real packaging process!
The conversion process
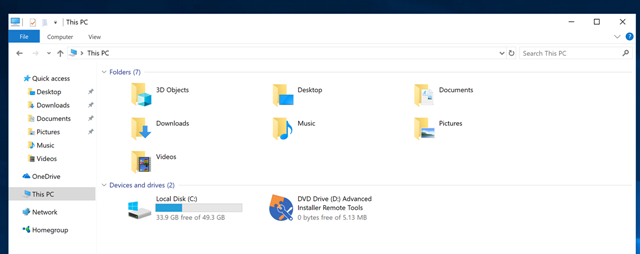
As first thing, Advanced Installer will create a checkpoint (if you have enabled the related option in the first part) and then will spin up your Virtual Machine. In order to work properly, you will need to install a tool provided by Caphyon inside the VM. Once the VM has booted up, you will automatically find an ISO mounted as drive inside the VM:
Double click on the drive called Advanced Installer Remote Tools and perform the setup (which will be silent, you will just need to accept the UAC at some point). If you do the operation fast enough, Advanced Installer will just continue the packaging without reporting any error. Otherwise, if you take a little more time, Advanced Installer may prompt you a warning that he hasn’t been able to connect to the Virtual Machine. In this case, just make sure the installation of the tools is finished on the VM and then press Retry to resume the process.
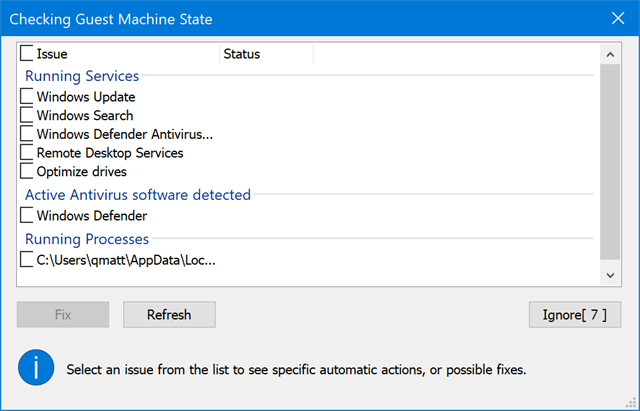
At this point, Advanced Installer will copy the MSI to the VM and it will check the VM state before capturing it:
Thanks to this window, you’ll be able to disable or stop services and apps that are running and that could generate noise during the packaging process. If you’re using a clean VM specific for this purpose, it’s very likely that you won’t find anything significant here. What I exactly mean with “noise”? Let’s do a step back and see how the repackaging process works. The Desktop App Converter captures the state of the machine (file system, registry, etc.) as first step. Then it performs the setup of the application and captures the state again. As last step, it makes a comparison between the two states to detect all the changes. If you have other running processes or applications, the tool might capture also changes to the system that haven’t been performed by the setup itself.
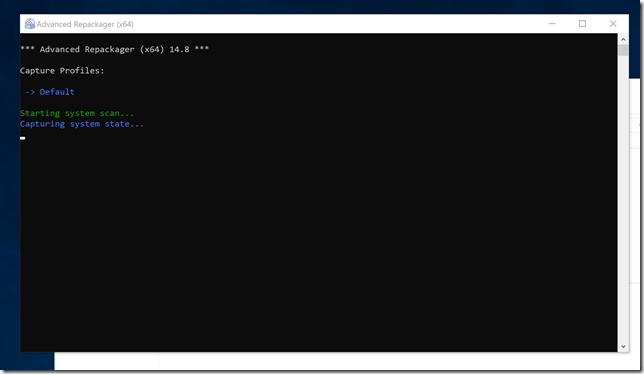
Going back to the conversion process, the next step done by tool is to capture the state of the system:
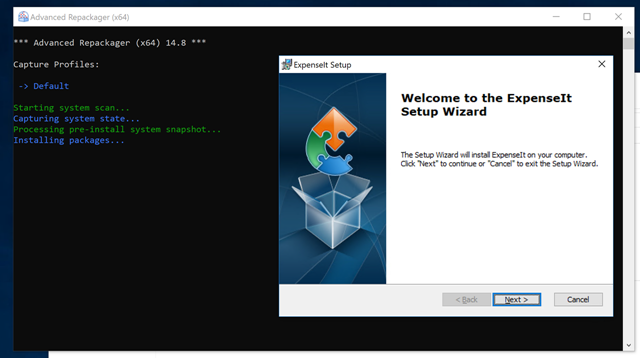
When it has finished, it will trigger the setup of the application. Being a VM and not a container, you’ll be able to execute the setup like you would do on your own machine:
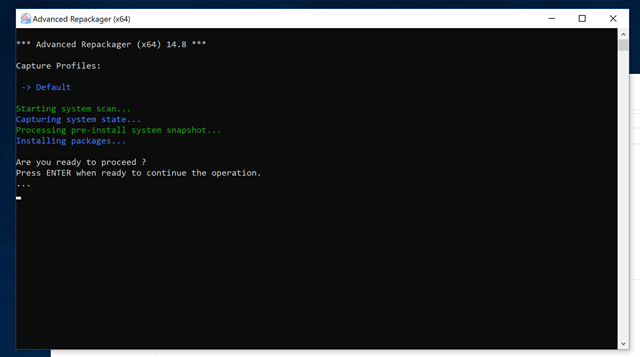
At this point, you need to complete the setup as you would do to install the application on your regular machine. At the end of the process, the tool will realize that the setup is finished and it will ask you a confirmation:
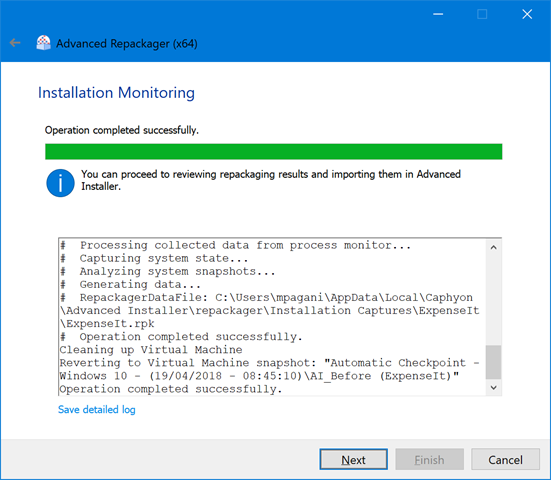
Press Enter to continue. Now the tool won’t require anymore your intervention for a while, since it will capture a new state of the machine and it will detect the differences with the original state. When the process is finished, Advanced Installer will automatically shut down the VM and you will return to the Advanced Installer instance running on your real machine:
If you have enabled the option to revert the VM to the original state, the tool will also take care of automatically restoring the checkpoint it has created at the beginning of the process. Now you can press Next to start the final phase.
The conversion project
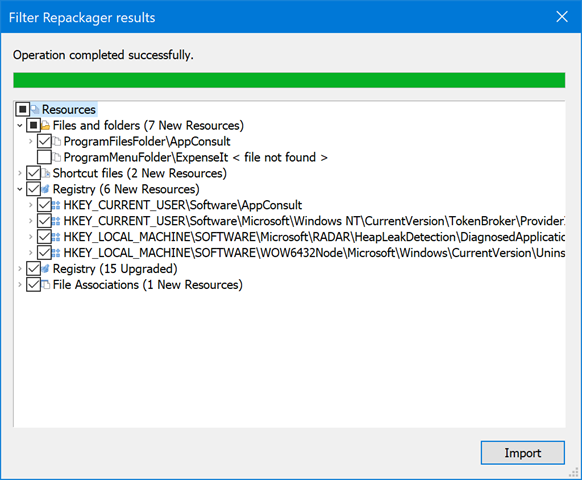
Now Advanced Installer will import the output of the conversion as a full project, which will allow you to customize many parameters, sign the package with a custom certificate and save it for future references or repackaging activities. As first step, Advanced Installer will show you all the changes it has detected in the registry and in the file system:
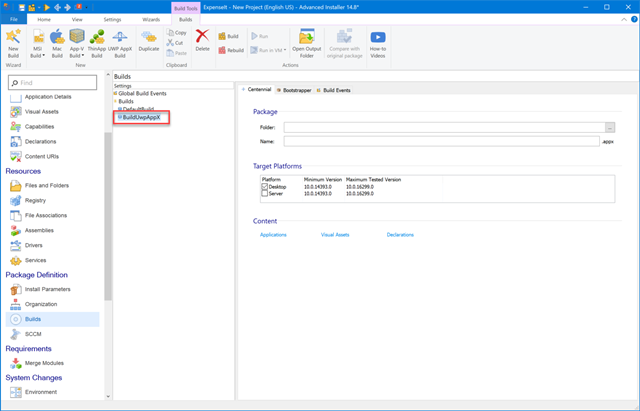
This way, if you notice something that has been imported for mistake or which isn’t really needed, you can just uncheck it. The changes won’t be included anymore in the output package. After pressing the Import button, you’re all set! Your new project will be automatically opened and the focus will be automatically set to the option that allows you to export it as an AppX package:
If you want to build the app package, it’s enough to set the Folder where you want to create it and the Name of the file. Then press the Build button in the toolbar (or right click on the BuildUwpAppX build definition and choose Build) and Advanced Installer will start the packaging operation. At the end of the process, you will find an app package in the output folder ready to be tested.
Customizing the package
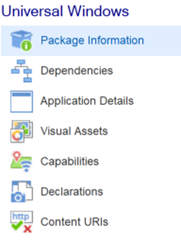
One of the advantages of Advanced Installer is that it offers you a visual editor for the manifest. Also Visual Studio offers this option, but it’s available only for native UWP applications or Desktop Bridge applications that have been packaged using the Windows Application Packaging Project. You can find the editor under the Universal Windows section in the left navigation bar:
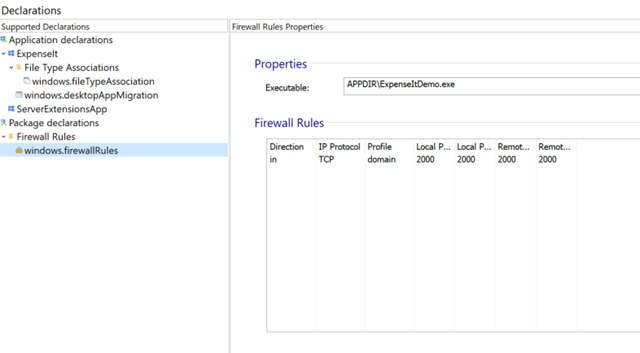
The various sections matches the various areas of the Visual Studio editor, so you’ll be able to customize the visual assets, the declared capabilities, the entry point, etc. But there’s a twist! The Capabilities editor, in fact, supports also adding and configuring the specific Desktop Bridge extensions, like firewall rules or startup tasks. Many of these capabilities aren’t supported by the Visual Studio editor yet, but they need to be manually included in the XML definition. Let’s say, for example, that you want to add some firewall rules, so that your application doesn’t prompt the firewall popup when it tries to communicate with the external world using ports different than the 80 one. Normally, you would need to manually edit the AppxManifext.xml file with a text editor and add a similar definition:
 <Extensions>
  <desktop2:Extension Category="windows.firewallRules">
    <desktop2:FirewallRules Executable="VFS\ProgramFilesX86\AppConsult\ExpenseIt\ExpenseItDemo.exe">
      <desktop2:Rule LocalPortMax="2000" LocalPortMin="2000" Direction="in" IPProtocol="TCP" Profile="domain" RemotePortMax="2000" RemotePortMin="2000"/>
    </desktop2:FirewallRules>
  </desktop2:Extension>
</Extensions>
Thanks to Advanced Installer, instead, you can just right click in the Declarations section, choose Add package declaration, select Firewall rules and you’ll be able to easily edit the ports you want to open with a simple user interface:
Signing the package
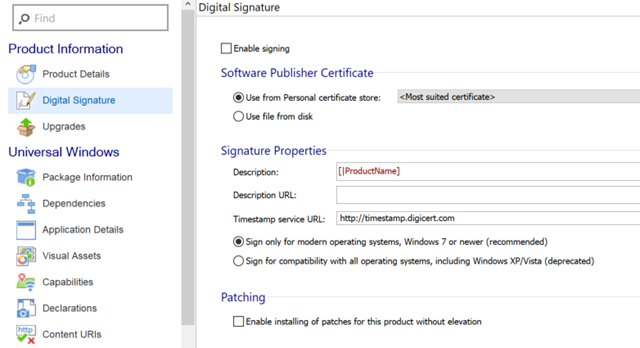
Another feature that makes the testing and deployment experience easier is the code signing option. When you manually package an application or you convert it using the Desktop App Converter by Microsoft, you have to manually sign the package using the signtool utility which ships with the Windows 10 SDK. Remember, in fact, that you can’t install on a Windows machine a package which isn’t coming from the Store or which isn’t signed with a certificate trusted by the machine. Thanks to Advanced Installer, you can replace this command line based step with a visual experience. In the Product Information section of your project, in fact, you will find an entry called Digital Signature.
In this section you just need to click on Enable signing and then:
- Pick up a certificate from your Personal certificate store
- Choose a .pfx file from your machine
Either ways, when you’ll rebuild the package from the Builds section, it will be automatically signed with the certificate you have selected, so that you can easily sideload it or distribute it within your company.
Additionally, to make even simpler the testing phase, Caphyon is going to include in an upcoming release of Advanced Installer Express an option to quickly generate a self-signing certificate, so that you’ll be able to create a working app package in no time.
Checking for errors
Another useful feature of Advanced Installer I want to share is the Issue List. When you build a package, it will get automatically populated with a series of issues that are identified in the package configuration. They might not be a blocker, so the package still gets created, but you can expect some features to not work as expected. For example, after converting my installer, I can see these two errors in the window at the bottom:
The first one is helpful to detect that the original setup was creating a key under the HKEY_CURRENT_USER registry hive, which isn’t supported by the Desktop Bridge during the package deployment process. The registry.dat file which is deployed with the package, in fact, can create keys only in the HKEY_LOCAL_MACHINE hive. All the keys under HKEY_CURRENT_USER must be created at runtime, since they are stored in the virtual registry which is specific for the app.
The second warning, instead, is inviting me to sign the package, otherwise I won’t be able to install it.
Neat, isn’t it?
Wrapping up
If you’re trying to package your existing desktop application so that you can take advantage of all the benefits of the Desktop Bridge (better deployment tool, access to the Store and the Store for Business, etc.), starting from today you have a new free tool that you can add to your arsenal. The Desktop App Converter included in Advanced Installer Express is a great solution when your application or your computer’s configuration doesn’t meet some of the criterias required by the Microsoft tools, like supporting silent installation or requiring the Container feature enabled. Additionally, the close partnership between Microsoft and Caphyon helps to make sure that Advanced Installer will be always up-to-date and ready to support all the Desktop Bridge enhancements that are coming in the future, like full support to the new MSIX format that we have announced at the Windows Developer Day.
In the next posts we’ll see how Advanced Installer can help also to handle some advanced scenarios, like handling the transitioning from a desktop app to a Store app.
Happy packaging!
Comments
- Anonymous
April 27, 2018
great article - nice tool. - Anonymous
February 03, 2019
Is "Using VM" option still available in Express edition? I installed Express edition from https://www.advancedinstaller.com/express-edition.html. But when I followed your above tutorial, I don't see a VM option available any more in Express edition. Their wizard displays the message: "This option is available only in Architect edition". Could you please clarify/verify?- Anonymous
February 14, 2019
Hello, the feature is part of the paid version. An alternative option is to install the tool directly on the VM and run it from there.
- Anonymous
