Upgrading Failover Clusters on the same hardware
A failover cluster is a group of independent computers that work together to increase the availability of applications and services. The clustered servers, also called nodes, are connected by physical cables and by software. If one of the cluster nodes fails, a process called failover happens where another node begins to provide service. As a result, users experience minimum service disruptions during outages.
It's important to keep your failover clusters as up to date as possible, particularly when your organization upgrades to a later version of Windows Server. However, upgrading Windows Server doesn't require upgrading your hardware. This article tells you how to upgrade your existing cluster nodes without changing your hardware.
Overview
As of Windows Server 2012 R2, you can upgrade your failover clusters by joining your existing nodes to a cluster that's running the next latest version of Windows Server. This later version is known as an uplevel version, because it's one level higher than your current version of WIndows Server.
As of Windows Server 2012 R2, here's how uplevel joining works:
- You can join a Windows Server 2012 R2 node to a Windows Server 2016 cluster.
- You can join a Windows Server 2016 node to a Windows Server 2019 cluster.
- You can join a Windows Server 2019 node to a Windows Server 2022 cluster.
This method also works in reverse, where a node can join with a cluster one version lower than its current version. For example:
- You can join a Windows Server 2019 node to a Windows Server 2016 cluster.
- You can join a Windows Server 2022 node to a Windows Server 2019 cluster.
Joining nodes in this manner supports Cluster OS Rolling Upgrade, which allows you to upgrade your cluster without stopping applications.
However, you can only join Windows Server nodes and clusters that are one level apart from each other. Trying to join a node to a cluster that's two levels higher or lower doesn't work. For example, a Windows Server 2016 node will be unable to join a Windows Server 2022 cluster. In order to upgrade a WIndows Server 206 deployment to Windows Server 2022, you must chain upgrades together, one level at a time, until you reach the desired version.
Before you start upgrading, review the information at Windows Server upgrade content to understand upgrade compatibility for different versions of Windows Server. When you upgrade-in place, you can only upgrade one or two versions forward. For example, if your server cluster currently uses Windows Server 2012 R2 or Windows Server 2016, you can upgrade in-place to Windows Server 2019.
You can also use the Cluster Migration Wizard to upgrade your failover cluster, but it can only support upgrades that go two versions later than the current version you're running.
The directions in this article cover upgrading Windows Server 2012 failover cluster server to Windows Server 2019.
Prerequisites
Before you start upgrading, you should do the following things:
Review Windows Server upgrade content to understand upgrade compatibility for different versions of Windows Server.
Perform a backup to make sure you can revert to the most recent version of your failover cluster if the installation process doesn't work as intended.
Update all drivers and firmware to the certified levels required for the Windows Server version you're upgrading to.
Install the Copy Cluster Roles wizard, which requires shared storage to work as intended.
You should also keep the following considerations and limitations in mind when planning your upgrade:
If your initial clusters are running earlier versions of Windows Server, you might need to perform multiple in-place upgrades to reach the latest version.
If the cluster is running virtual machines (VMs), you must run the Update-VmVersion command in PowerShell to upgrade the VMs after you finish upgrading the clusters.
The Copy Cluster wizard only copies in-box roles such as Generic Service, Physical Disk, and IP Address. It doesn't copy the SQL Server, Exchange Server, or third-party applications. If you use the Copy Cluster wizard to upgrade your nodes, applications like SQL Server, Exchange Server, and third-party applications won't automatically migrate.
You need shared storage in order to use the Copy Cluster Roles wizard.
Step 1: Evict first node and upgrade to Windows Server 2016
Upgrading your failover cluster requires upgrading it one node at a time. The instructions in this article only cover a two-node failover cluster, with nodes labeled NODE1 and NODE2, but you can repeat these steps for additional nodes as needed for your deployment.
To evict and upgrade your deployment's first node:
Sign into the first node, then open Failover Cluster Manager.
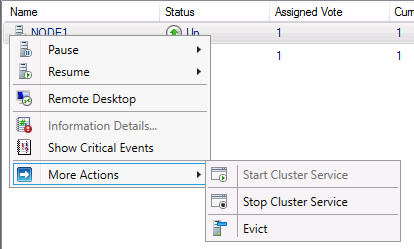
Drain all resources from NODE1 to NODE2 by right-clicking on the first node, then selecting Pause > Drain Roles.

Evict NODE1 from the Cluster by right-clicking the node name and selecting More Actions > Evict.

If required, detach the node from the storage you're using. If you're not sure if you need to detach your storage or how to do it, ask your storage vendor for guidance.
Upgrade the first node to the target Windows Server version. Ensure you have added all the necessary roles, features, drivers and security updates.
In Failover Cluster Manager, go to Management and select Create Cluster to create a new cluster. In this example, the new cluster is labeled CLUSTER1.

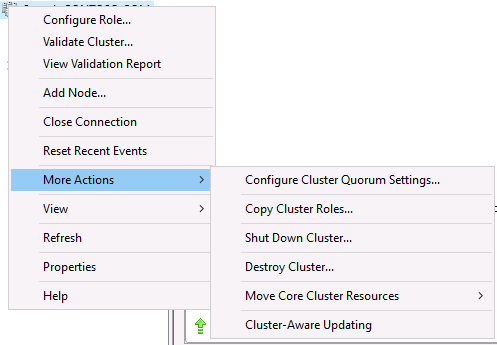
Once you create the new cluster, you need to migrate the roles from the original cluster to this new cluster. On the new cluster, right-click on the new cluster name and select More Actions > Copy Cluster Roles.

Once you finish migrating all resources, turn off the second node in the original cluster and disconnect it from the storage.
Reconnect the storage to the first node.
Turn all resources back on and make sure they're working as expected.
Step 2: Rebuild second node to Windows Server 2019
After you finish upgrading the first node, you can upgrade the second node to Windows Server 2019 and join it to the cluster.
To upgrade the second node:
Perform a clean installation of Windows Server 2019 on the second node. Make sure to add all necessary roles, features, drivers, and security updates.
Make sure you've deleted the original cluster.
Now that the original cluster is gone, you can leave the new cluster name as-is or change its name to that of the original cluster. If you want to use the original cluster's name, follow these steps:
In Failover Cluster Manager, go to the first node and right-click the name of the cluster, then select Properties.
On the General tab, rename the cluster by entering the desired name into the name field.
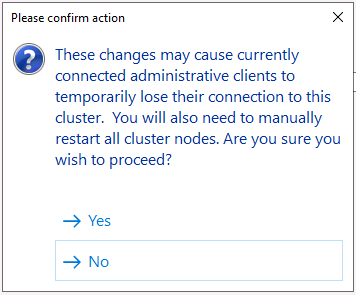
Select Apply. You should see the following dialog box.

- Restart the cluster to finish applying the changes.
In the Failover Cluster Manager, go to the first node, then right-click on Nodes and select Add Node to add the second node to the cluster.
Reattach the storage to the second node.
Right-click on the first node, then select Pause > Drain Roles to drain all resources from the first node to the second node.
Test your resources to make sure they're all online and functioning as expected.
Step 3: Rebuild first node to Windows Server 2019
Finally, you'll need to rebuild the first node and move the copied resources back into it.
To rebuild the first node:
Follow the directions in Step 1: Evict first node and upgrade to Windows Server 2016 to evict the first node from the cluster and disconnect the storage.
Rebuild or upgrade the first node to Windows Server 2019. Make sure you've added all necessary roles, features, drivers, and security updates.
Reattach the storage and add the first node back to the cluster.
Move all resources back to the first node and make sure they all work as intended.
The current cluster functional level remains at Windows 2016. In a PowerShell window, run the Update-ClusterFunctionalLevel command to update the functional level to Windows 2019.
Your failover cluster is now upgraded to Windows Server 2019.