Viva Glint Questions setup
As a Microsoft Viva Glint Administrator, use the Questions section to manage survey items, modify introduction and thank you messages, and add optional features like targeting, display logic, and sections. To set up survey items, use information from your Holistic Vision and Strategy Discovery Workbook and your Deployment guide survey tab as a guide.
Note
The term item refers to any question or statement posed to a survey taker.
Edit the survey introduction message
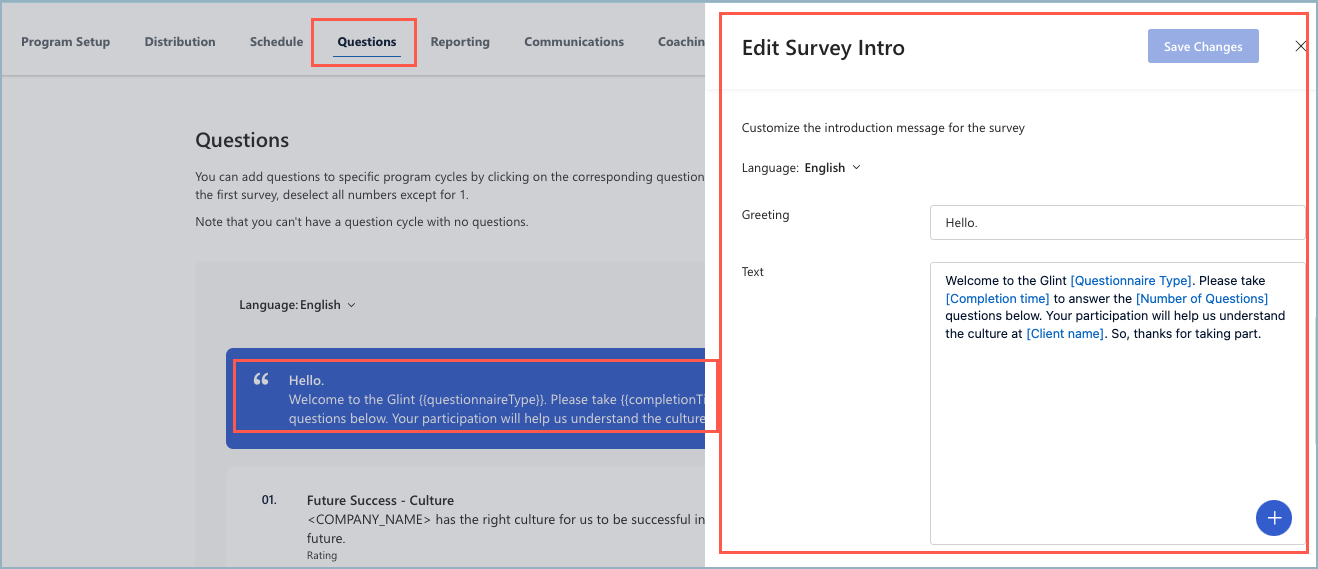
Customize the introduction message for the survey by hovering over and selecting the Hello message. In the Edit Survey Intro pane:
Edit Greeting: "Hello" is prepopulated but can be customized.
Edit Text: Default text shows in the Text box. All default text can be edited. Delete macros or add macros by selecting the + symbol.
If the survey uses multiple languages, choose each language from the Language dropdown menu to edit translations. Changes autosave when a new language is selected from the dropdown menu.
Select Save Changes when all edits are complete.

Add a hyperlink to the survey introduction
To add a link to an employee resource or other information in your survey introduction:
- Select the Questions section of your survey program and select the survey introduction section.
- In the Text field, add
[Display text](link), replacing "Display text" with the text that should become a link. Replace "link" with a link to the employee resource.- Example:
[Contoso handbook](http://www.contoso.com)
- Example:
- If your survey uses multiple languages, select each language from the Language dropdown menu to add the hyperlink to the Text field in all languages. Changes autosave when a new language is selected from the dropdown menu.
- Select Save Changes.
- Preview your survey to confirm that the hyperlink works as expected.
Add a logo to the survey introduction
Tip
Ensure that logos are horizontally oriented, have a transparent background, and 16 MB or smaller in file size.
- From the admin dashboard, select Configuration. In the Action Taking section, select Content Resources.
- Select + New to add a new resource and OK in the languages message that appears.
- Add a title in the Untitled Resource and Title fields. Survey intro logos can be unique to each survey program. Include the survey name in the title if desired.
- In Type, select Image.
- Optionally, add a Description.
- In File, select Choose File. Choose the image file from your device. If the image is as you'd like, select Save.
- Select Publish and then select Publish again in the Publish Resource dialog box.
- On the Resources page, filter to Image and copy the text of the recently added image from the Name column.
- Replace "logo-name" in this text with the name of your uploaded logo:
 - Copy the
text (with your logo name added) and paste it into the end of the Text field. - If your survey uses multiple languages, select each language from the Language dropdown menu to add the logo to the Text field in all languages. Changes autosave when a new language is selected from the dropdown menu.
- Select Save Changes.
- Preview your survey to confirm that the logo appears as expected.
Add survey questions
In programs that use survey templates, like Quarterly Engagement, the Questions section is prepopulated with survey items. There are two ways to access the Question library pane to add questions to a survey:
- Select the + symbol that appears above the Thank you message after the last survey question, or
- Select the + symbol next to the Thank you message and select the Browse Questions menu option.
- To prefilter questions based on type, choose Add Rating Question, Add Multiple Choice Question, or Add Open-Ended Question from the menu.
- Use the Search for a question field to enter keywords to search for an item in the Question library edit pane.
- Use the Sources, Type, Benchmark, and the More Filters options to filter to items based on your survey needs.
- To add an item to the survey, hover over it and select the + symbol.
Tip
For open-ended questions, consider whether Auto-expand comments input is enabled in Program Setup.
Note
For Recurring surveys:
- Choose survey items for each cycle by selecting the cycle number next to the item. Cycle one (1) is the upcoming survey that launches on the date selected in the Send the next survey on field in the survey Schedule.
- To be able to save the Questions section, every cycle needs to have at least one question selected.
Create a custom question
When creating new custom questions, keep in mind that:
- There are no preloaded translations.
- There are no external benchmarks. Learn more about mapping custom questions to benchmarks.
- Custom questions aren't included in the Attrition Risk Index.
- Custom questions aren't mapped to standard Action Plan Templates or recommended Focus Areas.
Caution
Your organization may have policies governing appropriate survey items for employees. Ensure you consult any such policies before proceeding. Rather than create a new item, search the Question Library for existing questions that could be reused or repurposed. Viva Glint standard questions are validated and typically come with benchmarks and action plans.
- Select the + symbol at before the Thank you message to open the Question library edit pane.
- Select the + Create button. A Create Question window opens.
- You can also select an existing question to access the Edit Question pane and choose Duplicate question create a custom copy of a Viva Glint item.
- For your new item, enter information in editable fields.
- If your survey uses multiple languages, select each language from the Language dropdown menu to update translations. Changes autosave when a new language is selected from the dropdown menu.
- Select Save and Add.
Edit survey questions
Before editing an item:
- Select the item and check whether it exists in other surveys in the Associated Programs tab.
- Review the impact of editing Viva Glint standard items.
To edit a survey item in the Questions section:
Hover over the item to display the horizontal ellipsis.
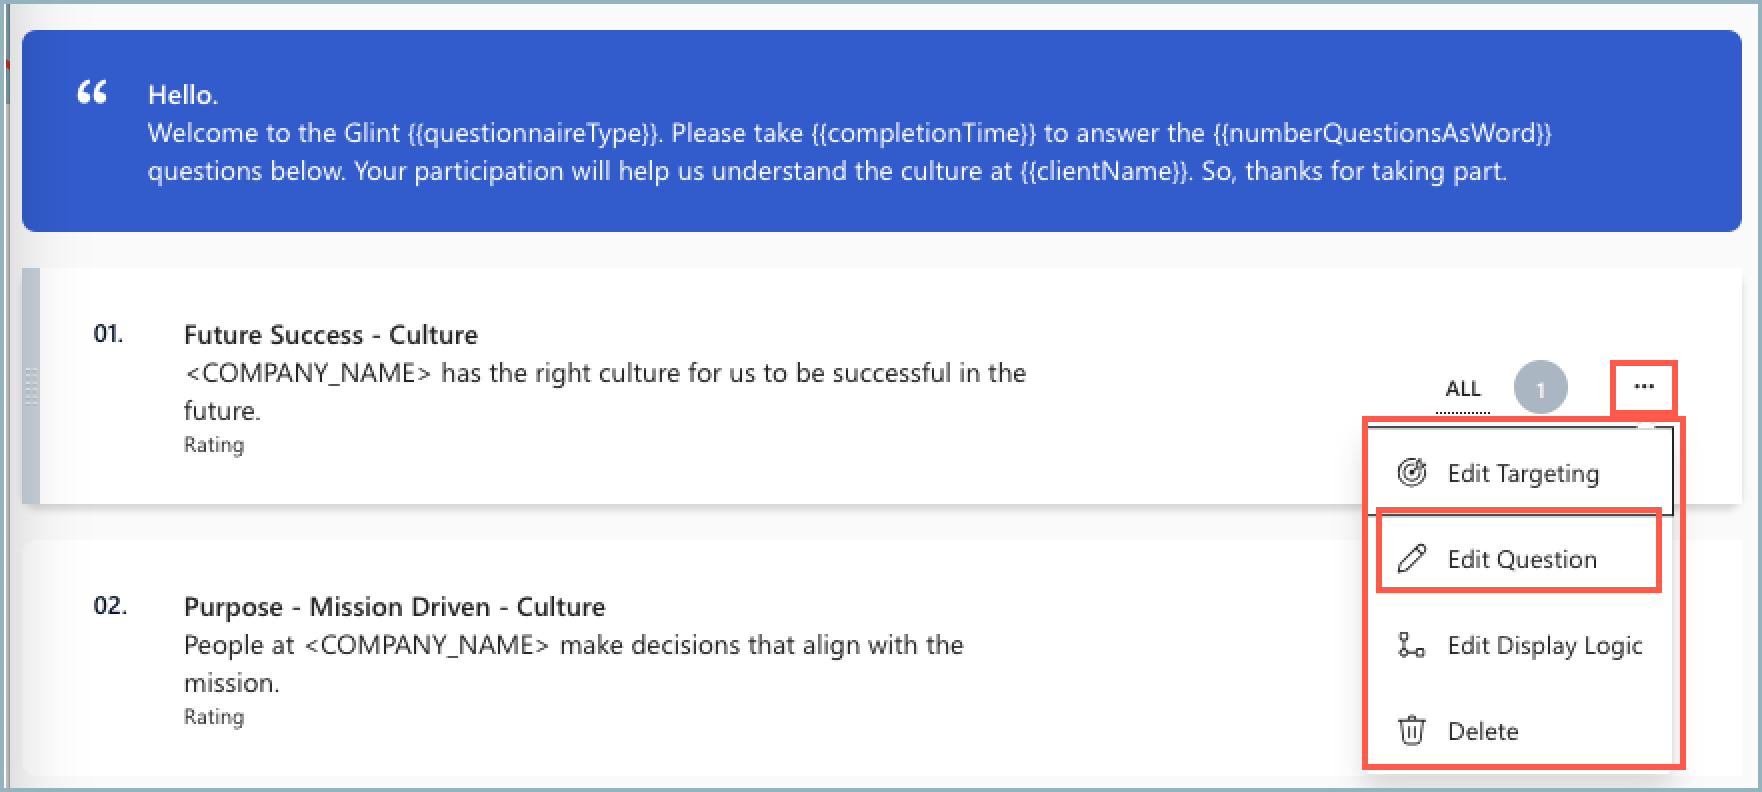
Select Edit Question from the ellipsis dropdown menu.
In the Edit Question pane, change information in editable fields.
If your survey uses multiple languages, select each language from the Language dropdown menu to update translations. Changes autosave when a new language is selected from the dropdown menu.
Select Save changes.
Important
- Open-Ended questions are always optional and don't include an "Optional question" setting.
- To add a new response option to Multiple Choice/Multi-Select questions, always use the "+ Add new choice" feature. Switch the "Show" toggle to "Hide" to retire an option. Overwriting an existing option with a different/new label causes trend issues in reports and confusion in raw data exports.
Editable question fields
Viva Glint survey questions have some fields that are view only and fields can vary by question type. For more information, see the following table.
| Field | Description and use | Question type | Editable or view only |
|---|---|---|---|
| Question ID | Unique question ID. | All | View only |
| Language | Dropdown field that lists all translations for the question. This field also appears for English-only surveys. select languages from the dropdown menu to update translations. | All | Editable |
| Question Type | The question type: Rating, Open-Ended, or Multiple Choice/Multi-Select | All | View only |
| Reporting label | The shortened label for a question that appears in reports. | All | Editable |
| Question text | The full question text that survey takers see. This text also appears in some report areas. | All | Editable |
| Benchmark | The Viva Glint standard question that this item is linked to for benchmarking. Learn more. | Rating | Editable |
| Instruction text | Help text for survey takers to answer the question. | All | Editable |
| Comment placeholder text | Help text for survey takers to provide comments. | All | Editable |
| Rating scale | The number of responses for rated questions. | Rating | View only |
| Label for all options | Enable this toggle to display a label for all responses instead of only high and low values. | Rating | Editable |
| Low value | The label for the lowest response for rated questions ("Strongly Disagree"). | Rating | Editable |
| High value | The label for the highest response for rated questions ("Strongly Agree"). | Rating | Editable |
| Option description | Enable this toggle to show descriptions for each multiple choice response option. | Multiple Choice | Editable |
| Option fields | Labels for each multiple choice response option. | Multiple Choice | Editable |
| Select as least | The minimum number of responses a user needs to select for a multi-select question. | Multiple Choice | Editable |
| Select at most | The maximum number of responses a user can select for a multi-select question. | Multiple Choice | Editable |
| Allows comments | Enable or disable to allow or disallow comments that supplement responses. | Rating and Multiple Choice | Editable |
| Optional question | Enable or disable to allow or disallow users to skip the question. | Rating and Multiple Choice | Editable |
| Suggested action template | Confirm the default or select a different template from the dropdown menu for managers to have suggested action items when choosing this item as a Focus Area. | Rating | Editable |
Add a Section Break or Survey Section
To alert survey takers to a change in topic or keep in mind certain information as they answer part of a survey, Viva Glint Admins can add Section Breaks or Survey Sections.
- Section Break: A message that appears once for a survey taker and disappears as they scroll through a survey.
- Survey Section: A header with questions tied to it that remains at the top of the screen as the user responds.
Add a Section Break
Select the circular + button on the Questions page.
Select Add Section Break to reveal an edit pane.
Add text to the Title and Text fields.
Use the + symbol to add macros, if needed.
If your survey uses multiple languages, select each language from the Language dropdown menu to update translations. Changes autosave when a new language is selected from the dropdown menu.
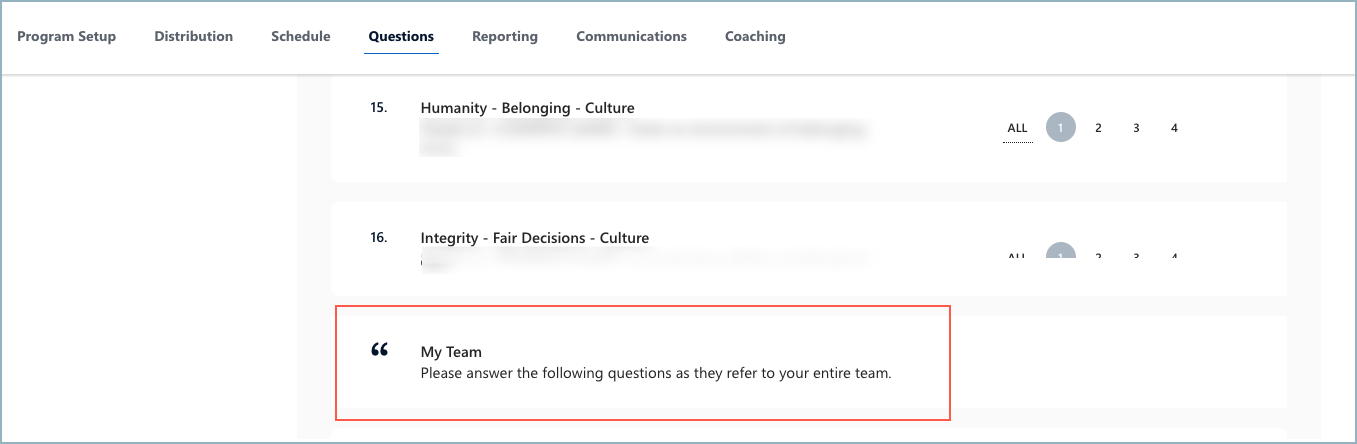
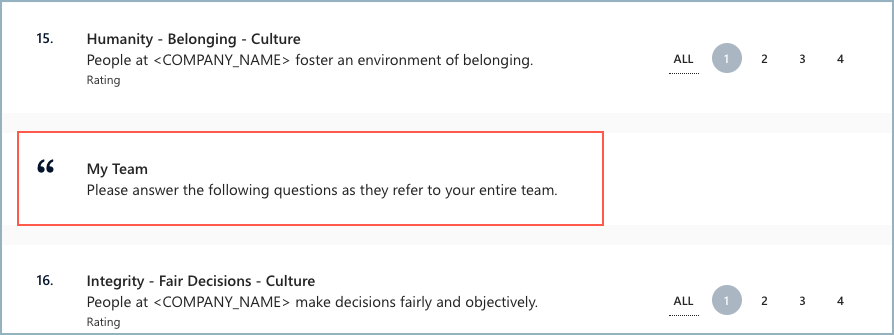
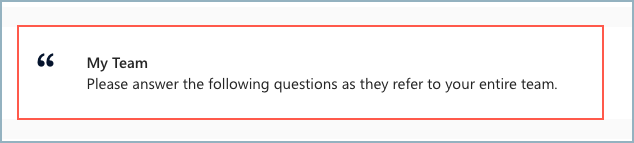
Select Save Changes. Now the Section Break title appears as a row after survey questions, with a quotation mark.
Move the Section Break by dragging it into place where you want to alert survey takers of a new section.
To edit or delete the Section Break, use the ellipsis on the Section Break to select Edit Section or Delete from the dropdown menu.
Add a Survey Section
Select the + button on the Questions page.
Select Add Section Section to reveal an edit pane.
Add text to the Title and Text fields.
If your survey uses multiple languages, select each language from the Language dropdown menu to update translations. Changes autosave when a new language is selected from the dropdown menu.
Select Save Changes. Now the Survey Section appears as a row beneath your survey items, with brackets calling it out.
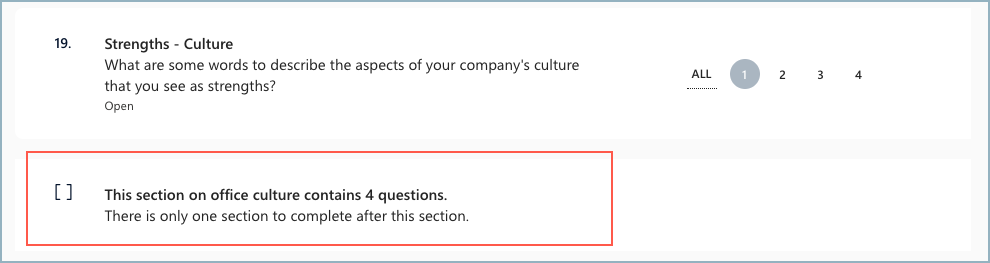
Move the Survey Section by dragging it into place where you want to alert survey takers of a new section.
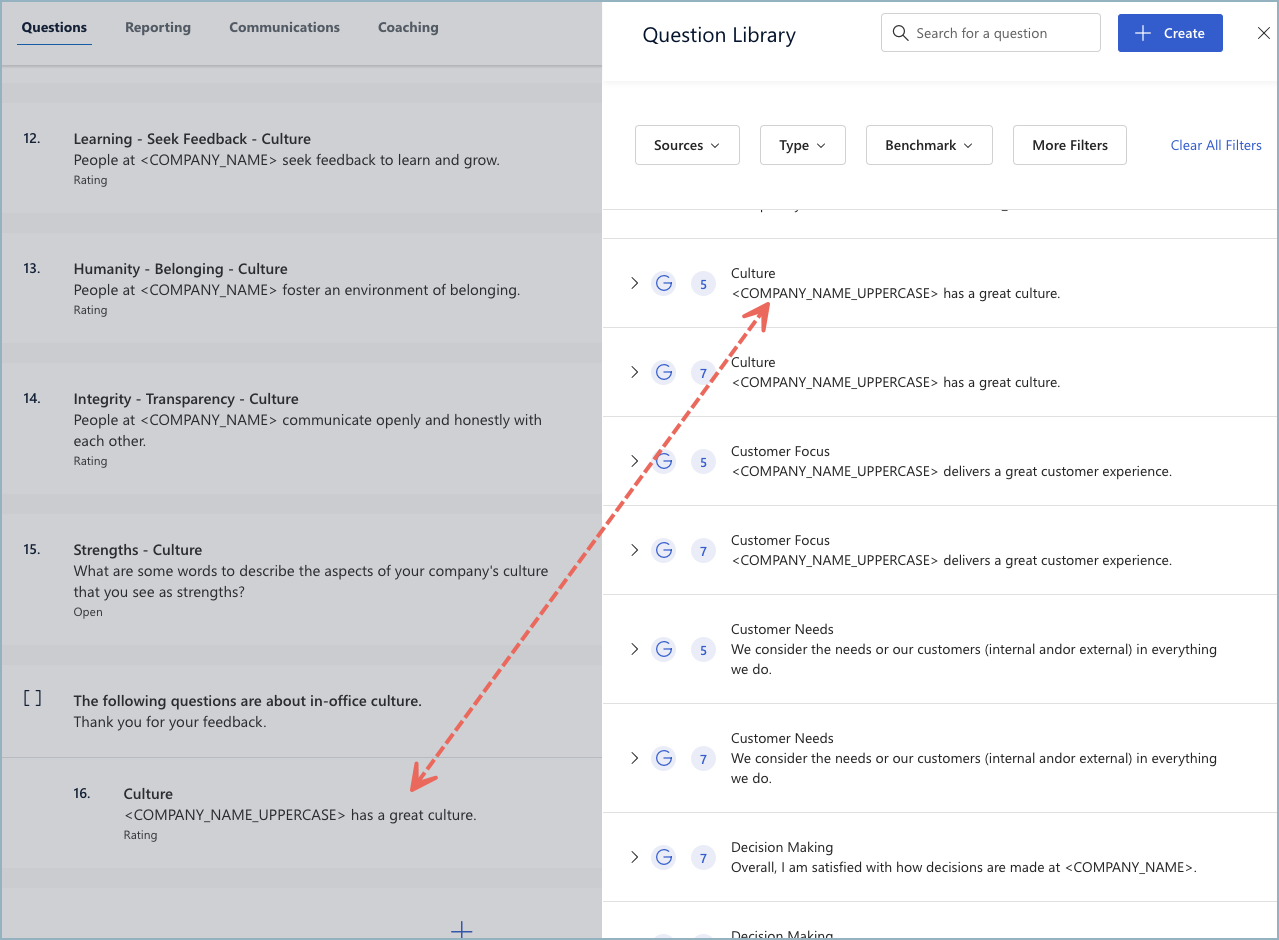
To add questions to the Survey Section, use the ellipsis on the Survey Section to select + Add Question from the dropdown menu.

Choose questions in the Question Library edit panel opens. Hover over a question and select the + symbol to add to the Survey Section.
Note
If questions already exist in the survey, delete them and readd to the Survey Section.
The new survey item shows under the Survey Section.
Add question targeting
Microsoft Viva Glint Administrators can use Distribution Lists or User Roles to target survey items or exclude items for specific groups of users. Learn how to target items to certain users.
Add Display Logic
Display logic rules allow Viva Glint Admins to show or hide survey items depending on the survey taker’s responses to previous questions in a survey. Learn more about tailoring survey experiences with Viva Glint Display Logic.
Delete survey questions
To delete an item from a survey program:
- Hover over a question and select the ellipsis that appears.
- In the dropdown menu, select Delete.
- Select Yes, delete it in the dialog that appears.
Note
This action only removes the item from the survey program. The item still exists in the Question Library and Viva Glint Admins can add it to other surveys.
Edit the "Thank You!" message
Customize the Thank You message by hovering over and selecting the message at the bottom of the Questions section. In the edit pane that opens:
- Edit Greeting: Customize the default "Thank you!" text or leave as is.
- Edit Text:
- Customize the default message or leave as is.
- Delete macros or add macros by selecting the + symbol in the Text box.
- Macros pull in values from Viva Glint (like survey frequency) or from your employee data (like Department).
- If your survey uses multiple languages, select each language from the Language dropdown menu to edit translations. Changes autosave when a new language is selected from the dropdown menu.
- Select Save Changes.
Note
To add a hyperlink to the survey Thank You message, follow these steps.