Use remote tools to troubleshoot Azure VM issues
Applies to: ✔️ Windows VMs
When you troubleshoot issues on an Azure virtual machine (VM), you can connect to the VM by using the remote tools that are discussed in this article instead of using the Remote Desktop Protocol (RDP).
Serial console
Use a serial console for Azure Virtual Machines to run commands on the remote Azure VM.
Remote CMD
Download PsExec. Connect to the VM by running the following command:
psexec \\<computer>-u user -s cmd
Note
- The command must be run on a computer that's in the same virtual network.
- DIP or HostName can be used to replace <computer>.
- The -s parameter makes sure that the command is invoked by using System Account (administrator permission).
- PsExec uses TCP ports 135 and 445. As a result, the two ports have to be open on the firewall.
Run command
For more information about how to use the run command feature to run scripts on the VM, see Run PowerShell scripts in your Windows VM with run command.
Custom Script Extension
You can use the Custom Script Extension feature to run a custom script on the target VM. To use this feature, the following conditions must be met:
The VM has connectivity.
Azure Virtual Machine Agent is installed and is working as expected on the VM.
The extension wasn't previously installed on the VM.
The extension injects the script only the first time that it's used. If you use this feature later, the extension recognizes that it was already used and doesn't upload the new script.
Upload your script to a storage account, and generate its own container. Then, run the following script in Azure PowerShell on a computer that has connectivity to the VM.
For Azure Resource Manager VMs
#Set up the basic variables.
$subscriptionID = "<<SUBSCRIPTION ID>>"
$storageAccount = "<<STORAGE ACCOUNT>>"
$storageRG = "<<RESOURCE GROUP OF THE STORAGE ACCOUNT>>"
$localScript = "<<FULL PATH OF THE PS1 FILE TO EXECUTE ON THE VM>>"
$blobName = "file.ps1" #Name you want for the blob in the storage.
$vmName = "<<VM NAME>>"
$vmResourceGroup = "<<RESOURCE GROUP>>"
$vmLocation = "<<DATACENTER>>"

#Set up the Azure PowerShell module, and ensure the access to the subscription.
Login-AzAccount #Ensure login with the account associated with the subscription ID.
Get-AzSubscription -SubscriptionId $subscriptionID | Select-AzSubscription

#Set up the access to the storage account, and upload the script.
$storageKey = (Get-AzStorageAccountKey -ResourceGroupName $storageRG -Name $storageAccount).Value[0]
$context = New-AzureStorageContext -StorageAccountName $storageAccount -StorageAccountKey $storageKey
$container = "cse" + (Get-Date -Format yyyyMMddhhmmss)
New-AzureStorageContainer -Name $container -Permission Off -Context $context
Set-AzureStorageBlobContent -File $localScript -Container $container -Blob $blobName  -Context $context

#Push the script into the VM.
Set-AzVMCustomScriptExtension -Name "CustomScriptExtension" -ResourceGroupName $vmResourceGroup -VMName $vmName -Location $vmLocation -StorageAccountName $storageAccount -StorageAccountKey $storagekey -ContainerName $container -FileName $blobName -Run $blobName
Remote PowerShell
Note
TCP Port 5986 (HTTPS) must be open so that you can use this option.
For Azure Resource Manager VMs, you must open port 5986 on the network security group (NSG). For more information, see Security groups.
For RDFE VMs, you must have an endpoint that has a private port (5986) and a public port. Then, you also have to open that public-facing port on the NSG.
Set up the client computer
To use PowerShell to connect to the VM remotely, you first have to set up the client computer to allow the connection. To do this, add the VM to the PowerShell trusted hosts list by running the following command, as appropriate.
To add one VM to the trusted hosts list:
Set-Item wsman:\localhost\Client\TrustedHosts -value <ComputerName>
To add multiple VMs to the trusted hosts list:
Set-Item wsman:\localhost\Client\TrustedHosts -value <ComputerName1>,<ComputerName2>
To add all computers to the trusted hosts list:
Set-Item wsman:\localhost\Client\TrustedHosts -value *
Enable RemotePS on the VM
For VMs created using the classic deployment model, use the Custom Script Extension to run the following script:
Enable-PSRemoting -Force
New-NetFirewallRule -Name "Allow WinRM HTTPS" -DisplayName "WinRM HTTPS" -Enabled True -Profile Any -Action Allow -Direction Inbound -LocalPort 5986 -Protocol TCP
$thumbprint = (New-SelfSignedCertificate -DnsName $env:COMPUTERNAME -CertStoreLocation Cert:\LocalMachine\My).Thumbprint
$command = "winrm create winrm/config/Listener?Address=*+Transport=HTTPS @{Hostname=""$env:computername""; CertificateThumbprint=""$thumbprint""}"
cmd.exe /C $command
For Azure Resource Manager VMs, use run commands from the portal to run the EnableRemotePS script:

Connect to the VM
Run the following command based on the client computer location:
Outside the virtual network or deployment
For a VM created using the classic deployment model, run the following command:
$Skip = New-PSSessionOption -SkipCACheck -SkipCNCheck
Enter-PSSession -ComputerName  "<<CLOUDSERVICENAME.cloudapp.net>>" -port "<<PUBLIC PORT NUMBER>>" -Credential (Get-Credential) -useSSL -SessionOption $Skip
For an Azure Resource Manager VM, first add a DNS name to the public IP address. For detailed steps, see Create a fully qualified domain name in the Azure portal for a Windows VM. Then, run the following command:
$Skip = New-PSSessionOption -SkipCACheck -SkipCNCheck
Enter-PSSession -ComputerName "<<DNSname.DataCenter.cloudapp.azure.com>>" -port "5986" -Credential (Get-Credential) -useSSL -SessionOption $Skip
Inside the virtual network or deployment, run the following command:
$Skip = New-PSSessionOption -SkipCACheck -SkipCNCheck
Enter-PSSession -ComputerName  "<<HOSTNAME>>" -port 5986 -Credential (Get-Credential) -useSSL -SessionOption $Skip
Note
Setting the SkipCaCheck flag bypasses the requirement to import a certificate to the VM when you start the session.
You can also use the Invoke-Command cmdlet to run a script on the VM remotely.
Invoke-Command -ComputerName "<<COMPUTERNAME>" -ScriptBlock {"<<SCRIPT BLOCK>>"}
Remote Registry
Note
TCP port 135 or 445 must be open in order to use this option.
For Azure Resource Manager VMs, you have to open port 5986 on the NSG. For more information, see Security groups.
For RDFE VMs, you must have an endpoint that has a private port 5986 and a public port. You also have to open that public-facing port on the NSG.
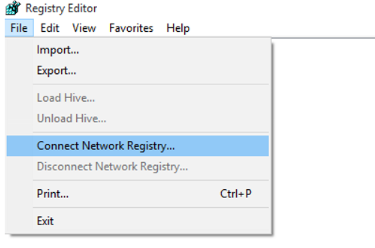
From another VM on the same virtual network, open the registry editor (regedit.exe).
Select File > Connect Network Registry.
Locate the target VM by host name or dynamic IP (preferable) by entering it in the Enter the object name to select box.
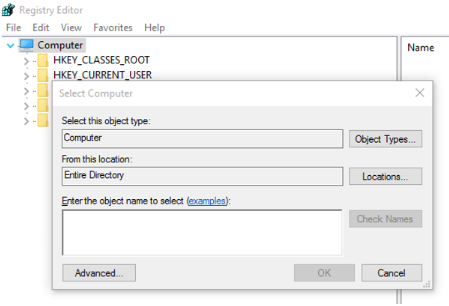
Enter the credentials for the target VM.
Make any necessary registry changes.
Remote services console
Note
TCP ports 135 or 445 must be open in order to use this option.
For Azure Resource Manager VMs, you have to open port 5986 on the NSG. For more information, see Security groups.
For RDFE VMs, you must have an endpoint that has a private port 5986 and a public port. You also have to open that public-facing port on the NSG.
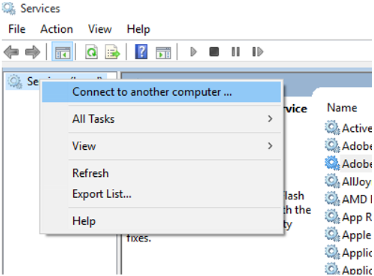
From another VM on the same virtual network, open an instance of Services.msc.
Right-click Services (Local).
Select Connect to another computer.
Enter the dynamic IP of the target VM.
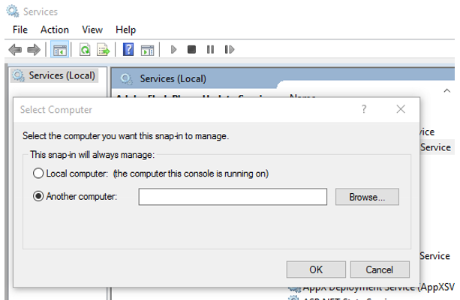
Make any necessary changes to the services.
Next steps
- For more information about the Enter-PSSession cmdlet, see Enter-PSSession.
- For more information about the Custom Script Extension for Windows using the classic deployment model, see Custom Script Extension for Windows.
- PsExec is part of the PSTools Suite.
- For more information about the PSTools Suite, see PSTools.
Contact us for help
If you have questions or need help, create a support request, or ask Azure community support. You can also submit product feedback to Azure feedback community.