Troubleshoot UEFI boot failures in Azure Linux virtual machines
Applies to: ✔️ Linux VMs
Note
CentOS referenced in this article is a Linux distribution and will reach End Of Life (EOL). Consider your use and plan accordingly. For more information, see CentOS End Of Life guidance.
Linux partner images in Azure Marketplace are tagged and configured for both BIOS generation 1 boot and Unified Extensible Firmware Interface (UEFI) generation 2 boot.
When you deploy generation 2 Linux virtual machines (VMs) in Azure, you may encounter UEFI boot failures. This article discusses some scenarios where UEFI boot failures occur and provides solutions.
Symptoms
When you deploy a generation 2 Linux VM in Azure, the boot fails, and the server is inaccessible.
Identify UEFI boot errors
Check the current state of your VM by using the Azure boot diagnostics.
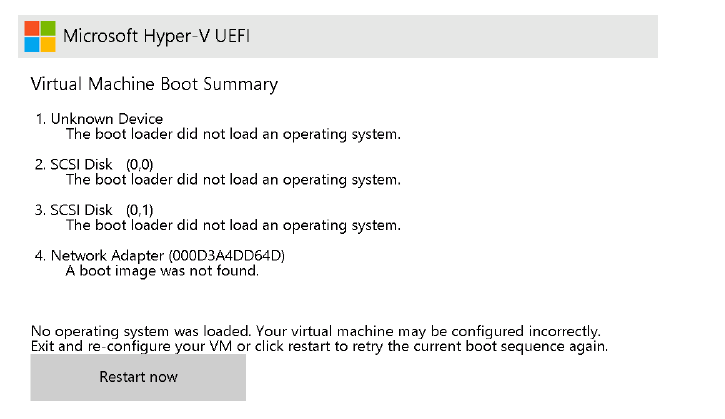
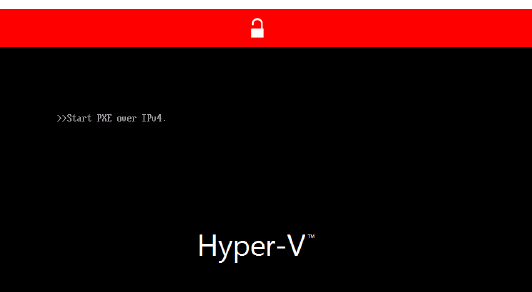
The boot diagnostics screenshot shows the following error messages:
Error 1
Virtual Machine Boot Summary
- Unknown Device
The boot loader did not load an operating system. - SCSI Disk (0,0)
The boot loader did not load an operating system. - SCSI Disk (0,1)
The boot loader did not load an operating system. - Network Adapter (000D3A4DD64D)
A boot image was not found.
No operating system was loaded. Your virtual machine may be configured incorrectly. Exit and re-configure your VM or click restart to retry the current boot sequence again.

- Unknown Device
Error 2
Start PXE over IPv4

Before you troubleshoot
To perform the offline VM repair that's required for Scenario 1: UEFI partition in boot image is missing and Scenario 2: UEFI partition in boot image is corrupted, make sure that you have access to Azure CLI or Azure Cloud Shell.
Scenario 1: UEFI partition in boot image is missing
If the UEFI boot loader partition is missing or deleted, the generation 2 Linux VM will fail to boot.
To resolve this issue, follow these steps:
Use the az vm repair create command to create a repair VM. The repair VM will have a copy of the OS disk for the non-functional VM attached. For more information, see Repair a Linux VM by using the Azure Virtual Machine repair commands.
Recreate the partition by using the following commands:
root@repair-centos7:~# gdisk /dev/sdc
GPT fdisk (gdisk) version 1.0.3

Partition table scan:
  MBR: protective
  BSD: not present
  APM: not present
  GPT: present

Found valid GPT with protective MBR; using GPT.

Command (? for help): p
Disk /dev/sdc: 134217728 sectors, 64.0 GiB
Model: Virtual Disk
Sector size (logical/physical): 512/4096 bytes
Disk identifier (GUID): <Disk GUID>
Partition table holds up to 128 entries
Main partition table begins at sector 2 and ends at sector 33
First usable sector is 34, last usable sector is 134217694
Partitions will be aligned on 2048-sector boundaries
Total free space is 1019837 sectors (498.0 MiB)

Number  Start (sector)    End (sector)  Size       Code  Name
   1         1026048         3123199   1024.0 MiB  0700
   2         3123200       134215679   62.5 GiB    8E00
  14            2048           10239   4.0 MiB     EF02

Command (? for help): n
Partition number (3-128, default 3):
First sector (34-134217694, default = 10240) or {+-}size{KMGTP}: 10240
Last sector (10240-1026047, default = 1026047) or {+-}size{KMGTP}: 1026047
Current type is 'Linux filesystem'
Hex code or GUID (L to show codes, Enter = 8300): ef00
Changed type of partition to 'EFI System'

Command (? for help): p
Disk /dev/sdc: 134217728 sectors, 64.0 GiB
Model: Virtual Disk
Sector size (logical/physical): 512/4096 bytes
Disk identifier (GUID): <Disk GUID>
Partition table holds up to 128 entries
Main partition table begins at sector 2 and ends at sector 33
First usable sector is 34, last usable sector is 134217694
Partitions will be aligned on 2048-sector boundaries
Total free space is 4029 sectors (2.0 MiB)

Number  Start (sector)    End (sector)  Size       Code  Name
   1         1026048         3123199   1024.0 MiB  0700
   2         3123200       134215679   62.5 GiB    8E00
   3           10240         1026047   496.0 MiB   EF00  EFI System
  14            2048           10239   4.0 MiB     EF02

Command (? for help): w

Final checks complete. About to write GPT data. THIS WILL OVERWRITE EXISTING
PARTITIONS!!

Do you want to proceed? (Y/N): Y
OK; writing new GUID partition table (GPT) to /dev/sdc.
Warning: The kernel is still using the old partition table.
The new table will be used at the next reboot or after you
run partprobe(8) or kpartx(8)
The operation has completed successfully.
Important
- Replace
/dev/sdcwith the corresponding copy of the operating system (OS) disk device. - The partition number choice doesn't matter as long as the sector start and end points are correct. The correct sector start and end points are chosen because the OS is able to determine the missing sectors.
- Ensure the ending sector isn't occupied by any other partition within the disk. Choosing default values should suffice here.
Azure Linux partner images have the following partition number, sector start points, and sector end points:
Linux OS Distribution EFI Partition number Sector Start Sector End CentOS 7 15 10240 1024000 CentOS 8 15 10240 1024000 Debian 10 15 8192 262143 Debian 11 15 8192 262143 RHEL 7 1 2048 1026047 RHEL 8 15 10240 1024000 Oracle Linux 7 15 10240 1024000 Oracle Linux 8 15 10240 1024000 Ubuntu 18.04 15 10240 227327 Ubuntu 20.04 15 10240 227327 SLES 12 2 6144 1054719 SLES 15 2 6144 1054719 - Replace
Once the partition is recreated, restore the VM by swapping the repaired OS disk with the original OS disk of the VM by using the az vm repair restore command. For more information, see the step 5 in Repair a Linux VM by using the Azure Virtual Machine repair commands.
Scenario 2: UEFI partition in boot image is corrupted
If the UEFI boot partition is corrupted, the generation 2 Linux VM will fail to boot. To resolve this issue, follow these steps:
Use the az vm repair create command to create a repair VM. The repair VM will have a copy of the OS disk for the non-functional VM attached. For more information, see Repair a Linux VM by using the Azure Virtual Machine repair commands.
Clean the corrupted partition by using the following commands:
root@repair-centos7:~# gdisk -l /dev/sdc
GPT fdisk (gdisk) version 1.0.3

Partition table scan:
  MBR: protective
  BSD: not present
  APM: not present
  GPT: present

Found valid GPT with protective MBR; using GPT.
Disk /dev/sdc: 134217728 sectors, 64.0 GiB
Model: Virtual Disk
Sector size (logical/physical): 512/4096 bytes
Disk identifier (GUID): <Disk GUID>
Partition table holds up to 128 entries
Main partition table begins at sector 2 and ends at sector 33
First usable sector is 34, last usable sector is 134217694
Partitions will be aligned on 2048-sector boundaries
Total free space is 4029 sectors (2.0 MiB)

Number  Start (sector)    End (sector)  Size       Code  Name
   1         1026048         3123199   1024.0 MiB  0700
   2         3123200       134215679   62.5 GiB    8E00
   3           10240         1026047   496.0 MiB   EF00  EFI System
  14            2048           10239   4.0 MiB     EF02

root@repair-centos7:~# fsck.vfat -n /dev/sdc3
fsck.fat 4.1 (2017-01-24)
0x25: Dirty bit is set. Fs was not properly unmounted and some data may be corrupt.
 Automatically removing dirty bit.
Leaving filesystem unchanged.
/dev/sdc3: 19 files, 1438/63326 clusters

root@repair-centos7:~# fsck.vfat /dev/sdc3
fsck.fat 4.1 (2017-01-24)
0x25: Dirty bit is set. Fs was not properly unmounted and some data may be corrupt.
1) Remove dirty bit
2) No action
? 1
Perform changes ? (y/n) y
/dev/sdc3: 19 files, 1438/63326 clusters
root@repair-centos7:~# fsck.vfat /dev/sdc3
fsck.fat 4.1 (2017-01-24)
/dev/sdc3: 19 files, 1438/63326 clusters
Important
- Replace
/dev/sdcwith the corresponding copy of the OS disk device. - Always take a backup of the OS disk and perform a dry run with the
-noption before performing the file system check mentioned above. - The
dosfsckcommand can be used to perform the vfat file system check. Both commands are the same. For more information, see fsck.vfat.
- Replace
Once the partition is cleaned, restore the VM by swapping the repaired OS disk with the original OS disk of the VM by using the az vm repair restore command. For more information, see the step 5 in Repair a Linux VM by using the Azure Virtual Machine repair commands.
Scenario 3: Entire /boot partition contents are deleted
If the entire /boot partition or other important contents are missing and can't be recovered, restoring the VM from a backup is the only option. For more information, see How to restore Azure VM data in Azure portal.
Contact us for help
If you have questions or need help, create a support request, or ask Azure community support. You can also submit product feedback to Azure feedback community.