Build reusable Blazor components using layouts
- 7 minutes
Blazor includes layouts to make it easy to code common user interface (UI) elements that appear on many pages in your app.
Suppose you're working in the pizza delivery company's website and you created the content for most of the main pages as a set of Blazor components. You want to ensure that these pages have the same branding, navigation menus, and footer section. However, you don't want to have to copy and paste that code into multiple files.
Here, you learn how to use layout components in Blazor to render common HTML on multiple pages.
Note
The code blocks in this unit are illustrative examples. You write your own code in the next unit.
What are Blazor layouts?
In most websites, the arrangement of UI elements is shared across multiple pages. For example, there might be a branded banner at the top of the page, the main site navigation links down the left side, and a legal disclaimer at the bottom. After you code these common UI elements in one page, it's tedious to copy and paste them into the code for all the other pages. Worse, if there's a change later, such as a new major section of the site to link to or a site rebrand, you have to make the same changes repeat in all the individual components. Instead, use a layout component to streamline and reuse common UI elements.
A layout component in Blazor is one that shares its rendered markup with all the components that reference it. You place common UI elements like navigation menus, branding, and footers on the layout. Then you reference that layout from multiple other components. When the page is rendered, unique elements such as the details of the requested pizza, come from the referencing component. But, common elements come from the layout. You only have to code the common UI elements once, in the layout. Then if you need to rebrand the site, or make some other change, you only have to correct the layout. The change automatically applies to all the referencing components.
Code a Blazor layout
A Blazor layout is a specific type of component, so writing a Blazor layout is a similar task to writing other components to render UI in your app. For example, you use @code block and many directives in the same way. Layouts are defined in files with a .razor extension. The file is often stored in the Shared folder within your app, but you can choose to store it in any location that's accessible to the components that use it.
Two requirements are unique to Blazor layout components:
- You must inherit the
LayoutComponentBaseclass. - You must include the
@Bodydirective in the location where you want to render the content of the components that you're referencing.
@inherits LayoutComponentBase
<header>
<h1>Blazing Pizza</h1>
</header>
<nav>
<a href="Pizzas">Browse Pizzas</a>
<a href="Toppings">Browse Extra Toppings</a>
<a href="FavoritePizzas">Tell us your favorite</a>
<a href="Orders">Track Your Order</a>
</nav>
@Body
<footer>
@new MarkdownString(TrademarkMessage)
</footer>
@code {
public string TrademarkMessage { get; set; } = "All content is © Blazing Pizzas 2021";
}
Note
Layout components don't include a @page directive because they don't handle requests directly and shouldn't have a route created for them. Instead, the referencing components use the @page directive.
If you created your Blazor app from a Blazor project template, the app's default layout is the Shared/MainLayout.razor component.
Use a layout in a Blazor component
To use a layout from another component, add the @layout directive with the name of the layout to apply. The component's HTML is rendered in the position of the @Body directive.
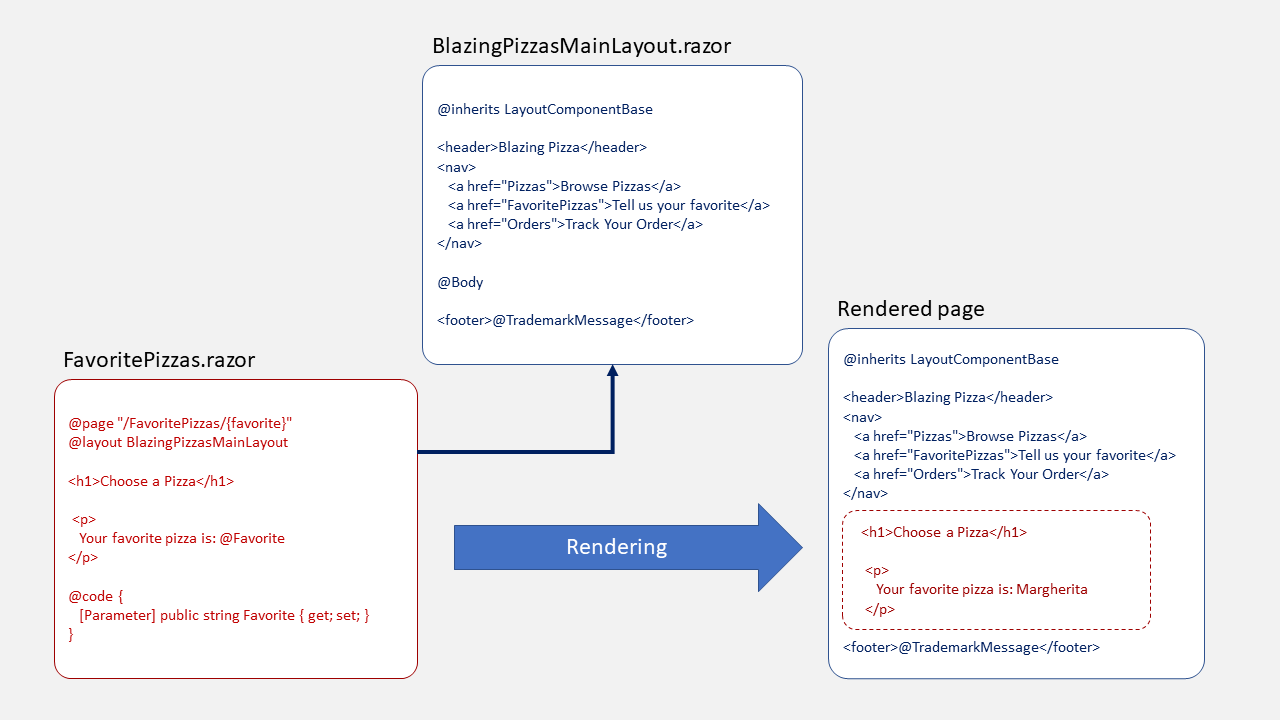
@page "/FavoritePizzas/{favorite}"
@layout BlazingPizzasMainLayout

<h1>Choose a Pizza</h1>

<p>Your favorite pizza is: @Favorite</p>

@code {
    [Parameter]
    public string Favorite { get; set; }
}
This diagram illustrates how a component and a layout are combined to render the final HTML:
If you want to apply a template to all the Blazor components in a folder, you can use the _Imports.razor file as a shortcut. When the Blazor compiler finds this file, it includes its directives in all the components in the folder automatically. This technique removes the need to add the @layout directive to every component and applies to components in the same folder as the _Imports.razor file and all its subfolders.
Important
Don't add a @layout directive to the _Imports.razor file in the root folder of your project because that results in an infinite loop of layouts.
If you want to apply a default layout to every component in all folders of your web app, you can do so in the App.razor component, where you configure the Router component, as you learned in unit 2. In the <RouteView> tag, use the DefaultLayout attribute.
<Router AppAssembly="@typeof(Program).Assembly">
    <Found Context="routeData">
        <RouteView RouteData="@routeData" DefaultLayout="@typeof(BlazingPizzasMainLayout)" />
    </Found>
    <NotFound>
        <p>Sorry, there's nothing at this address.</p>
    </NotFound>
</Router>
Components that have a layout specified in their own @layout directive, or in an _Imports.razor file, override this default layout setting.