Setup and configure the SharePoint Embedded environment and web app project
In this exercise, you'll create a project that contains a server-side and client-side component. The server-side component is a REST API that authenticates with Microsoft Entra ID and will access SharePoint Embedded Containers using the Microsoft Graph API. The client-side component is a single-page React app that will call the REST API that exposes the contents of the SharePoint Embedded Container.
At the end of this exercise, you'll have a template project that you'll use to add more functionality in the following sections.
Enable SharePoint Embedded in your Microsoft 365 SharePoint Online tenant
In order to use SharePoint Embedded to create and register Container Types, you must first enable it on your SharePoint Online tenant. This process must be done on both the provider and consuming tenants where you define your application and on any consuming tenants that will use your SharePoint Embedded app.
Note
You can use the same SharePoint Online tenant as both the provider/developer and consuming tenant.
Enabling SharePoint Embedded on a SharePoint Online tenant is a one-way operation; it can't be disabled. This is to ensure any apps you've created on the consuming tenant will continue to function.
Once you enable SharePoint Embedded on a SharePoint Online tenant, you'll be able to create a Container Type in your provider tenant and register the Container Type in a consuming tenant.
To enable SharePoint Embedded, navigate to the Microsoft 365 admin center (https://portal.microsoft.com) and sign in with the Work and School of your Microsoft 365 tenant's admin account.
Select Show All at the bottom of the left-hand navigation, then select Admin Centers > SharePoint.

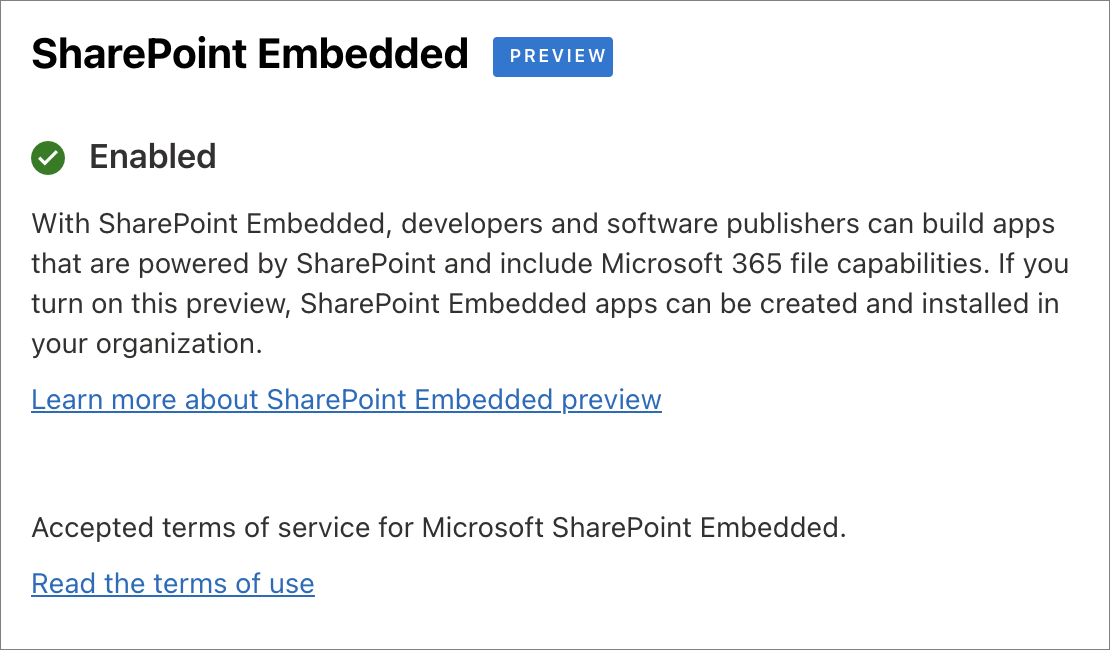
Next, on the SharePoint admin center, select Settings in the left-hand navigation. Locate and select SharePoint Embedded. Review the terms of service and select Enable to enable it on your SharePoint Online tenant.
Create Microsoft Entra ID Application
Start by creating the Microsoft Entra ID Application. This will be used to authenticate and obtain the necessary permissions to call the Microsoft Graph and Microsoft SharePoint APIs.
Open a browser and navigate to the Microsoft Entra admin center (https://entra.microsoft.com). Sign in using a Work or School Account that has global administrator rights to the tenancy.
Select Manage > App registrations in the left-hand navigation and then select New registration.
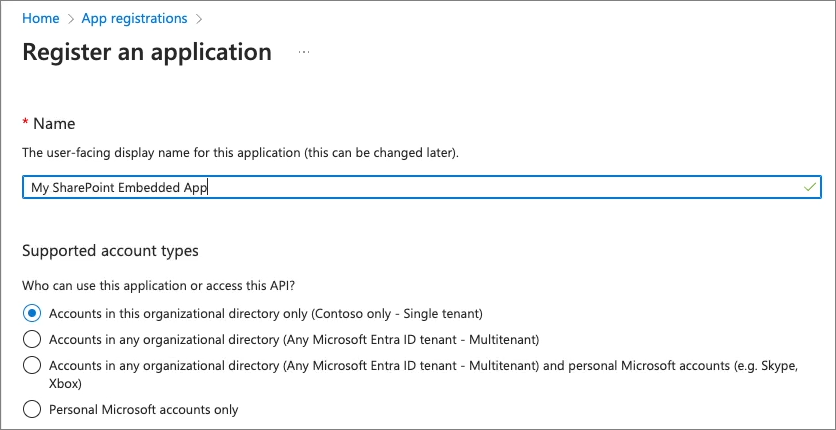
On the Register an application page, set the values as follows, and then select Register:
- Name: My SharePoint Embedded
- Supported account types: Accounts in this organizational directory only (Andrew Connell Inc. only - Single tenant)
Microsoft Entra ID will then display the details of the new app. Create a text file to keep track of multiple values you'll need later in this module. Copy the Application (Client) ID & Directory (tenant) ID from the app's overview page into the text file.
Configure authentication
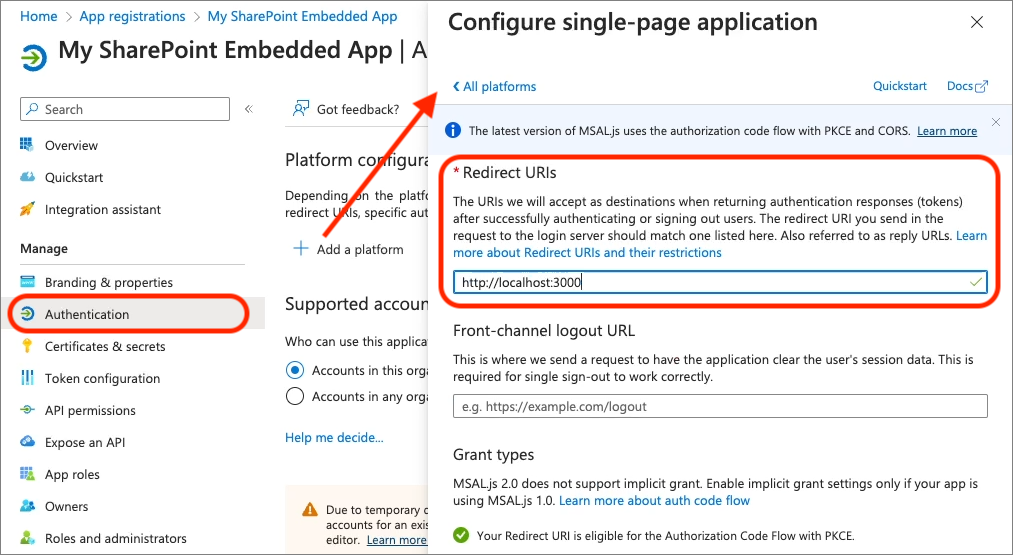
Next, configure the app's authentication settings. Select Manage > Authentication from the left-hand navigation.
Select Add a platform and then select Single-page application.
On the Configure single-page application pane, set the Redirect URIs to http://localhost:3000 and select Configure.
Configure API Permissions
Next, set the permissions the app will need so it can create and access Container Types and Containers.
Note
At the time of publishing this module, during the SharePoint Embedded public preview, the two permissions the app needs aren't yet visible in the list of permissions in the Microsoft Entra ID web interface to be selected. To get around this limitation, manually add them to the app's manifest.
From the Manage > Manifest page, locate the property requiredResourceAccess.
The existing resource with the resourceAppId set to00000003-0000-0000-c000-000000000000 is Microsoft Graph. Add the following application & delegated permission for the FileStorageContainer.Selected scope. The existing permission that's already present is for the User.Read scope.
{
  "resourceAppId": "00000003-0000-0000-c000-000000000000",
  "resourceAccess": [
    {
      "id": "085ca537-6565-41c2-aca7-db852babc212",
      "type": "Scope"
    },
    {
      "id": "40dc41bc-0f7e-42ff-89bd-d9516947e474",
      "type": "Role"
    }
  ]
}
Next, add a new resourceAppId for SharePoint whose ID is 00000003-0000-0ff1-ce00-000000000000, and add the following application & delegated permissions for the Container.Selected scope:
{
  "resourceAppId": "00000003-0000-0ff1-ce00-000000000000",
  "resourceAccess": [
    {
      "id": "4d114b1a-3649-4764-9dfb-be1e236ff371",
      "type": "Scope"
    },
    {
      "id": "19766c1b-905b-43af-8756-06526ab42875",
      "type": "Role"
    }
  ]
},
Add a Custom Permission to the Microsoft Entra ID App
Next, add a custom permission, to the application so an administrator can prompt the user to allow the app to manage containers.
On the Manage > Expose an API page, select the Set link next to the Application ID URI. This will default the app's ID to api://<app-id>.
Next, select Add a scope to add a new permission for the app. Create a new scope using the following settings and then select Add scope:
- Scope name: Container.Manage
- Who can consent? Admins only
- Admin (& User) consent title: Manage SharePoint Embedded Containers.
- Admin (& User) consent description: The application can call this app's API to manage SharePoint Embedded Storage Containers.
- State: Enabled
In the web API, you'll add code to ensure this permission has been granted to the application.
Grant admin consent to the new permissions
Some of the permissions require admin consent. From the API Permissions page, scroll to the bottom of the page, and select the link Enterprise applications.
On the Permissions page, select Grant admin consent for Contoso and then Accept the prompt to grant admin consent to the two pairs of permissions: FileStorageContainer.Selected for Microsoft Graph and Container.Selected for SharePoint. The two pairs represent the application & delegated options for each of the two permissions.
Create a Client Secret
For an app to authenticate using the OAuth2 client credentials flow with Microsoft Entra ID, it needs both the client ID and a client secret.
Select Manage > Certificates and secrets from the left-hand navigation.
On the Certificates & Secrets page, select the Client Secrets tab and then select New client secret. Set a description and select an expiration duration, then select Add.
When the secret is created, it will be shown one time so make sure you copy this as the client secret in your local text file for use later in this module. If you don't copy this value, you'll have to create a new secret as you can't ever view a previously created secret.
Create the Container Type
The last step is to create a new Container Type. This can be done using the SharePoint Online PowerShell module. Make sure you have the latest version installed by either installing...
Install-Module "Microsoft.Online.SharePoint.PowerShell"
... or by upgrading the one you've previously installed to ensure you have the latest version...
Update-Module "Microsoft.Online.SharePoint.PowerShell"
Once you have the latest version, connect to your SharePoint Online site and create a new Container Type:
Update the following values in the following PowerShell script, then execute the script:
{{SPO_ADMIN_URL}}: This is the URL of your SharePoint Online admin center. You can get this by signing into the Microsoft 365 Portal (https://portal.microsoft.com) with the Work and School of your tenant's admin account, select Show All at the bottom of the left-hand navigation, then select Admin Centers > SharePoint. Copy the URL of the SharePoint admin center and use this value. For example, if your tenant ID is Contoso123, your admin url would behttps://contoso123-admin.sharepoint.com.{{CONTAINER_TYPE_NAME}}: Pick a name for your new Container Type. For example, useMyFirstSpeContainerType.{{AZURE_ENTRA_APP_ID}}: Set this to the value of the Microsoft Entra ID app ID, also known as the "client ID" you created previously. This value should be in your local text file.
Import-Module "Microsoft.Online.SharePoint.PowerShell"
Connect-SPOService -Url "https://{{SPO_ADMIN_URL}}"
New-SPOContainerType -TrialContainerType
                     -ContainerTypeName "{{CONTAINER_TYPE_NAME}}"
                     -OwningApplicationId "{{AZURE_ENTRA_APP_ID}}"
The PowerShell script will display the details for your new Container Type, for example:
Container Type ID:
===============================================================================
ContainerTypeId     : 1e59a44b-b77e-051e-3cba-dbf83007b520
ContainerTypeName   : MyFirstSpeContainerType
OwningApplicationId : 520e6e65-1143-4c87-a7d3-baf242915dbb
Classification      : Trial
AzureSubscriptionId : 00000000-0000-0000-0000-000000000000
ResourceGroup       :
Region              :
Copy the ContainerTypeId your local text file for later use.
Register Container Type in consuming tenant
Finally, as part of the last step, you need to register the Container Type (that's currently defined in the provider tenant), in the consumer tenant(s). This is true for both single tenant and multitenant applications and ensures that only specified applications have access to the Containers in their tenant.
If this step isn't completed, the SharePoint Embedded application will get an access denied error when attempting any operation with a container.
Register a Container Type with the SharePoint Online REST API. The SharePoint Online REST API requires an application to authenticate with a certificate rather than just a client secret.
Create self-signed certificate
First, create a new self-signed certificate using PowerShell's New-SelfSignedCertificate cmdlet. Update the following values in the following PowerShell script, then execute the script:
{{CERT NAME}}: The name of the certificate. This can be anything you like.{{CERT_PATH}}: The fully qualified path to the location of the *.cer file, such as c:\mycert.cer.
$cert = New-SelfSignedCertificate -Subject "CN={{CERT_NAME}}" -CertStoreLocation "Cert:\CurrentUser\My" -KeyExportPolicy Exportable -KeySpec Signature -KeyLength 2048 -KeyAlgorithm RSA -HashAlgorithm SHA256
Export-Certificate -Cert $cert -FilePath "{{CERT_PATH}}" -Force

# Private key to Base64
$privateKey = [System.Security.Cryptography.X509Certificates.RSACertificateExtensions]::GetRSAPrivateKey($cert)
$privateKeyBytes = $privateKey.Key.Export([System.Security.Cryptography.CngKeyBlobFormat]::Pkcs8PrivateBlob)
$privateKeyBase64 = [System.Convert]::ToBase64String($privateKeyBytes, [System.Base64FormattingOptions]::InsertLineBreaks)
$privateKeyString = @"
-----BEGIN PRIVATE KEY-----
$privateKeyBase64
-----END PRIVATE KEY-----
"@

# Print private key to output
Write-Host $privateKeyString
Save the value of the private key in Base64 format, also referred to as PEM format, to a new *.key file with the same name as the generated *.cer file.
Important
The contents of the file must include the -----BEGIN PRIVATE KEY----- and -----END PRIVATE KEY----- strings.
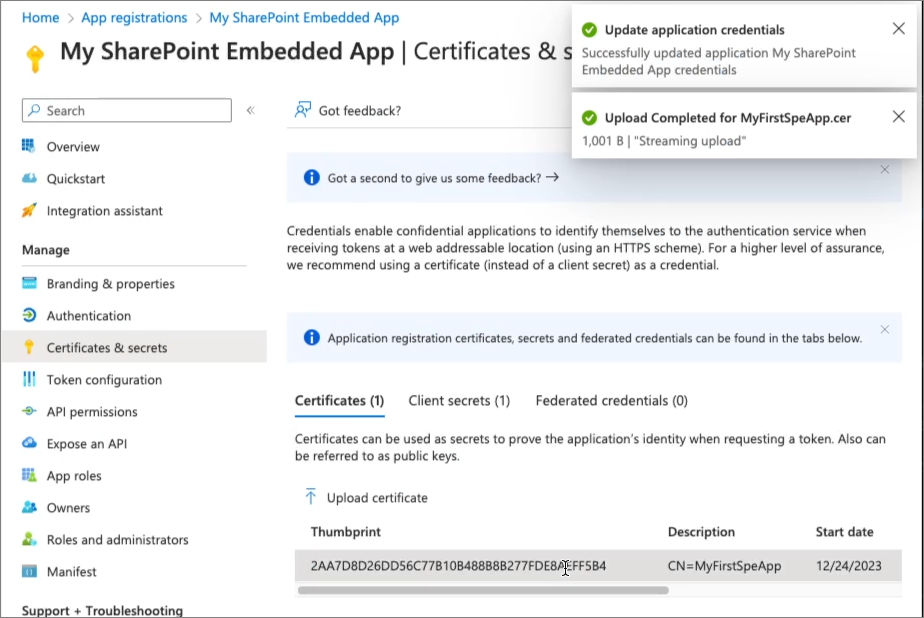
On the Manage > Certificates & secrets page, select Certificates, and then select Upload certificate. Select the *.cer file and select Add.
After uploading the certificate, copy the Thumbprint displayed on the Certificates & Secrets page in the Microsoft Entra ID portal:
Register Container Type in consumer tenant
Next, register the Container Type with the consumer's tenant using the SharePoint REST /_api/v2.1/storageContainerTypes/{{ContainerTypeId}}/applicationPermissions endpoint. The SharePoint Embedded team has made this easy by providing a Postman collection filled with lots of examples in calling the different SharePoint Online & Microsoft Graph endpoints.
In the SharePoint Embedded Samples repo, find the Postman collection, get the raw URL of it, and import it into Postman as a new collection:
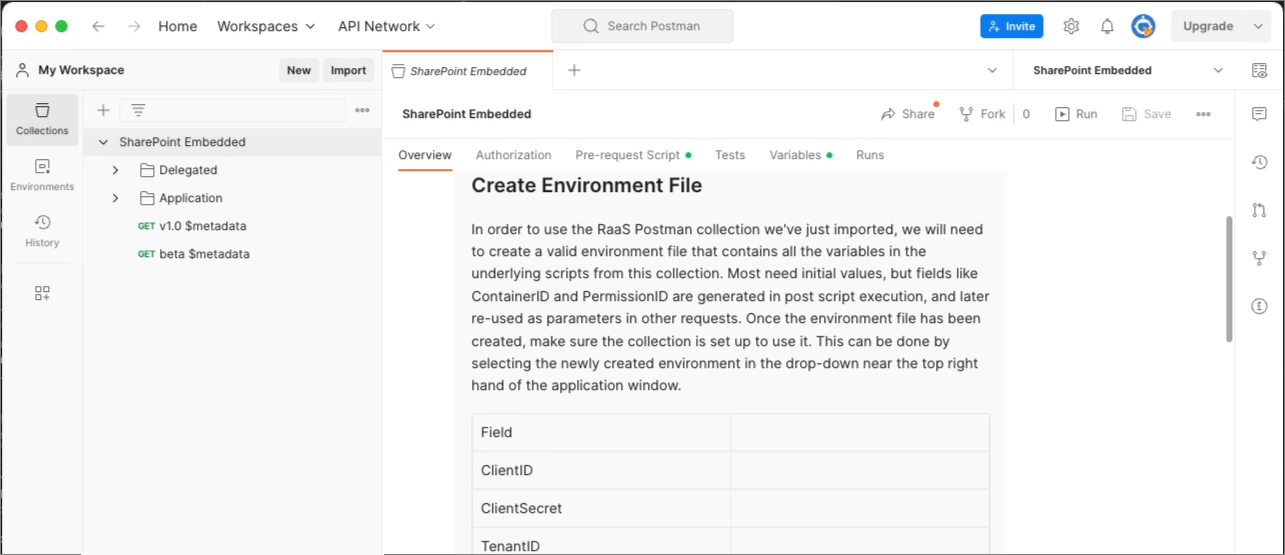
Notice the overview of the collection contains a bunch of documentation. One important section covers creating a Postman environment file to simplify setting the necessary values. I've already created one and just need to populate the values:
- ClientID: The Microsoft Entra ID application's application or client ID.
- ClientSecret: The Microsoft Entra ID application's client secret.
- ConsumingTenantId: The ID of the Microsoft 365 tenant of the consumer tenant you want to target.
- TenantName: The name of your tenant. That's subdomain portion of your SharePoint Online site.
- RootSiteUrl: The root URL of your tenant.
- ContainerTypeID: The GUID of the Container Type created in the provider tenant.
- CertThumbprint: The thumbprint of the certificate Microsoft Entra ID displayed after successfully uploading the certificate to the Microsoft Entra ID application.
- CertPrivateKey: The private key of the certificate. This is the key in PEM format.
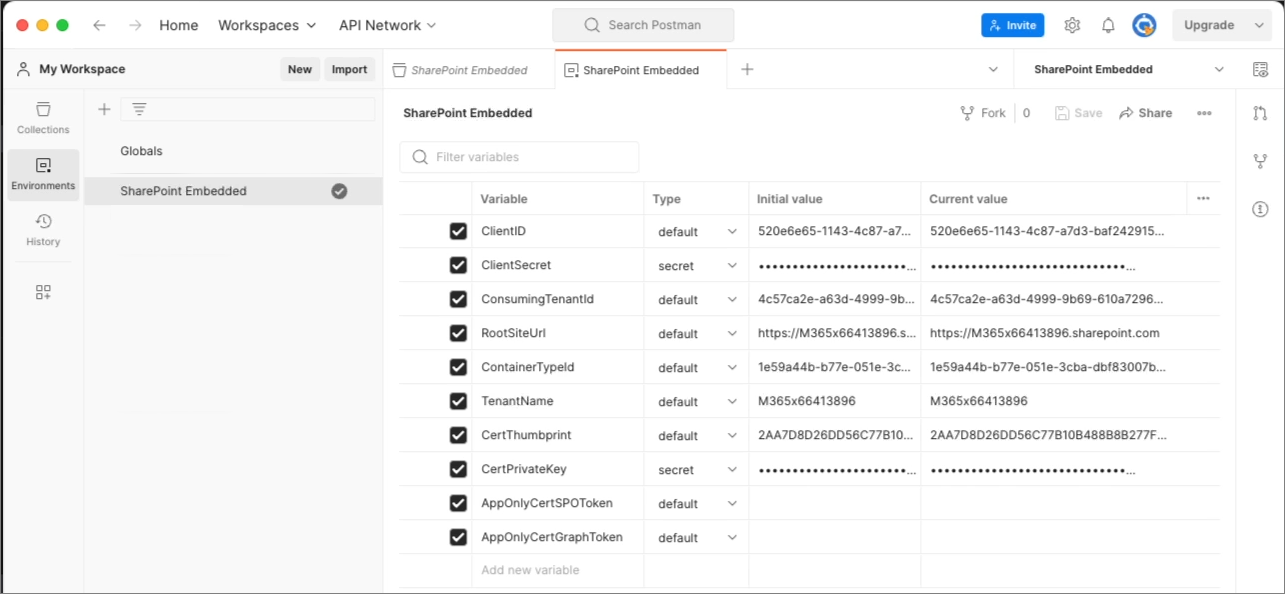
Once the Postman collection and environment are set up, run the Register ContainerType request in the Application > Containers folder. After the request completes, the app that you'll create in the remainder of this module will be able to manage and access storage containers in my Microsoft 365 tenant.
Create a web app to access SharePoint Embedded Containers
With SharePoint Embedded setup in the provider and consumer tenants, including creating and registering the Container Type, the next step is to create the application. This application will consist of two projects:
- A web project to build and render the front-end React SPA app
- A server side API to host the methods that require a confidential client that will perform operations that can't be done from the client app.
Let's start by creating the front-end part of the project:
Create front-end application
From a command line, navigate to the folder where you want to create the application and execute the following command:
npx create-react-app my-first-spe-app --template typescript
Next, install npm packages that will facilitate the SPA user interface and authentication with Microsoft Entra ID. From the command line, move into the folder my-first-spe-app created by the previous command and execute the following command:
npm install @azure/msal-browser @fluentui/react-components @fluentui/react-icons @microsoft/mgt-react @microsoft/mgt-element @microsoft/mgt-msal2-provider -SE
This command will install the following npm packages:
- @azure/msal-browser: Used to authenticate with Microsoft Entra ID.
- @microsoft/mgt-element, @microsoft/mgt-react, & @microsoft/mgt-msal2-provider: The Microsoft Graph Toolkit that contains UI components for React.
- @fluentui/react-components & @fluentui/react-icons: UI components from the Fluent UI v9 library.
Create back-end application
Next, create and add the necessary scaffolding for the API server. Start by running the following command to install more npm packages:
npm install restify @azure/msal-node @microsoft/microsoft-graph-client isomorphic-fetch jsonwebtoken jwks-rsa -SE

npm install @types/restify @types/jsonwebtoken @types/isomorphic-fetch -DE
This command will install the npm packages:
- restify & @types/restify: A Node.js-base API server and associated type declarations for TypeScript.
- @azure/msal-node: Used to authenticate with Microsoft Entra ID.
- @microsoft/microsoft-graph-client: Microsoft Graph JavaScript SDK.
- isomorphic-fetch: Polyfill that adds the browser
fetchAPI as a global so its API is consistent between the client & server. - jsonwebtoken: Implementation of JSON Web Tokens.
- jwks-rsa: Library to retrieve signing keys from a JSON Web Key Set (JWKS) endpoint.
Add a TypeScript compiler configuration for the server-side project:
Create a new file, ./server/tsconfig.json project and add the following code to it. This will configure the TypeScript compiler for the server-side API part of this project.
{
  "$schema": "http://json.schemastore.org/tsconfig",
  "compilerOptions": {
    "target": "ES2015",
    "module": "commonjs",
    "lib": [
      "es5",
      "es6",
      "dom",
      "es2015.collection"
    ],
    "esModuleInterop": true,
    "moduleResolution": "node",
    "strict": true
  }
}
Next, add a placeholder for the server-side API to this project.
Create a new file, ./server/index.ts, and add following code to it:
import * as restify from "restify";

const server = restify.createServer();
server.use(restify.plugins.bodyParser());

server.listen(process.env.port || process.env.PORT || 3001, () => {
  console.log(`\nAPI server started, ${server.name} listening to ${server.url}`);
});

// add CORS support
server.pre((req, res, next) => {
  res.header('Access-Control-Allow-Origin', req.header('origin'));
  res.header('Access-Control-Allow-Headers', req.header('Access-Control-Request-Headers'));
  res.header('Access-Control-Allow-Credentials', 'true');

  if (req.method === 'OPTIONS') {
    return res.send(204);
  }

  next();
});
This creates a new Restify server, configures it to listen for requests on port 3001, and enables CORS on the server.
Add project global settings and constants
Next, add few constants to store your deployment settings
Create a new file, ./.env, to store settings for your API server. Add the following to the file:
API_ENTRA_APP_CLIENT_ID=
API_ENTRA_APP_CLIENT_SECRET=
API_ENTRA_APP_AUTHORITY=

CONTAINER_TYPE_ID=
Create a new file ./src/common/constants.ts to store settings for your client-side app. Add the following to the file:
export const CLIENT_ENTRA_APP_CLIENT_ID = '';
export const CLIENT_ENTRA_APP_AUTHORITY = '';

export const API_SERVER_URL = '';

export const CONTAINER_TYPE_ID = '';
Update the values in these two files using the following guidance:
- API_ENTRA_APP_CLIENT_ID: This is the application (client) ID of the Microsoft Entra ID application you created previously.
- API_ENTRA_APP_CLIENT_SECRET: This is the application (client) secret of the Microsoft Entra ID application you created previously.
- API_ENTRA_APP_AUTHORITY: This is the authority of the Microsoft Entra ID application. Use
https://login.microsoftonline.com/{{MS-ENTRA-TENANT-ID}}/. The tenant ID is the ID of the Microsoft Entra ID tenant where the application was previously created. - API_SERVER_URL: This is the URL of the server-side API server. Use
http://localhost:3001. - CLIENT_ENTRA_APP_CLIENT_ID: This is the application (client) ID of the Microsoft Entra ID application you created previously.
Finally, add a new file, ./src/common/scopes.ts, to store a list of OAuth2 scopes (permissions) that we'll use in the client-side application:
// microsoft graph scopes
export const GRAPH_USER_READ = 'User.Read';
export const GRAPH_USER_READ_ALL = 'User.Read.All';
export const GRAPH_FILES_READ_WRITE_ALL = 'Files.ReadWrite.All';
export const GRAPH_SITES_READ_ALL = 'Sites.Read.All';
export const GRAPH_OPENID_CONNECT_BASIC = ["openid", "profile", "offline_access"];

// SharePoint Embedded scopes
export const SPEMBEDDED_CONTAINER_MANAGE= 'Container.Manage';
export const SPEMBEDDED_FILESTORAGECONTAINER_SELECTED= 'FileStorageContainer.Selected';
Create a cop of this file for the API server. Save the copied file to the following location in the project: ./server/common/scopes.ts.
Configure project build
Now, let's make some changes to the project to simplify builds and testing.
Update the scripts to simplify building the projects:
Open a command prompt, set the current folder to the root of your project, and run the following command to install a few npm packages used in development:
npm install env-cmd npm-run-all -DELocate and open the ./package.json file and update the
scriptssection to the following:"scripts": { "build:backend": "tsc -p ./server/tsconfig.json", "start": "run-s build:backend start:apps", "start:apps": "run-p start:frontend start:backend", "start:frontend": "npm run start-cre", "start:backend": "env-cmd --silent -f .env node ./server/index.js", "start-cre": "react-scripts start", "build-cre": "react-scripts build", "test-cre": "react-scripts test", "eject-cre": "react-scripts eject" },
The following list explains what the scripts do:
- All the default create-react-app (CRE) scripts have been updated to include the -cre suffix in their name to indicate they're associated with the create-react-app.
- The start script uses the run-s method from the npm-run-all npm package to run two scripts sequentially:
- It first runs the build script to transpile the entire project from TypeScript to JavaScript.
- Then, it runs the script start:apps.
- The start:apps script runs the start:frontend & start:backend scripts in parallel using the run-p method from the npm-run-all npm package.
- The start:backend script uses the env-cmd npm package to inject the environment variables in the ./.env file into the API server process.
At this point, you have a template project that you'll use to add more functionality in the following sections.
Summary
In this exercise, you created a project that contains a server-side and client-side component. The server-side component is a REST API that authenticates with Microsoft Entra ID and will access SharePoint Embedded Containers using the Microsoft Graph API. The client-side component is a single-page React app that will call the REST API that exposes the contents of the SharePoint Embedded Container.