Enable cash flow forecasts
This unit explains how to enable the Cash flow forecasts feature for Finance insights.
When the Cash flow forecasts feature is enabled, you can monitor and manage your cash balances more effectively. You can use this feature with the Customer payment predictions feature if you've completed the setup from the previous unit.
To set up the Cash flow forecasts feature, follow these steps:
Enable the Cash flow forecasts feature:
- Open the Feature management workspace.
- Select Check for updates.
- On the All tab, search for Cash flow forecasts.
- Turn on the feature by selecting Enable now.
Set up the Cash flow forecasts feature:
Go to Cash and bank management > Cash flow forecasting > Cash flow forecast setup. The cash flow can't be generated if the liquidity accounts aren't set up.
- Add the liquidity accounts that should be included in the forecasts from the General ledger tab and then select + Add in the Liquidity accounts section of the page.
- Set up the liquidity account for payments on the Accounts receivable and Accounts payable tabs. Be sure to recalculate the cash flow forecast.
Go to Cash and bank management > Setup > Finance Insights > Cash flow forecasts.
On the Cash flow forecast tab, select View the data fields used in the prediction model. This setting lets you view the default list of fields that are used for the AI cash flow forecast model.
To use the default list of fields to create the prediction model, set the Enable feature option to Yes.
Select Create prediction model.
To create the Cash flow forecast model, you'll need to have more than 100 transactions that extend over one year. The model works best if you use at least two years of data and over 1,000 transactions.
After completing the following setup, you can enter or import external data into the cash flow forecasts:
- Go to Cash and bank management > Cash flow forecasting > Cash flow forecast setup to enter settings that support the use of external data in the cash flow forecasts.
- Go to the External source tab, and then in the External cash flow categories section, define the external liquidity categories to track for cash flow forecasting.
- Select the + Add button on this page to set up the external cash flow categories. Make sure that you leave the posting type as Liquidity.
Enter or modify external data for cash flow forecasts:
Go to Workspaces > Cash flow forecast.
Select External data, and then select either Add external data or Edit existing external data.
When the Microsoft Excel file opens, enter information in the following fields:
- Entry ID (unique)
- Description (optional)
- External source name – Select one of the values in the list that you defined when you set up Finance insights
- Legal entity
- Date
- Amount in transaction currency
- Currency code
- Default dimension (optional)
- Document number(optional)
- Account number (optional)
- Account name (optional)
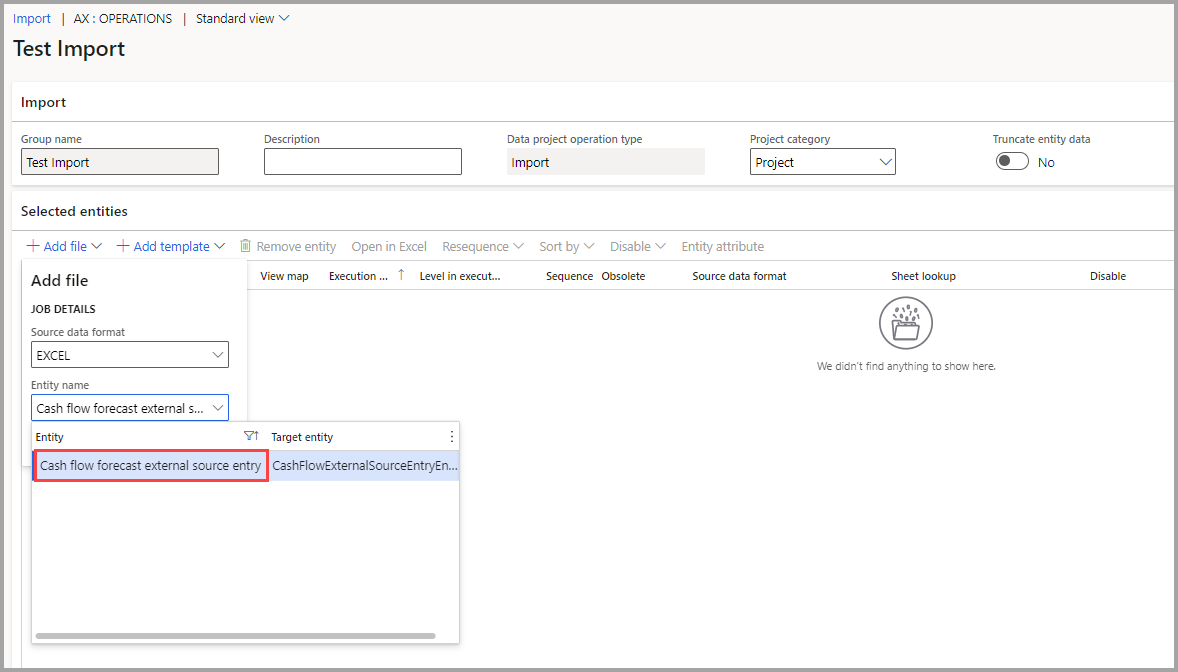
Another way to import external data for cash flow forecasting is through the Data Management workspace, as follows:
- Go to Workspaces > Data management > Import and then enter a group name and add a file.
- For the entity name, select Cash flow forecast external source entry.

