Exercise - Handle a queue message
In this exercise, you'll extend your application with a route that can trigger on a message in a message queue.
Note
Before you start this exercise, make sure that you've downloaded the Azurite extension, downloaded Azure Storage Explorer, and downloaded Azure Functions Core Tools.
Scaffold the app
For this exercise, we'll start on a new Azure Functions app. Create a new directory and place yourself in it.
Select View > Command Palette.
Select Azure Functions: Create New Project.
Select a folder, usually your current folder.
In Select a language, select Custom Handler.
In Select a template for your first function, select HttpTrigger.
Give the app a name, such as queueTrigger.
Select an authorization level of anonymous. You can change that later if you want.
At the root, create a file named server.go. Your project should now have the following files:
queueTrigger/
  function.json
.funcignore
.gitignore
host.json
local.settings.json
proxies.json
server.go
Go to the function.json file in the
queueTriggerdirectory. Find the first binding entry in thetypeelement:{ "authLevel": "anonymous", "type": "httpTrigger", "direction": "in", "name": "req", "methods": [ "get", "post" ] }Change that binding entry to this configuration:
{
   "name": "queueItem",
   "type": "queueTrigger",
   "direction": "in",
   "queueName" : "items",
   "connection": "AzureWebJobsStorage"
}
In this step, you set the
nameproperty. You'll refer to it later in code. You also changed the trigger type toqueueTrigger, which makes it possible to listen to queue messages.The
queueNamevalue points out a specific queue. When you run the emulator later, you'll create a queue with such a name.Finally, you pointed out a variable in local.settings.json that will contain the connection string to the queue.
Create the app
At this point, you have an app skeleton. You're now ready to add code that can handle incoming queue messages.
Open the server.go file and add the following code:
package main

import (
  "encoding/json",
  "fmt"
  "io/ioutil"
  "log"
  "net/http"
  "os"
)

func queueHandler(w http.ResponseWriter, r *http.Request) {
}

func main() {
  customHandlerPort, exists := os.LookupEnv("FUNCTIONS_CUSTOMHANDLER_PORT")
  if !exists {
    customHandlerPort = "8080"
  }
  mux := http.NewServeMux()
  mux.HandleFunc("/queueTrigger", queueHandler)
  fmt.Println("Go server Listening on: ", customHandlerPort)
  log.Fatal(http.ListenAndServe(":"+customHandlerPort, mux))
}
You now have a route set up at
/queueTrigger.Find the import section and add the following structs under it:
type InvokeRequest struct {
  Data     map[string]json.RawMessage
  Metadata map[string]interface{}
}
Find the
queueHandler()method and add update it in the following way:func queueHandler(w http.ResponseWriter, r *http.Request) { var invokeRequest InvokeRequest d := json.NewDecoder(r.Body) d.Decode(&invokeRequest) var parsedMessage string json.Unmarshal(invokeRequest.Data["queueItem"], &parsedMessage) }The code first reads the body from incoming response stream and decodes it:
var invokeRequest InvokeRequest

d := json.NewDecoder(r.Body)
d.Decode(&invokeRequest)
Then the message itself is dug out with a call to
Unmarshal():var parsedMessage string json.Unmarshal(invokeRequest.Data["queueItem"], &parsedMessage)Now that you have the message, let's print it out.
Add the following code:
fmt.Println(parsedMessage) // your messageYour code is now all written, but you need to configure your project so you can test it.
In the host.json file, find the
defaultExecutablePathelement and give it a value of./server.Note
For Windows, you would use a value of
.\server.exe.Build the server.go file by running
go buildat the project root:go build server.go
Configure the environment
The next step is to configure your environment. Because you're developing locally, you need to set it up so that you can talk to an emulated message queue.
In the local.settings.json file, find an element in
ValuescalledAzureWebJobsStorage(or add it if it's missing). Give it the valueUseDevelopmentStorage=true. Your JSON entry should look like this:"AzureWebJobsStorage" : "UseDevelopmentStorage=true"Start the Azurite extension by opening the command palette (View > Command Palette) and then selecting Azurite: Start Queue Service.
Note
This step will create some local files in your project.
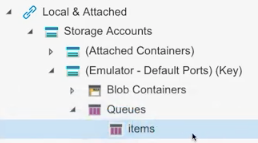
Open Azure Storage Explorer. On the left side, the contents of the emulator are visible.
Right-click the Queues node and select the option to create a new queue. Give it the name items.
Note
You can name the queue what you want. However, you're about to configure your function.json file. Whatever you name the queue here needs to go into function.json.
Locate function.json under the
queueTriggerdirectory. Ensure that thebindingsarray has the following entry:{ "name": "queueItem", "type": "queueTrigger", "direction": "in", "queueName" : "items", "connection": "AzureWebJobsStorage" }The
queueNameproperty has the same name as the queue that you created in Azure Storage Explorer. Theconnectionproperty points to the value that you set up in local.settings.json.The
nameproperty has the valuequeueItem. Your Go code uses this value to parse out the queue message.
Run the app
At this point, everything is set up. All you need to do is run the app, start Azure Storage Explorer, and create a queue message. Your code should be able to consume that message.
From a terminal, run the
func startcommand in the project root:func startIn Visual Studio Code, open the command palette and run Azurite: Start Queue Service.
Start Azure Storage Explorer, if it's not already started.
In Azure Storage Explorer, select Add Message:
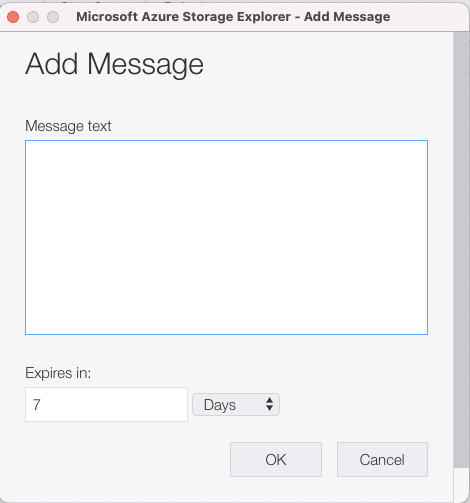
In the dialog that appears, enter message and select OK. You now see the details of the message that you created.
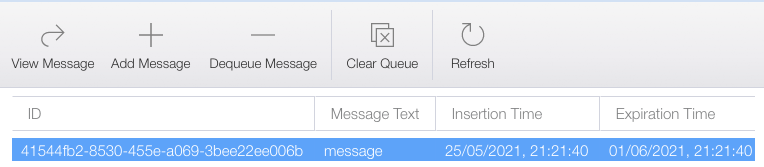
In Visual Studio Code, your function should now be running. In the terminal, you should now see message printed as the last row.
Your function was able to consume the queue message and write out its content.
Congratulations! You built an Azure function in Go that can trigger on a queue message. You also parsed that message.
What you do with an incoming message is up to you. For example, you can store it in a database or maybe send it as the payload in a web request.