Exercise - Send messages between microservices through RabbitMQ
RabbitMQ is a reliable message broker that provides flexible messaging exchanges and queues. To send and receive messages through RabbitMQ in a .NET Aspire project, you must add a RabbitMQ container, and then create code that sends messages from one microservice and receives it in another.
In this exercise, you'll send messages to a queue from the Catalog.API project. You'll add a new background service project that receives those messages from the queue and sends them to the console log for display.
Install prerequisites
The prerequisites for .NET Aspire are:
- .NET 8
- Visual Studio 2022 Preview
- Docker Desktop or Podman
- .NET Aspire workload in Visual Studio
If you've already got these packages installed, you can skip ahead to begin working with RabbitMQ.
Install .NET 8
Follow this .NET 8 link, and select the correct installer for your operating system. For example, if you're using Windows 11, and a modern processor, select the x64 .NET 8 SDK for Windows.
After the download is complete, run the installer and follow the instructions. In a terminal window, run the following command to verify that the installation was successful:
dotnet --version
You should see the version number of the .NET SDK you installed. For example:
8.0.300-preview.24203.14
Install Visual Studio 2022 Preview
Follow this Visual Studio 2022 Preview link, and select Download Preview. After the download is complete, run the installer and follow the instructions.
Install Docker Desktop
Follow this Docker Desktop link, and select the correct installer for your operating system. After the download is complete, run the installer and follow the instructions. For the best performance and compatibility, use the WSL 2 backend.
Open the Docker Desktop application and accept the service agreement.
Install the .NET Aspire workload in Visual Studio
Install the .NET Aspire workload using the .NET CLI:
Open a terminal.
Update .NET workloads with this command:
dotnet workload updateYou should see a message that the workloads are updated successfully.
No workloads installed for this feature band. To update workloads installed with earlier SDK versions, include the --from-previous-sdk option.
Updated advertising manifest microsoft.net.sdk.ios.
Updated advertising manifest microsoft.net.workload.mono.toolchain.net6.
Updated advertising manifest microsoft.net.sdk.android.
Updated advertising manifest microsoft.net.workload.emscripten.net7.
Updated advertising manifest microsoft.net.workload.emscripten.net6.
Updated advertising manifest microsoft.net.sdk.macos.
Updated advertising manifest microsoft.net.workload.emscripten.current.
Updated advertising manifest microsoft.net.workload.mono.toolchain.current.
Updated advertising manifest microsoft.net.sdk.maui.
Updated advertising manifest microsoft.net.workload.mono.toolchain.net7.
Updated advertising manifest microsoft.net.sdk.maccatalyst.
Updated advertising manifest microsoft.net.sdk.tvos.
Updated advertising manifest microsoft.net.sdk.aspire.
No workloads installed for this feature band. To update workloads installed with earlier SDK versions, include the --from-previous-sdk option.

Successfully updated workload(s): .
Install the .NET Aspire workload with this command:
dotnet workload install aspireYou should see a message that the Aspire workload is installed.
Installing Aspire.Hosting.Sdk.Msi.x64 ...... Done
Installing Aspire.ProjectTemplates.Msi.x64 ..... Done
Installing Aspire.Hosting.Orchestration.win-x64.Msi.x64 ............. Done
Installing Aspire.Hosting.Msi.x64 ..... Done
Installing Aspire.Dashboard.Sdk.win-x64.Msi.x64 ....... Done

Successfully installed workload(s) aspire.
Verify that the .NET Aspire workload is installed with this command:
dotnet workload listYou should see the details of the .NET Aspire workload.
 Installed Workload Id      Manifest Version      Installation Source
---------------------------------------------------------------------------------------------
aspire                     8.0.0/8.0.100         SDK 8.0.300-preview.24203, VS 17.10.34902.84

Use `dotnet workload search` to find additional workloads to install.
Clone project
Let's use git to obtain a sample app, which doesn't yet use a message broker:
In the command line, browse to a folder of your choice where you can work with code.
Execute the following command to clone the sample application:
git clone -b aspire-rabbitmq https://github.com/MicrosoftDocs/mslearn-aspire-starter
Create the RabbitMQ container
Let's start by adding RabbitMQ to the app host project. When we start the solution, .NET Aspire adds a RabbitMQ container to the app and passes references to the projects that use it:
Start Visual Studio, and select Open a project or solution.
Navigate to the folder where you cloned the project.
Double-click the start folder, select the eShop.rabbitmq.sln solution, and then select Open.
In Solution Explorer, right-click the eShop.AppHost project, select Add, and then select .NET Aspire package.
In the search textbox, at the end of the existing text, type RabbitMQ.
Select Aspire.Hosting.RabbitMQ package.
In the Version list, select the latest 8.0.0 version, and then select Install.
If the Preview Changes dialog appears, select Apply.
In the License Acceptance dialog, select I Accept.
In Solution Explorer, expand eShop.AppHost and then double-click Program.cs.
Locate the following line of code:
var builder = DistributedApplication.CreateBuilder(args);Immediately after that code, to register a RabbitMQ server, add this code:
var messaging = builder.AddRabbitMQ("messaging");Locate the following code, which registers the Catalog.API project for .NET Aspire orchestration:
var catalogApi = builder.AddProject<Catalog_API>("catalog-api")
    .WithReference(catalogDb);
To pass the RabbitMQ service to the Catalog.API project, alter that code to match this code:
var catalogApi = builder.AddProject<Catalog_API>("catalog-api")
    .WithReference(catalogDb)
    .WithReference(messaging);
Add RabbitMQ to the Catalog.API project
Now, we can install and configure RabbitMQ in the Catalog.API project:
In Visual Studio, in Solution Explorer, right-click the Catalog.API project, select Add, and then select .NET Aspire package.
In the search textbox, at the end of the existing text, type RabbitMQ.
Select the Aspire.RabbitMQ.Client package.
In the Version list, select the latest 8.0.0 version, and then select Install.
If the Preview Changes dialog appears, select Apply.
In the License Acceptance dialog, select I Accept.
In Solution Explorer, expand the Catalog.API project, and then double-click Program.cs.
In the Program.cs file, locate the following line of code:
var builder = WebApplication.CreateBuilder(args);Immediately after that line, to register the RabbitMQ connection, add this code:
builder.AddRabbitMQClient("messaging");
Send a message to a RabbitMQ queue
When a user requests the items in the catalog, we want to send a message to a RabbitMQ queue that describes the request details. Let's add that code now:
In the Solution Explorer, expand Catalog.API > Apis and then double-click CatalogApi.cs.
Locate the following code, which declares the
GetAllItems()method:public static async Task<Results<Ok<PaginatedItems<CatalogItem>>, BadRequest<string>>> GetAllItems( [AsParameters] PaginationRequest paginationRequest, [AsParameters] CatalogServices services) {To use dependency injection to obtain the connection to RabbitMQ, modify the code to match the following lines:
public static async Task<Results<Ok<PaginatedItems<CatalogItem>>, BadRequest<string>>> GetAllItems(
    [AsParameters] PaginationRequest paginationRequest,
    [AsParameters] CatalogServices services,
    RabbitMQ.Client.IConnection connection)
{
Locate the following line of code:
var totalItems = await services.DbContext.CatalogItems
    .LongCountAsync();
Immediately after that line, to create a RabbitMQ messaging channel, add this code:
var channel = connection.CreateModel();On the next line, to create a message queue, add this code:
channel.QueueDeclare(queue: "catalogEvents",
                     durable: false,
                     exclusive: false,
                     autoDelete: false,
                     arguments: null);
On the next line, to send the message, add this code:
var body = Encoding.UTF8.GetBytes("Getting all items in the catalog.");

channel.BasicPublish(exchange: string.Empty,
                     routingKey: "catalogEvents",
 					 mandatory: false,
                     basicProperties: null,
                     body: body);
Add a message consumer project
To receive messages from the RabbitMQ queue, let's create a new project:
In Solution Explorer, right-click the solution, point to Add, and then select New Project.
In the Search for templates textbox, type Console.
Select the C# Console App template and then select Next.
In the Project name textbox, type RabbitConsumer and then select Next.
In the Framework list, ensure that .NET 8.0 is selected, and then select Create.
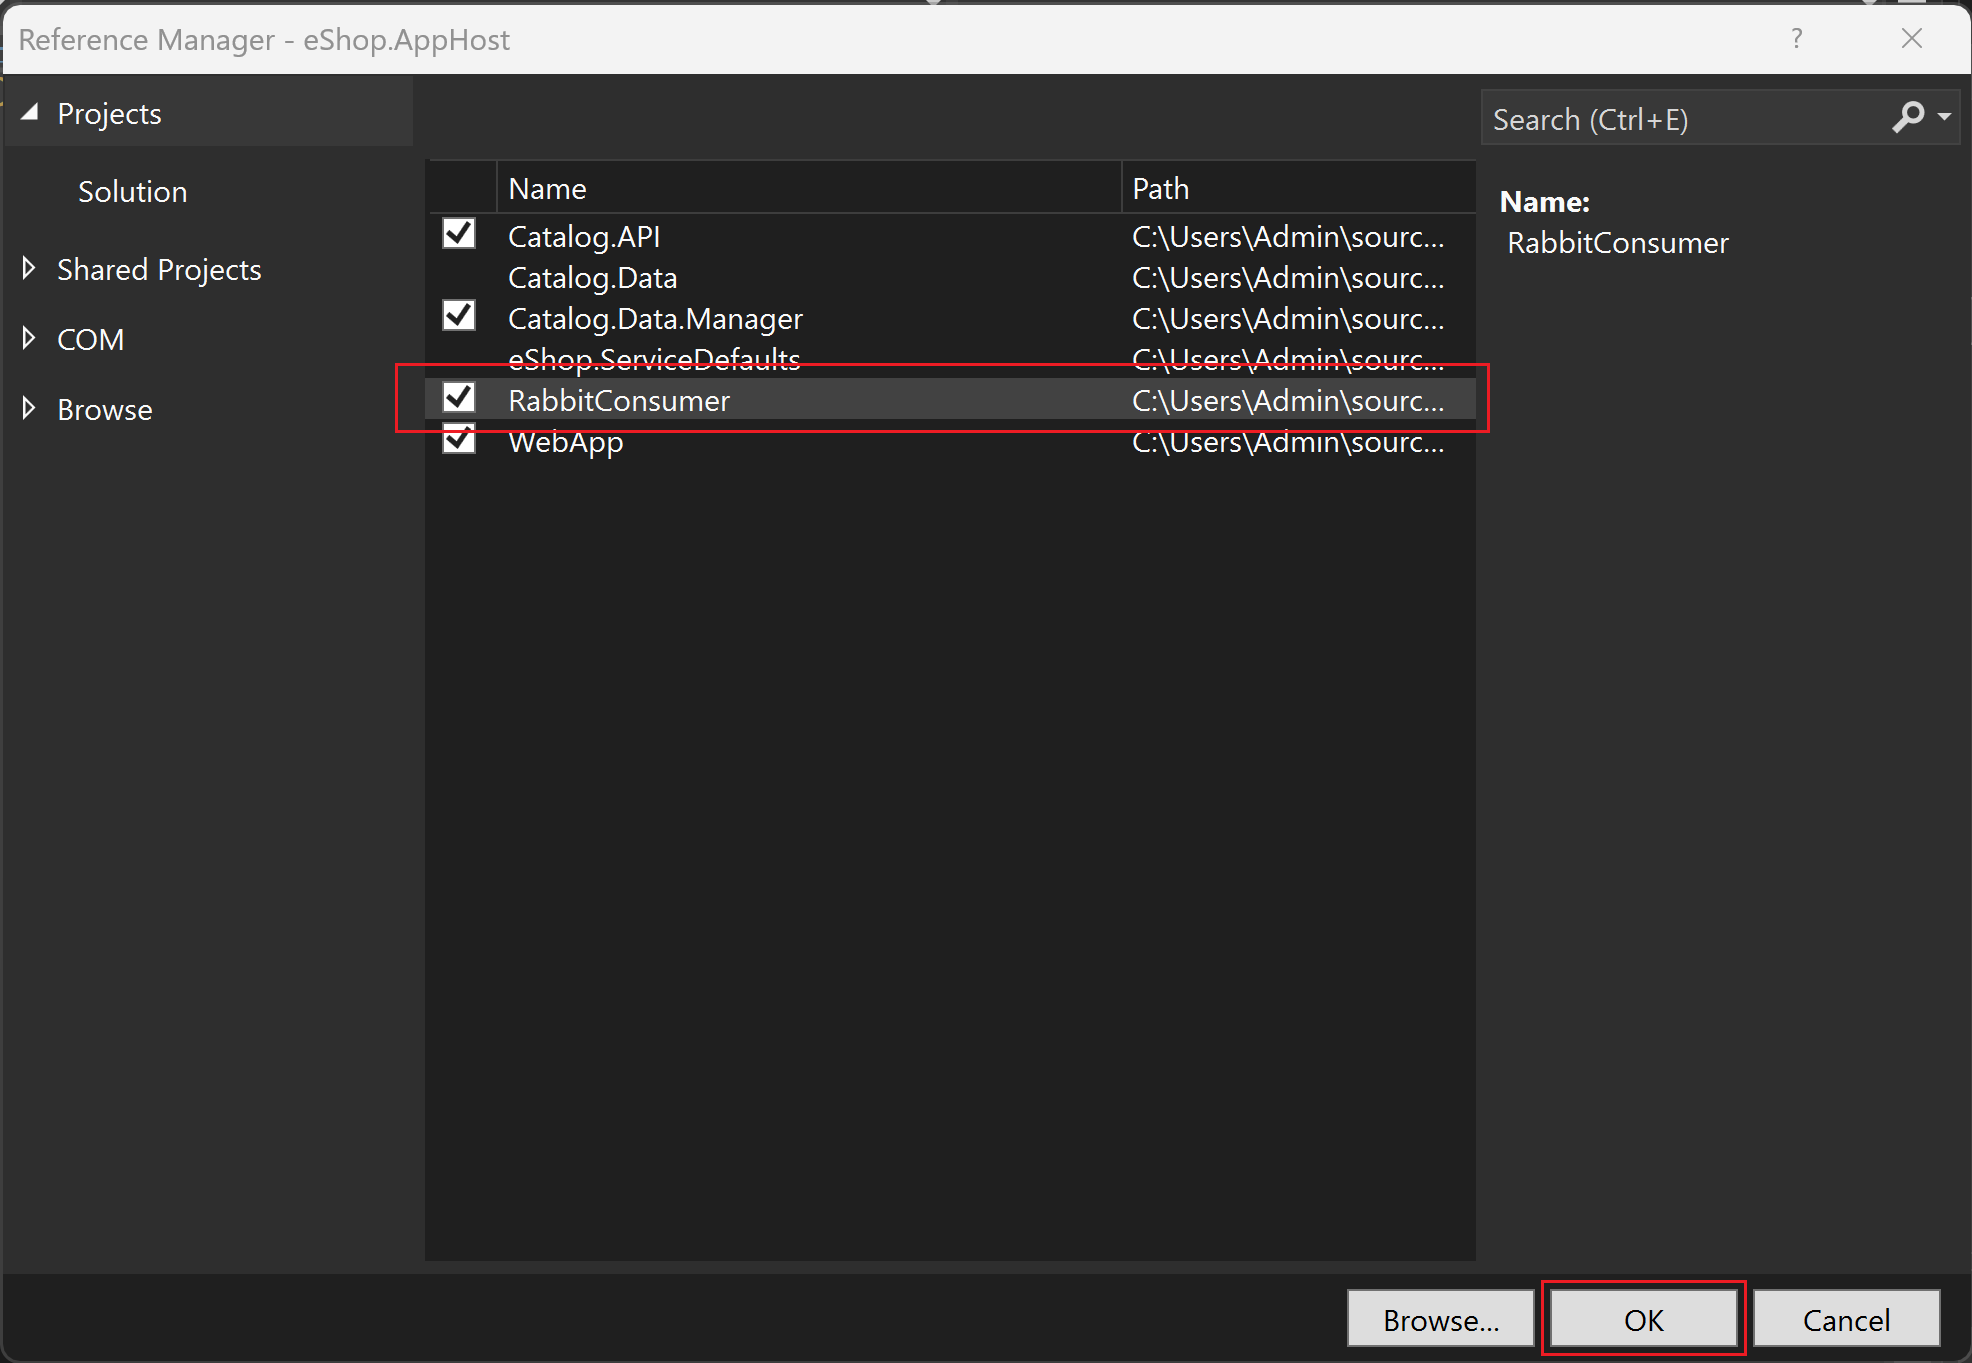
In Solution Explorer, right-click the AppHost project, point to Add, and then select Project Reference.
In the list of projects, ensure that RabbitConsumer is selected, and then select OK.
In Solution Explorer, expand AppHost and then double-click Program.cs.
Locate the following code:
builder.AddProject<WebApp>("webapp")
    .WithReference(catalogApi);
Immediately after that code, to add the RabbitConsumer project to .NET Aspire orchestration, add the following code:
builder.AddProject<Projects.RabbitConsumer>("consumers")
    .WithReference(messaging);
Configure the message consumer project
Before we can receive messages in the new message consumer project, we must configure it to use the RabbitMQ backing service from the AppHost:
In Visual Studio, in Solution Explorer, right-click the RabbitConsumer project, select Add, and then select .NET Aspire package.
In the search textbox, at the end of the existing text, type RabbitMQ.
Select the Aspire.RabbitMQ.Client package.
In the Version list, select the latest 8.0.0 version, and then select Install.
If the Preview Changes dialog appears, select Apply.
In the License Acceptance dialog, select I Accept.
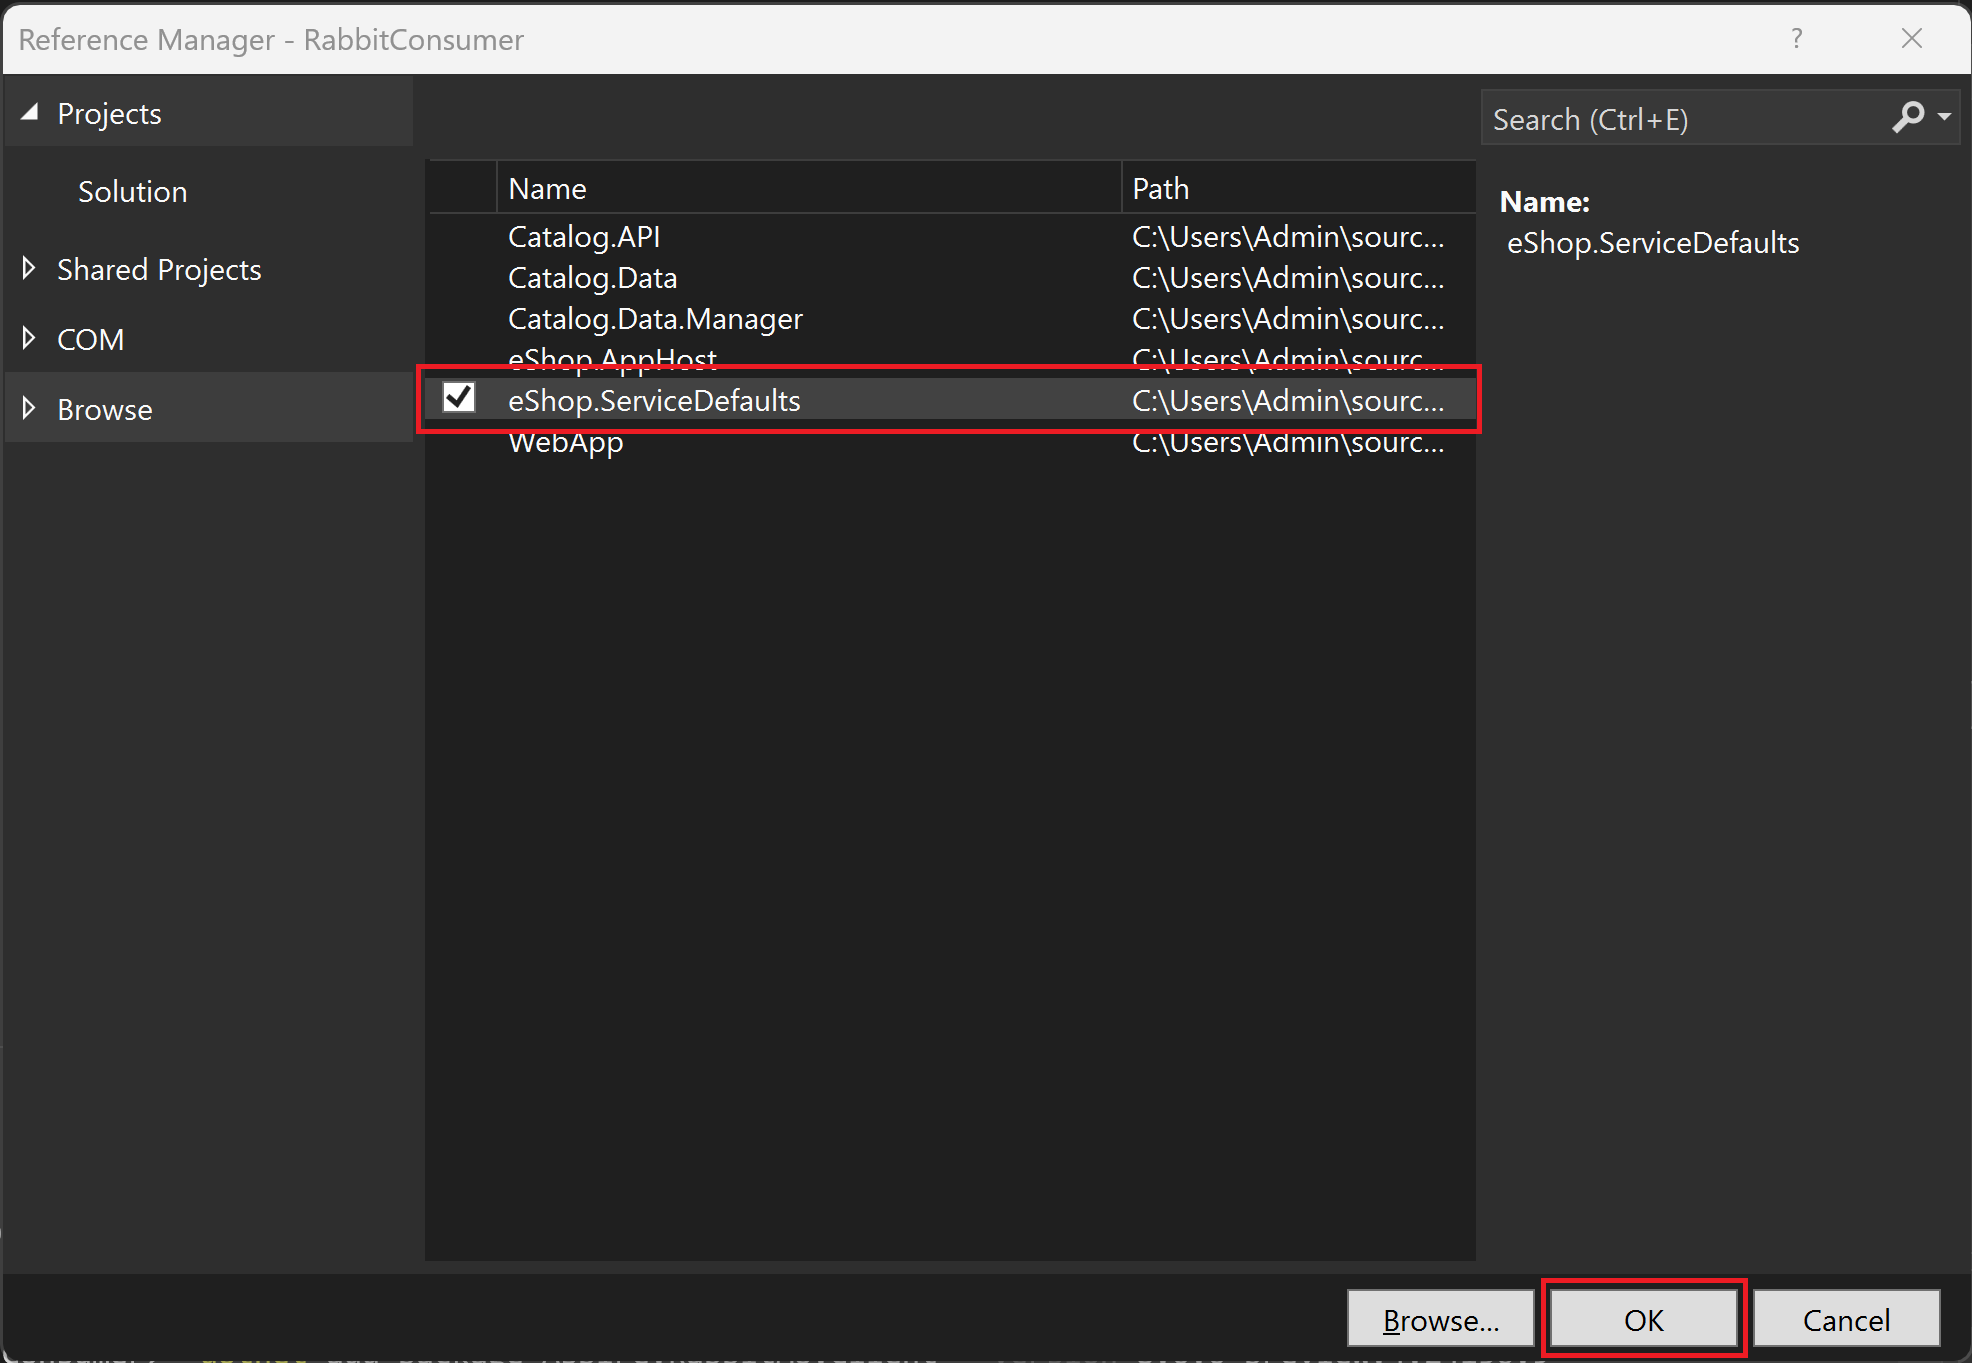
In Solution Explorer, right-click the RabbitConsumer project, point to Add, and then select Project Reference.
In the list of projects, ensure that eShop.ServiceDefaults is selected, and then select OK.
In Solution Explorer, expand the RabbitConsumer project, and then double-click Program.cs.
Remove all the default code and replace it with the following lines:
using Microsoft.Extensions.DependencyInjection;
using Microsoft.Extensions.Hosting;

var builder = Host.CreateApplicationBuilder(args);

builder.AddServiceDefaults();

builder.AddRabbitMQClient("messaging");

var host = builder.Build();

host.Run();
Notice that the code uses .NET Aspire orchestration to add the RabbitMQ service to the consumer project. You'll use that service to retrieve messages.
Receive a RabbitMQ message
To receive a message, we must create a integration that runs in the background waiting for messages to arrive. Use a BackgroundService class for this task:
In Solution Explorer, right-click the RabbitConsumer project, point to Add and then select Class.
In the Name textbox, type CatalogProcessingJob and then select Add.
In the CatalogProcessingJob.cs class, remove all the default code, and replace it with the following lines:
 namespace RabbitConsumer;

using System.Text;
using Microsoft.Extensions.Configuration;
using Microsoft.Extensions.DependencyInjection;
using Microsoft.Extensions.Hosting;
using Microsoft.Extensions.Logging;
using RabbitMQ.Client;
using RabbitMQ.Client.Events;

public class CatalogProcessingJob : BackgroundService
{
    private readonly ILogger<CatalogProcessingJob> _logger;
    private readonly IConfiguration _config;
    private readonly IServiceProvider _serviceProvider;
    private IConnection? _messageConnection;
    private IModel? _messageChannel;
 	private EventingBasicConsumer consumer;

    public CatalogProcessingJob(ILogger<CatalogProcessingJob> logger, IConfiguration config, IServiceProvider serviceProvider, IConnection? messageConnection)
    {
        _logger = logger;
        _config = config;
        _serviceProvider = serviceProvider;
    }

    protected override Task ExecuteAsync(CancellationToken stoppingToken)
    {
        string queueName = "catalogEvents";

        _messageConnection = _serviceProvider.GetRequiredService<IConnection>();

        _messageChannel = _messageConnection.CreateModel();
        _messageChannel.QueueDeclare(queue: queueName,
            durable: false,
            exclusive: false,
            autoDelete: false,
            arguments: null);

        consumer = new EventingBasicConsumer(_messageChannel);
        consumer.Received += ProcessMessageAsync;

        _messageChannel.BasicConsume(queue:  queueName,
            autoAck: true,
            consumer: consumer);

        return Task.CompletedTask;
    }

    public override async Task StopAsync(CancellationToken cancellationToken)
    {
        await base.StopAsync(cancellationToken);
        consumer.Received -= ProcessMessageAsync;
        _messageChannel?.Dispose();
    }

    private void ProcessMessageAsync(object? sender, BasicDeliverEventArgs args)
    {

        string messagetext = Encoding.UTF8.GetString(args.Body.ToArray());
        _logger.LogInformation("All products retrieved from the catalog at {now}. Message Text: {text}", DateTime.Now, messagetext);

        var message = args.Body;
    }
}
In Solution Explorer, in the RabbitConsumer project, double-click Program.cs.
Locate the following code:
builder.AddRabbitMQClient("messaging");Immediately after that line, add the following code:
builder.Services.AddHostedService<CatalogProcessingJob>();
Test the solution
Let's test our RabbitMQ backing service and the microservices that send and receive messages:
In Visual Studio, to start the app in debugging mode, press F5 or select Debug > Start Debugging.
If the Start Docker Desktop message appears, select Yes. The app starts and displays the .NET Aspire dashboard in a browser tab.
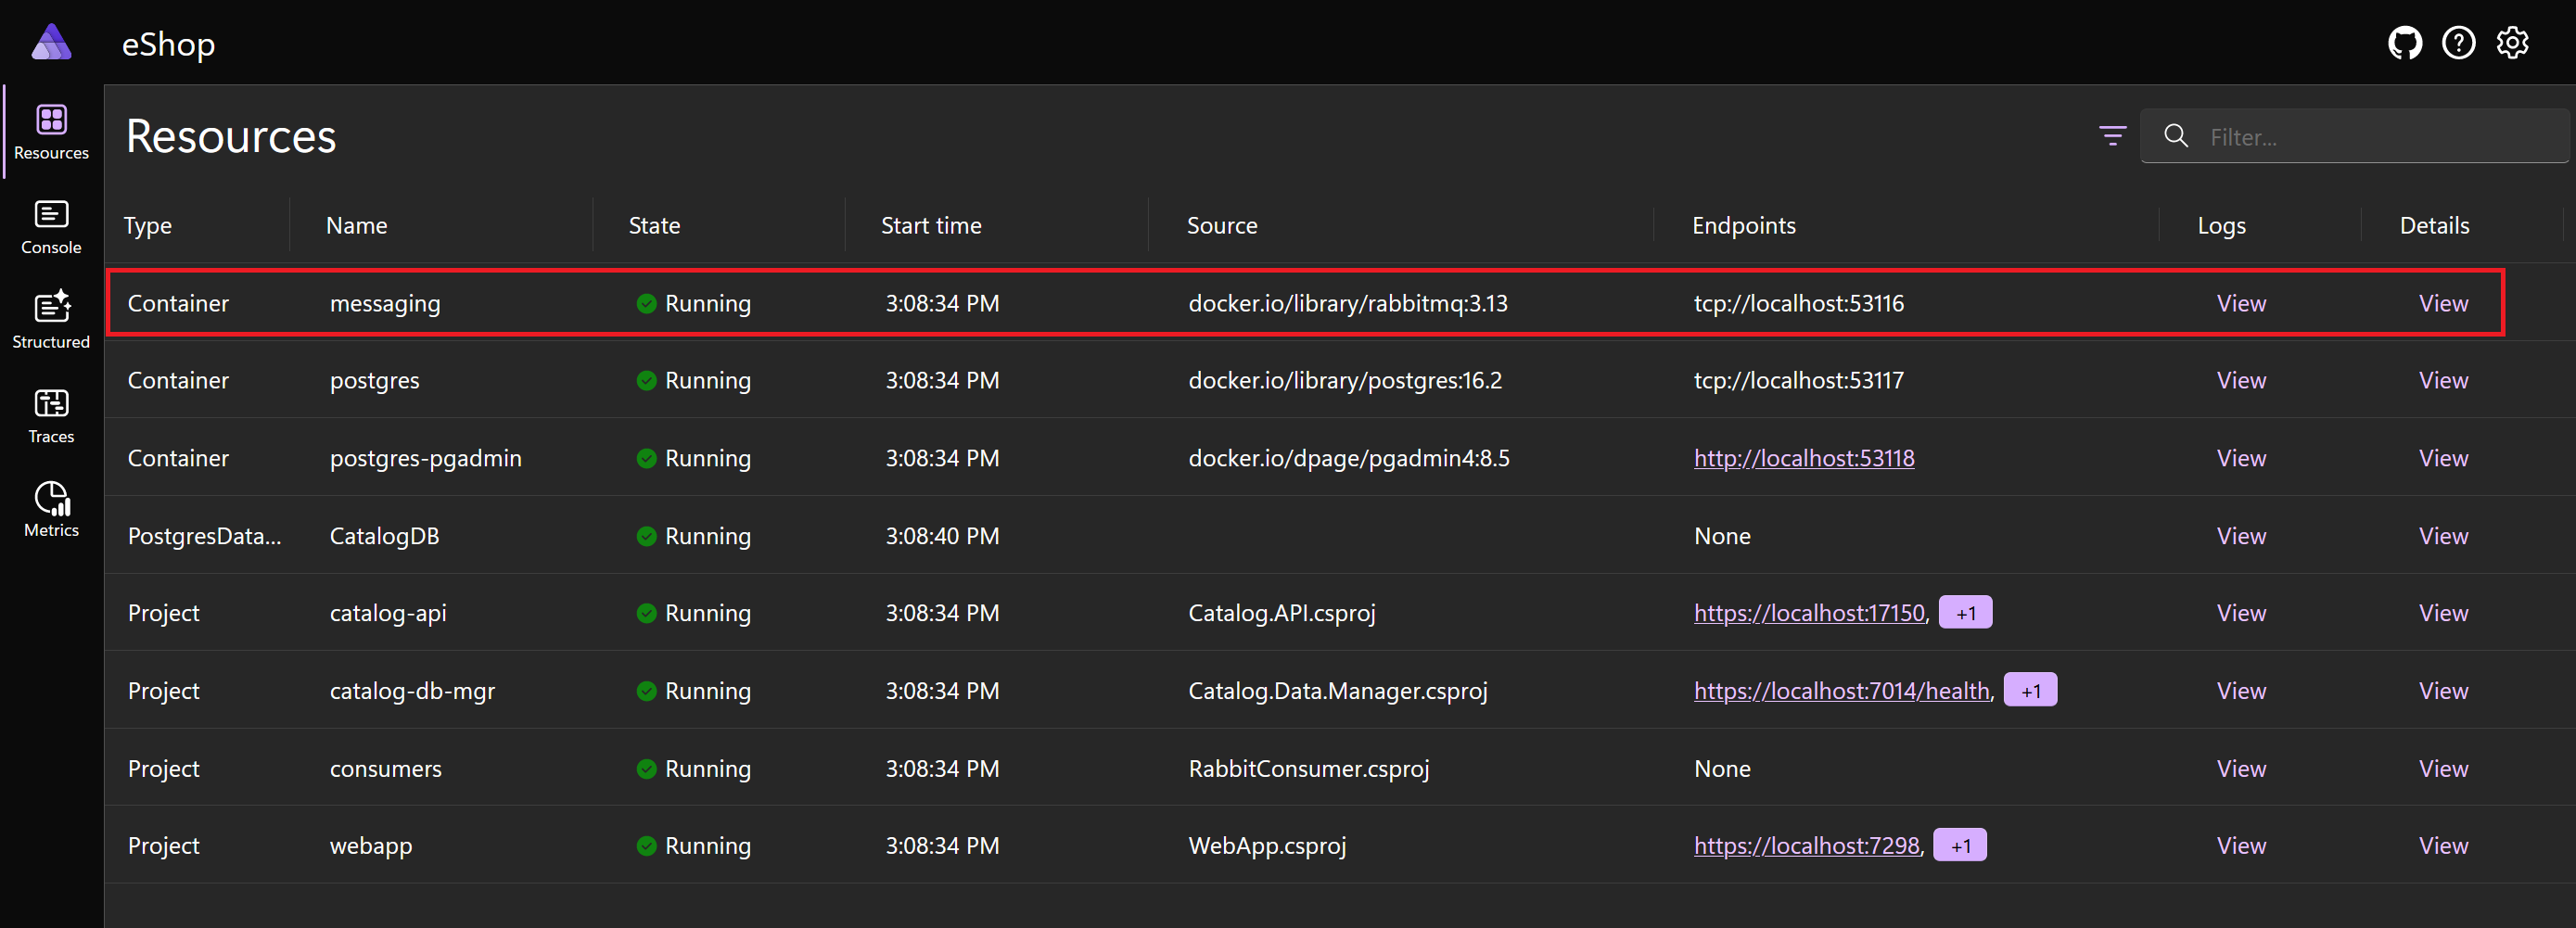
In the .NET Aspire dashboard, in the list of Resources, notice that the list includes a new container with the name messaging. The source includes rabbitmq:3. This container runs the RabbitMQ message broker.
In the navigation on the left, select Console.
In the Select a resource list, select messaging. The page displays the console logs for the RabbitMQ broker. Notice that the last few messages indicate that RabbitMQ completed its startup and accepted one connection. This connection is from the receiving RabbitConsumer project.
In the navigation on the left, select Resources.
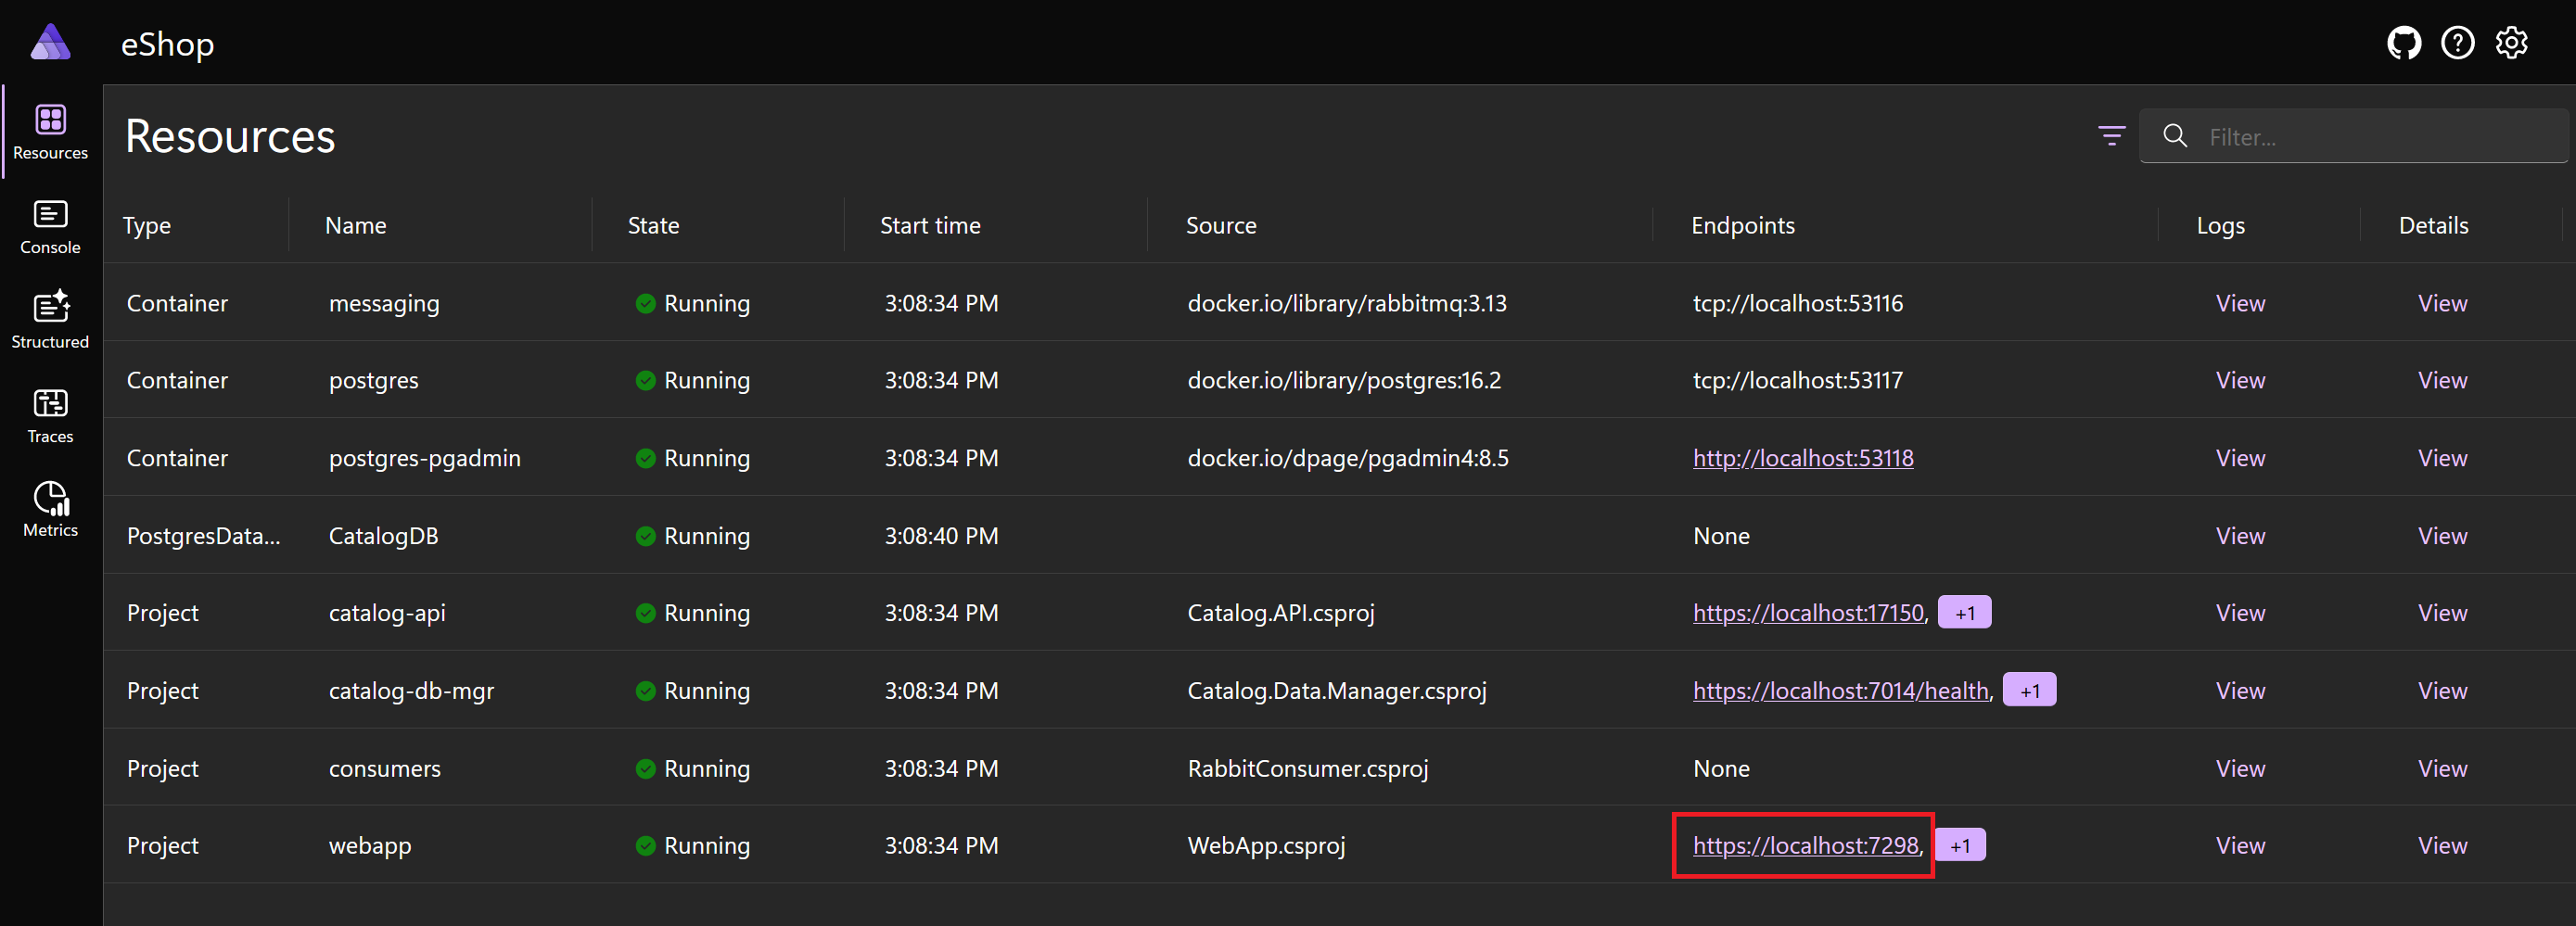
In the line for the webapp project, in the Endpoints column, select one of the links. The Northern Traders homepage opens and displays the product catalog. This page sends a message to the RabbitMQ queue.
Switch back to the .NET Aspire dashboard. In the navigation on the left, select Console.
In the Select a resource list, select messaging. Notice that RabbitQ has accepted a second connection. This connection is from the Catalog.API project.
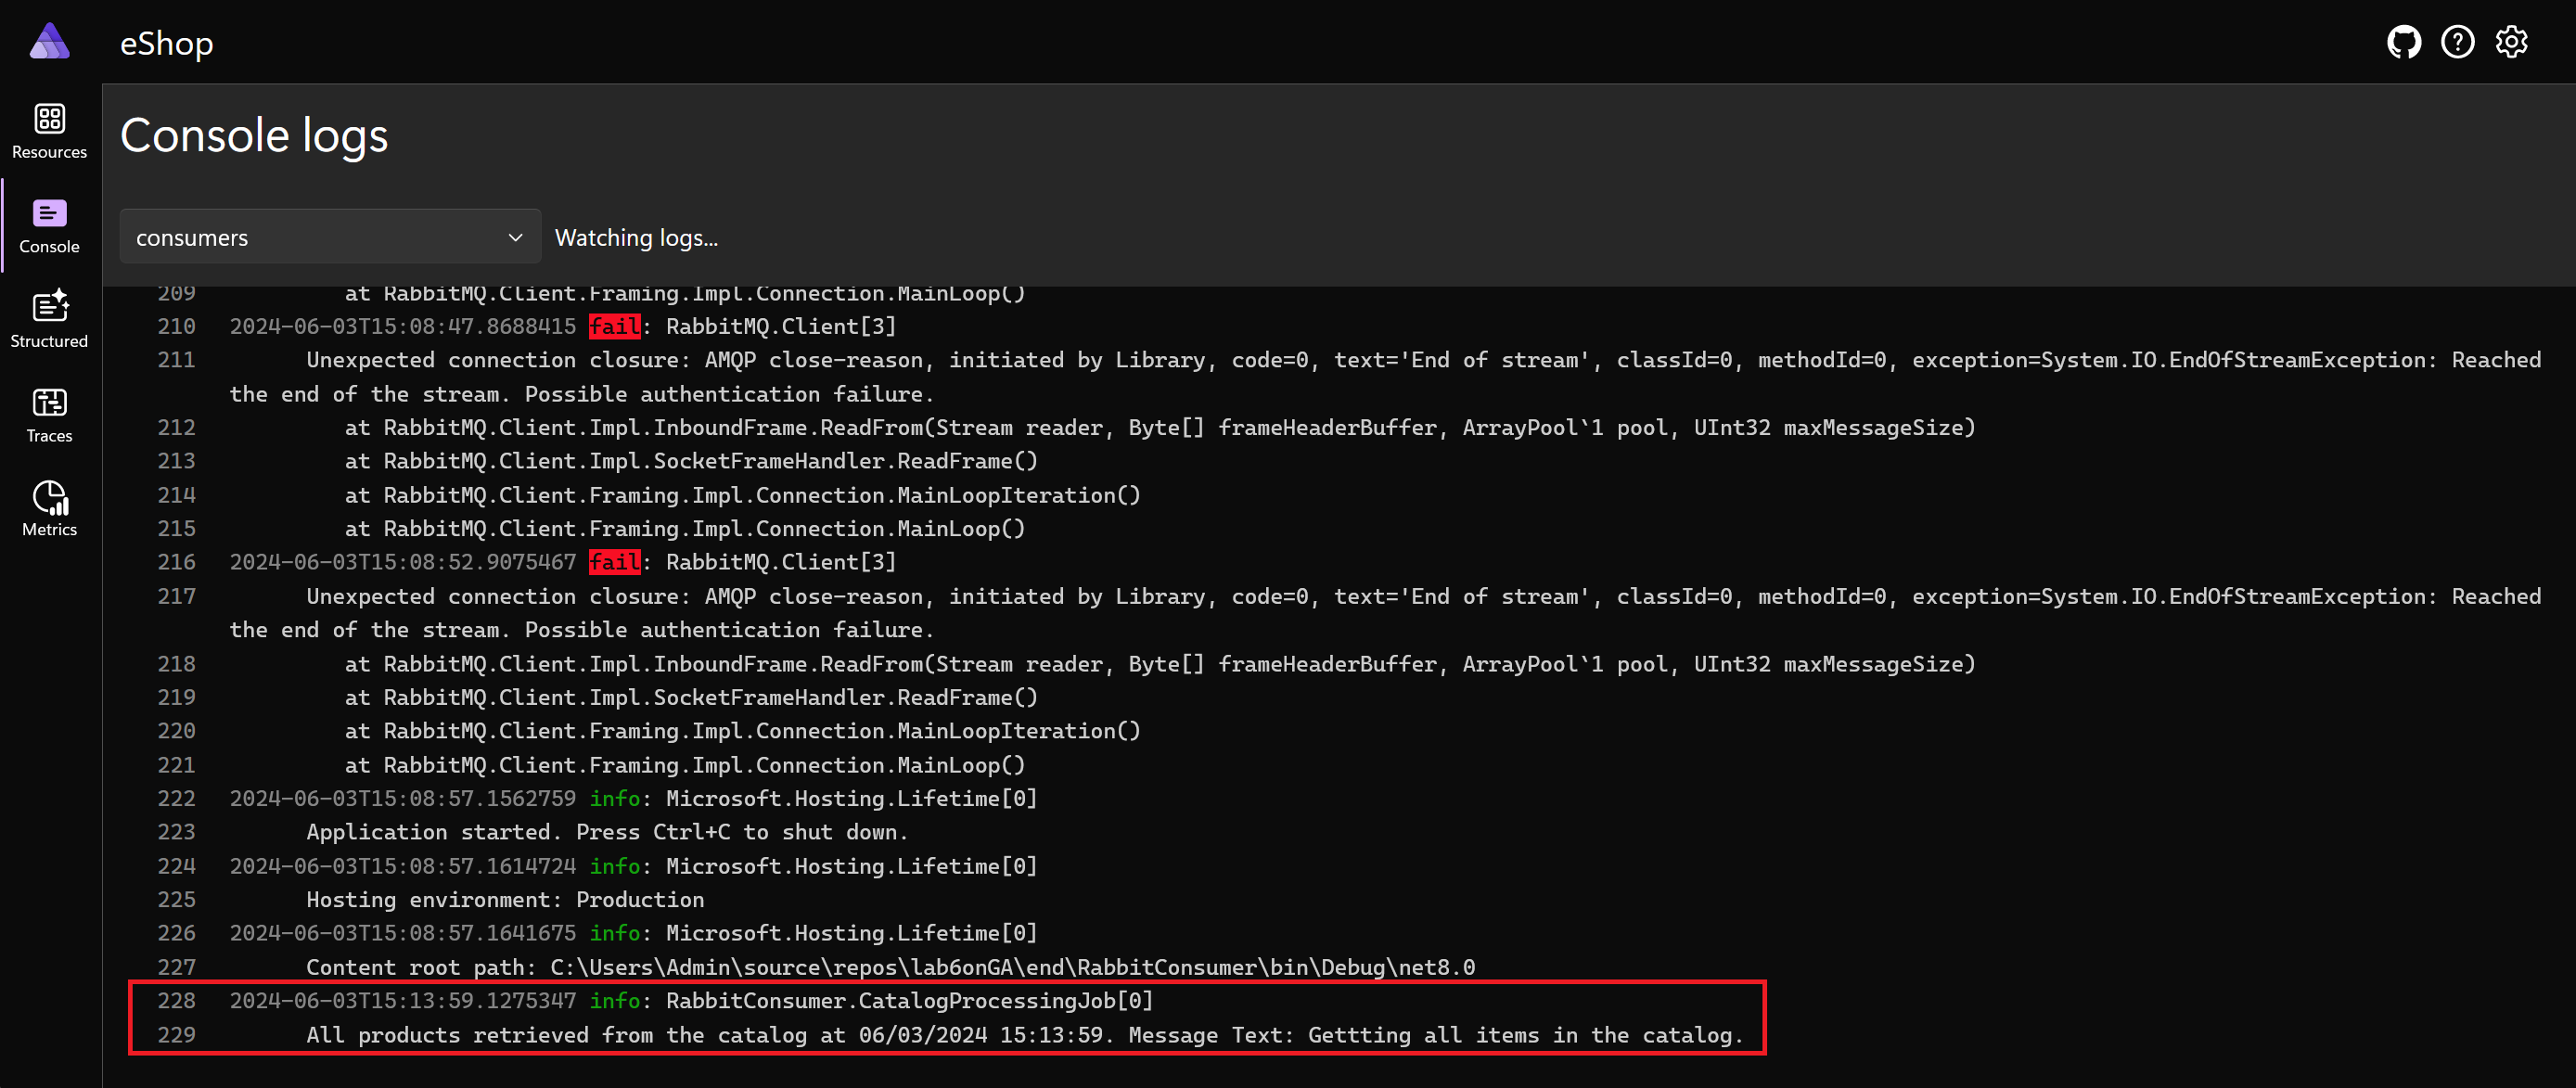
In the Select a resource list, select consumers. This log is for the RabbitConsumer project. The final entry displays the message "Getting all items in the catalog." This message has been retrieved from the RabbitMQ and logged.
