Describe knowledge base connections
Knowledge base connections, a feature of Microsoft Security Copilot currently in preview, allows you to integrate your organization’s knowledge base as another source of information. The inclusion of knowledge bases gives Copilot more context, resulting in responses that are more relevant, specific, and customized to your organization.
There are two ways to integrate a knowledge base into Copilot:
- Azure AI Search plugin
- File upload
File upload
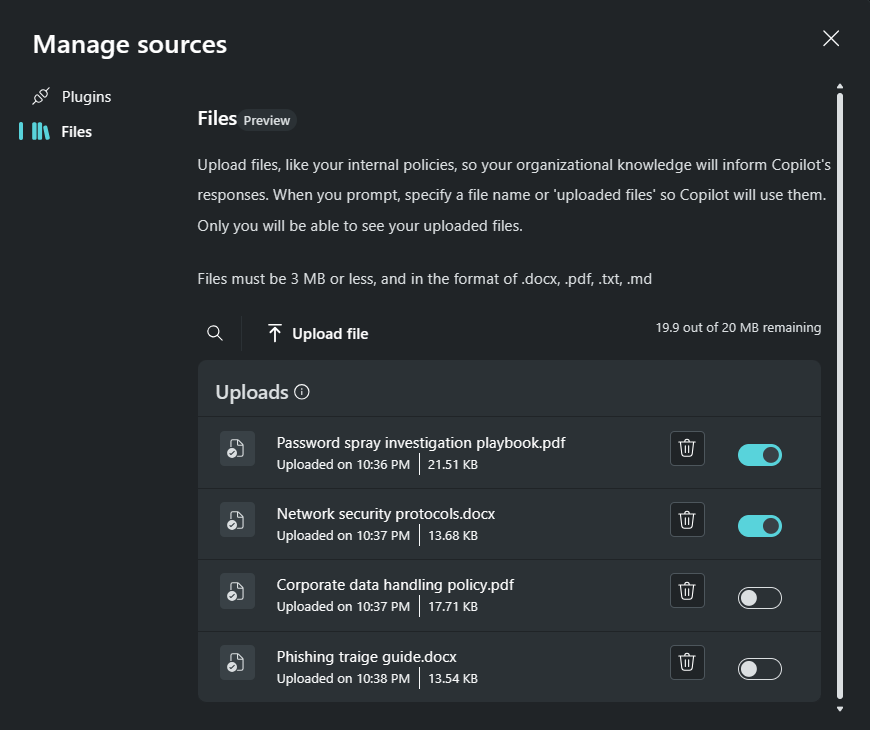
You can upload a file in Microsoft Security Copilot to allow Copilot to refer to the contents of the file for responses when you prompt Copilot for your "uploaded files" or by using the file’s name.
To upload a file, the steps are as follows:
Navigate to the file upload page by selecting the sources icon
 in the prompt bar then selecting files from the Manage sources page.
Select Upload file to look for your file. Check that the file you're about to upload is a common text file type like DOCX, MD, PDF, and TXT formats, and that each file doesn't exceed 3 MB. You can upload files, one at a time, as long as the maximum capacity for all the uploaded files doesn't exceed the maximum of 20 MB in total.
Wait for the file to appear in Uploads. If an error message appears, correct the problem, and try again.
Note
Uploaded files are only available to the user account that uploaded them. Uploaded files are stored like the rest of customer data as described in Privacy and data security in Microsoft Security Copilot.
To include the file as a source in your current session, select the toggle button so it's lit up (the circle inside the toggle button is in the rightmost position). If you aren't going to use the file yet, or want to exclude it as a source in your current session, select the toggle button so it's greyed out (the circle inside the toggle button is in the leftmost position).
To prompt using the uploaded file, you need to mention "uploaded files" if you want Copilot to reason over your available files. You can also include the file name if you would like to guide Copilot to reason over a specific file. For example, if you want Copilot to check a user account's actions against your organization's data handling policies to find out if any violations were committed, a sample prompt would be:
Based on the Contoso Data Handling Policy file, list any actions taken by user Preston-123 that might be a violation of the data handling policies. Include a verdict to the action and level of confidence of the verdict. Cite the policy name and section applicable to the verdict.
Delete a file
To delete a file, select the trash icon next to the file name to delete the file.
Restricting file upload (for owners)
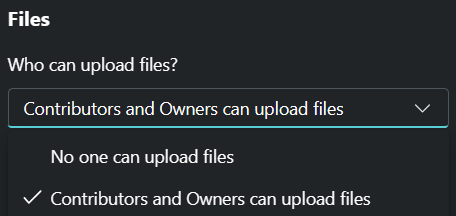
Users assigned the Owner role can choose who are allowed to upload files in owner settings. The options are:
- No one can upload files
- Contributors and Owners can upload files
By default, file upload is available for all users (Contributors and Owners).
Azure AI Search plugin
Azure AI Search is a service that enables you to effectively search, retrieve information, and extract insights from your content, securely and at scale. Common scenarios for using this type of service include document search, data exploration, and chat-style Copilot apps over proprietary data. These use cases are enabled through indexing and querying.
Indexing in Azure AI Search is the process of loading content into your search service and making it searchable. The index is the searchable result of the indexing process.
Querying can happen once an index is populated with searchable content. Your client app sends query requests to a search service and handles responses. All query execution is over a search index that you control.
Through the Azure AI Search plugin, you can bring your own index as a searchable source that you can query using prompts in the Copilot prompt bar.
Before you set up the connection to your existing Azure AI index, verify the following requirements:
- The Azure AI Search index is set up for vectorization for use with the text-embedding-ada-002 model.
- The text field in your index must be searchable.
- The title field in your index must be filterable.
One way to get started with setting up an index in the required way is to use integrated vectorization. Refer to Quickstart: Integrated vectorization (preview).
To create the connection to an existing Azure AI Search index, configure the Azure AI Search plugin as follows:
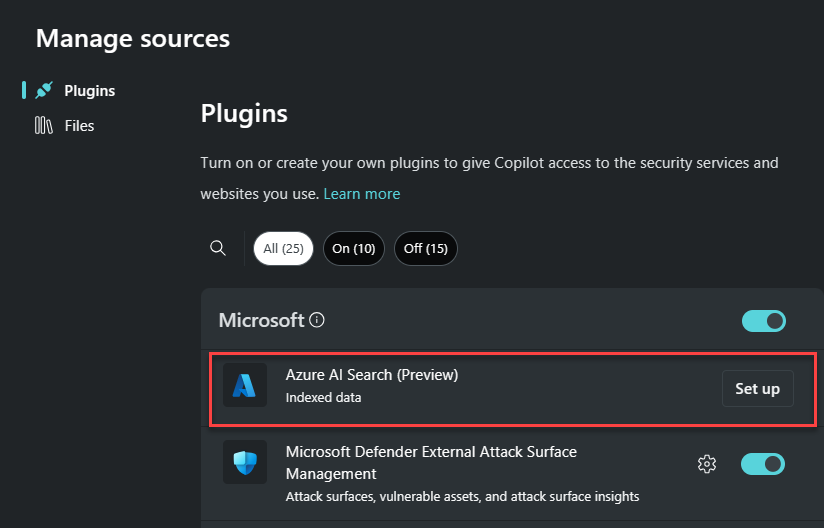
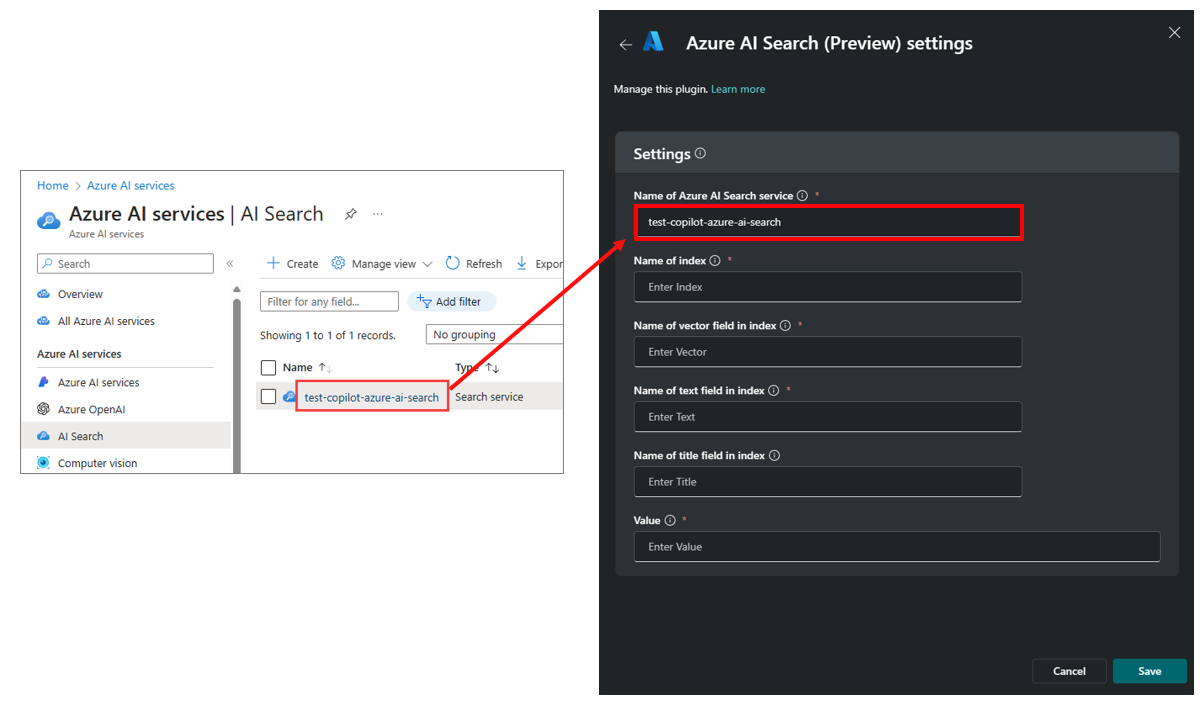
Navigate to the setup page for Azure AI Search plugin by selecting the sources icon, selecting plugins, then from the manage plugins windows, selecting the Azure AI Search setup button.
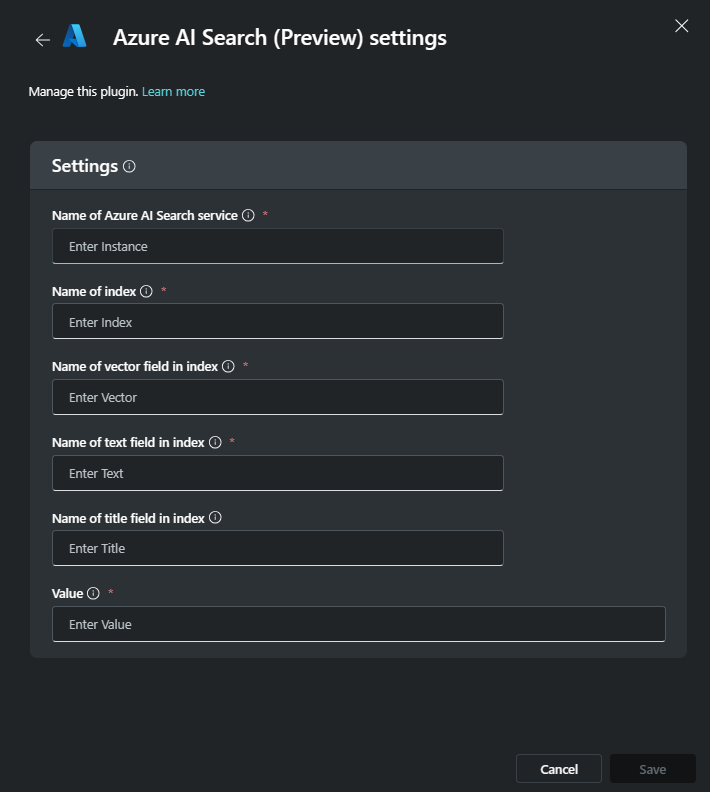
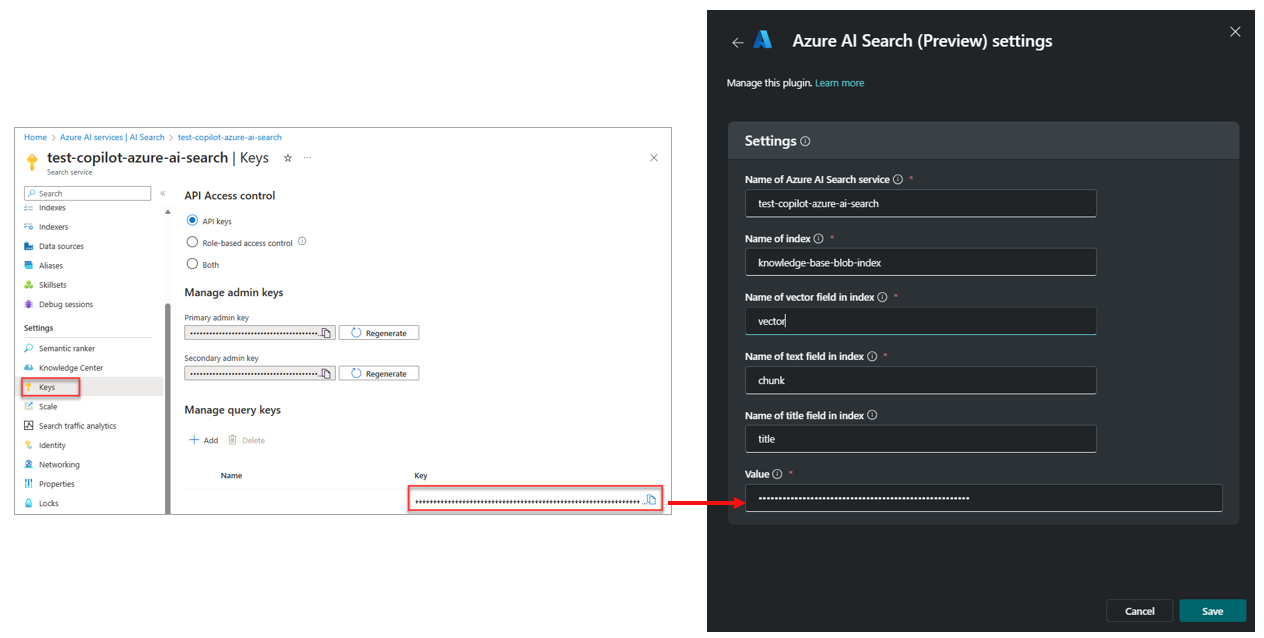
The parameters that you configure for the plugin map to information for the Azure AI Search instance, the index within the search instance that will be searched, and the fields associated with the index.
- Name of Azure AI Search service – This is the name of your search service.
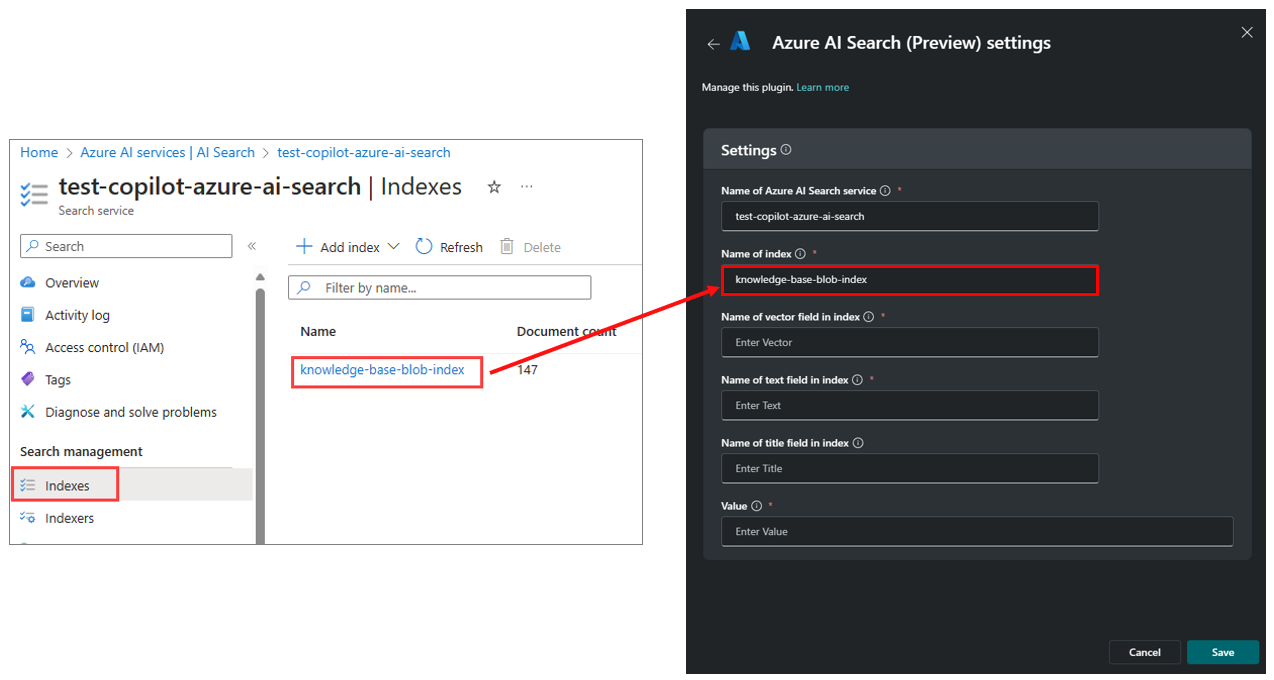
- Name of index – This is the name of the index, within your Azure AI search instance, that will be searched.
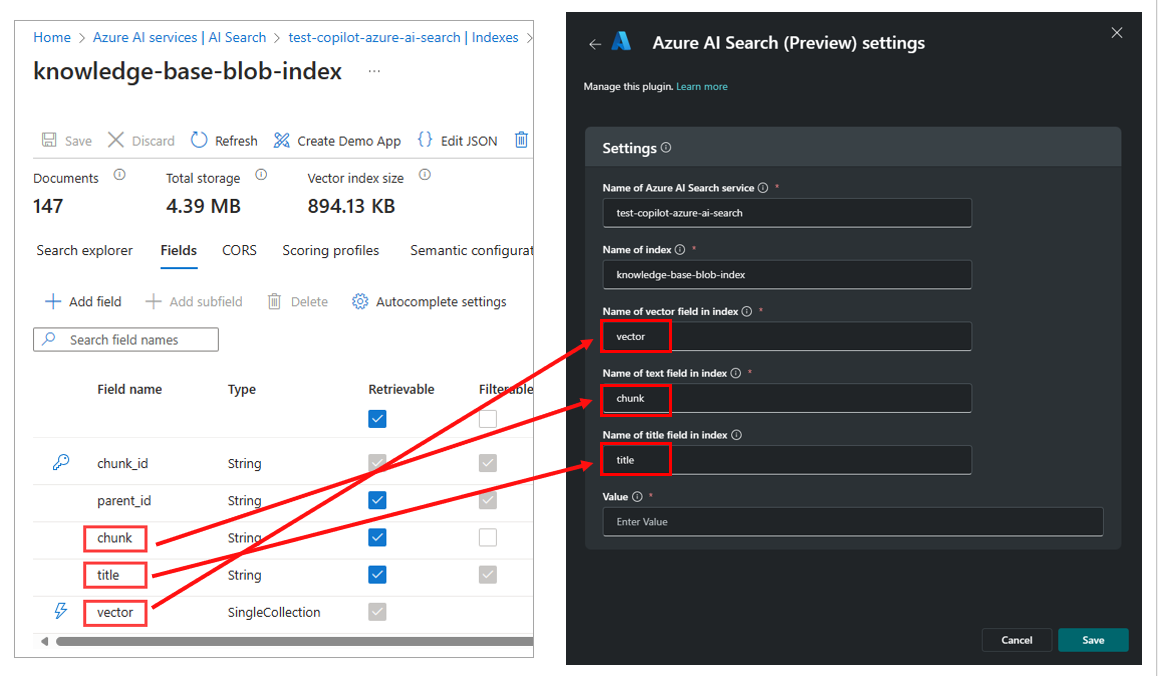
- Name of vector field in index – This is the name of the field in the index containing the vector of embeddings.
- Name of text field in index – This is the name of the text field in the index. The contents of this field, in your index, represents the text to search. If your index was created using the Import and vectorize data wizard, the name of the field containing the text to search may be referred to as chunk, as a default. The reason is that the wizard will chunk your data so that it doesn't exceed the token limit size of the embedding model. The default index field name, chunk, is referring to a chunk of text.
- Name of title field in index – This is the name of the title field in the index and represents the title of each document to display as a source (optional).
- Value – This is the access identifier for API authentication.
To obtain the information that you'll use for the plugin settings, you need to go to the Azure portal. Open a new browser tab to go to the Azure portal (https://portal.azure.com).
From the Azure portal, search for and navigate to Azure AI Search.
The AI Search page lists the search services. From here, you select the search instance you want the plugin to connect to. Before you select it, copy the name and enter it in Azure AI Search service field for the plugin. Copy the name and enter it in the plugin field select the search service.
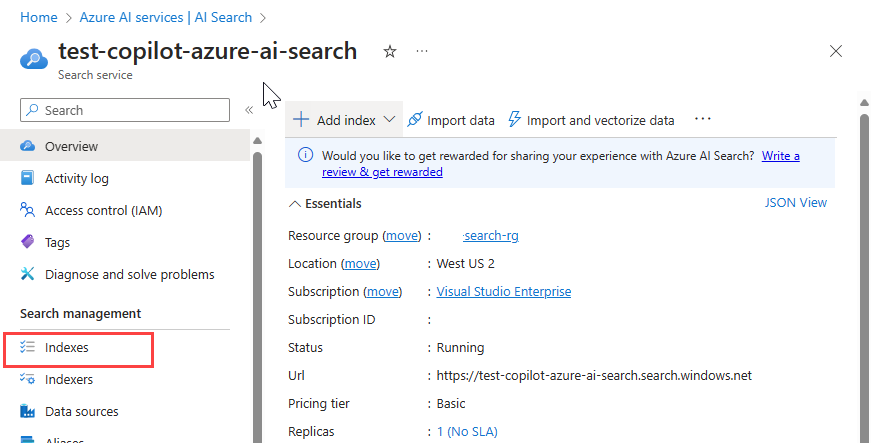
Select the search service whose name you entered in plugin settings page.
From the left navigation pane, select Indexes.
The indexes page lists the available indexes for a given Azure AI Search service. From the indexes page, copy the name of the index you want to Copilot to search and enter it into the index name field for the plugin.
Select the index whose name you entered in the plugin settings page. This opens the index page. From here, select the fields tab.
The fields tab shows the field names for the index. The field names for the example index named "knowledge-base-bloc-index" and shown in the image that follows may be different than what is shown for your index. Work with the admin who manages your Azure AI Search service for guidance, as needed.
Close the index fields page. Then From the left navigation pane, select Keys.
Copy the "Manage query keys" value for API authentication and enter it in the value field for the plugin, then select save.
Check that all your parameters are correct for the search instance and index you want to connect to then select save.
Important
Currently, Copilot does not validate your credentials when you save your settings. If they are not correct, you will see an error later when Copilot attempts to run the Azure AI Search plugin. Close the Azure AI Search settings window.
Once connected, prompt Copilot to look for information in the Azure AI Search index. Make sure to mention "Azure AI Search" in the prompt. For example:
New SOC analysts can ask Copilot about the organization’s processes within their Copilot workflows. This can speed up the onboarding process. Sample prompt: Summarize my organization’s multifactor authentication policies in Azure AI Search.
SOC analysts can ask Copilot to provide information that helps investigate phishing incidents across large volumes of suspicious emails or files ingested by the index. Sample prompt: What are the most common email subject headings in my Azure AI Search index that were used in suspected business email compromise (BEC) emails?
The Azure AI Search plugin performs a semantic and keyword search across the index's contents to find the relevant information so it's advisable to be as specific as you can in prompting. For more on the elements of an effective prompt and other prompting tips, read Describe the elements of an effective prompt.
