Exercise - Restrict network access
Users connect to your app server to enter orders, update their account, and perform similar activities. The app server in turn updates the database with these changes. Because users have personal data stored in the database, it's critical to ensure that you only allow access from trusted and necessary resources. There are several ways that you can control access to your SQL database over the network.
Firewall rules
Azure SQL Database has a built-in firewall that allows and denies network access to both the database server itself and individual databases. Initially, the SQL Database firewall blocks all public access to your Azure SQL Database. To access a database server, you must specify one or more server-level IP firewall rules that enable access to your Azure SQL Database. You use the IP firewall rules to specify which IP address ranges from the Internet are allowed, and whether Azure applications can attempt to connect to your Azure SQL Database.
Firewall rules are configured at the server or database level. The rules specifically state which network resources are allowed to establish a connection to the database. Depending on the level, the rules you can apply are as follows:
- Server-level firewall rules
- Allow access to Azure services
- IP address rules
- Virtual network rules
- Database-level firewall rules
- IP address rules
Note
SQL Data Warehouse only supports server-level IP firewall rules, and not database-level IP firewall rules.
Take a closer look at how these rules work.
Server-level firewall rules
These rules enable clients to access your entire Azure SQL server, that is, all the databases within the same logical server. There are three types of rules that can be applied at the server level.
The Allow access to Azure services rule allows services within Azure to connect to your Azure SQL Database. When enabled, this setting allows communications from all Azure public IP addresses. This communication includes all Azure Platform as a Service (PaaS) services, such as Azure App Service and Azure Container Service, and Azure VMs that have outbound Internet access. This rule can be configured through the ON/OFF option in the firewall pane in the portal, or by an IP rule that has 0.0.0.0 as the start and end IP addresses.
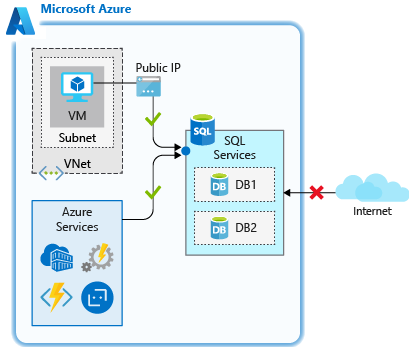
This rule is used when you have applications that run on PaaS services in Azure, such as Azure Logic Apps or Azure Functions that need to access your Azure SQL Database. Many of these services don't have a static IP address, so this rule ensures that they're able to connect to the database.
Important
This option configures the firewall to allow all connections from Azure including connections from the subscriptions of other customers. When selecting this option, make sure your sign-in and user permissions limit access to only authorized users.
IP address rules are rules that are based on specific public IP address ranges. IP addresses that connect from an allowed public IP range are permitted to connect to the database.
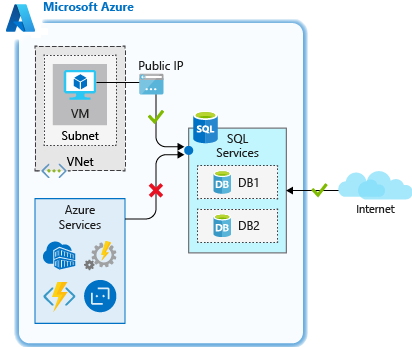
You can use these rules when you have a static public IP address that needs to access your database.
Virtual network rules allow you to explicitly allow connection from specified subnets inside one or more Azure virtual networks. Virtual network rules can provide greater access control to your databases and can be a preferred option. Since Azure virtual network address spaces are private, you can effectively eliminate exposure to public IP addresses and secure connectivity to those addresses you control.
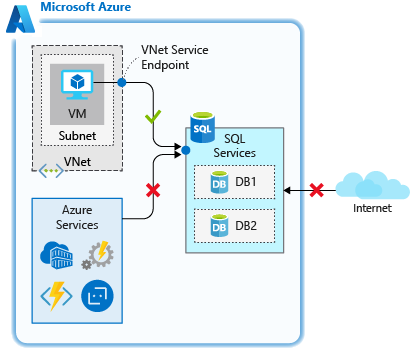
Use virtual network rules when you have Azure VMs that need to access your database.
For server-level rules, all of these rules can be created and manipulated through the portal, PowerShell, the CLI, and through Transact-SQL (T-SQL).
Database-level firewall rules
These rules allow access to an individual database on a logical server and are stored in the database itself. For database-level rules, you can configure only IP address rules. They function the same as when applied at the server-level, but are scoped to the database only.
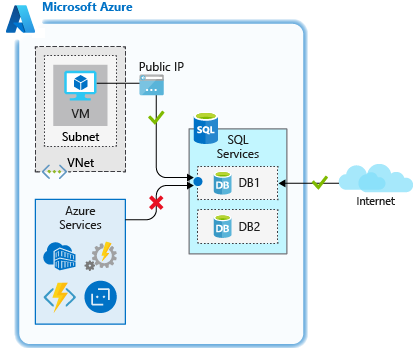
The benefits of database-level rules are their portability. When you replicate a database to another server, the database-level rules are replicated, since they're stored in the database itself.
The downside to database-level rules is that you can only use IP address rules. These rules might limit the flexibility you have and can increase administrative overhead.
Database-level firewall rules can be created and manipulated only through T-SQL.
Restrict network access in practice
As a best practice, use database-level IP firewall rules to enhance security and to make your database more portable. Use server-level IP firewall rules for administrators and when you have several databases with the same access requirements so that you don't want to spend time configuring each database individually.
Take a look at how these rules work in practice, and how you can secure network access to only allow what is necessary. Recall that you created an Azure SQL Database logical server, a database, and the appServer Linux VM that acts as an application server. This scenario is often seen when a database has been migrated to Azure SQL Database and resources inside of a virtual network need to access it. The firewall feature of Azure SQL Database can be used in many scenarios, but this example has practical applicability and demonstrates how each of the rules functions.
Go through the firewall settings and see how they work. You use both the portal and Cloud Shell for these exercises.
The database that you created doesn't currently allow access from any connections. This limited access is by design and based on the commands that you ran to create the logical server and database. Confirm that there's no access.
In Cloud Shell, SSH into your Linux VM if you aren't already connected. Replace
nnn.nnn.nnn.nnnwith the value from thepublicIpAddressin the previous unit.ssh nnn.nnn.nnn.nnnRerun the
sqlcmdcommand that you retrieved earlier to attempt to connect to the database. Replace[server-name]with the name of your server. Replace[username]and[password]with theADMINUSERcredentials you specified in the previous unit. Keep the single quotes around the username and password so that the shell doesn't misinterpret any special characters.sqlcmd -S tcp:[server-name].database.windows.net,1433 -d marketplaceDb -U '[username]' -P '[password]' -N -l 30You should see an error similar to the following output when you try to connect. This output is expected since access to the database isn't allowed.
Sqlcmd: Error: Microsoft ODBC Driver 17 for SQL Server : Login timeout expired.
Sqlcmd: Error: Microsoft ODBC Driver 17 for SQL Server : TCP Provider: Error code 0x2AF9.
Sqlcmd: Error: Microsoft ODBC Driver 17 for SQL Server : A network-related or instance-specific error has occurred while establishing a connection to SQL Server. Server is not found or not accessible.Check if instance name is correct and if SQL Server is configured to allow remote connections. For more information see SQL Server Books Online.
Grant access so that you can connect.
Use the server-level allow access to Azure services rule
Because your VM has outbound internet access, you can use the Allow access to Azure services rule to allow access from your VM.
Sign in to the Azure portal using the same account that you activated the sandbox with.
In the Search resources, services, and docs box at the top, search for your database server name,
server-name. Select the SQL server.In the SQL server pane, in the left menu pane, under Security, select Networking.
Scroll down to Exceptions, select the checkbox for Allow Azure services and resources to access this server, and then select Save. Wait until the system acknowledges this change.
Back in your SSH session, try to connect to your database again.
sqlcmd -S tcp:[server-name].database.windows.net,1433 -d marketplaceDb -U '[username]' -P '[password]' -N -l 30At this point, you should be able to connect. If it's successful, you should see a sqlcmd prompt.
1>
You opened up connectivity, but this setting currently allows access from any Azure resource, including resources outside of your subscription. Restrict this access further to limit network access to only resources that are within your control.
Use a database-level IP address rule
Recall that database-level IP address rules allow only access to an individual database on a logical server. Use one here to grant access to the static IP of your appServer VM.
To create a database-level IP rule, you need to run some T-SQL commands. Create a database rule using the following convention, where you pass in the rule name, the starting IP address, and the ending IP address. By specifying the start and end IP addresses to be the same, you limit access to a single IP. You could expand the range if you have a larger block of addresses that require access.
EXECUTE sp_set_database_firewall_rule N'My Firewall Rule', '40.112.128.214', '40.112.128.214'
While still at the sqlcmd prompt, run the following command. Replace the public IP address of your appServer VM in both locations.
Tip
When you run T-SQL commands such as the following, the
GOon the second line might not copy through to thesqlcmdprompt. You might need to type this part out. The T-SQL command won't run without it, so make sure to run theGOcommand.EXECUTE sp_set_database_firewall_rule N'My Firewall Rule', '[From IP Address]', '[To IP Address]'; GOAfter the command completes, enter
exitto exit sqlcmd. Remain connected over SSH.In the Azure portal, on the Networking pane for your SQL server, unselect Allow Azure services and resources to access this server, and then select Save. This change disables access from all Azure services, but you can connect because you have a database-level IP rule for your server.
Back in Cloud Shell, in the VM you're connected to over SSH, try to connect to your database again.
sqlcmd -S tcp:[server-name].database.windows.net,1433 -d marketplaceDb -U '[username]' -P '[password]' -N -l 30At this point, you should be able to connect. If it's successful, you see a sqlcmd prompt.
1>
Using a database-level rule allows access to be isolated specifically to the database. This rule can be useful if you want to keep your network access configured per database. If multiple databases share the same level of network access, you can simplify administration by using a server-level rule to apply the same access to all databases on the server.
Use a server-level IP address rule
Database-level rules are a great option, but what if you have multiple databases on the same server that your appServer VM needs to connect to? You could add a database-level rule to each database, but it can take more work as you add more databases. To reduce your administration efforts, allow access with a server-level rule, which would apply to all databases on the server.
Use a server-level IP rule to restrict the systems that can connect.
While still at the sqlcmd prompt, run the following command to delete the database-level IP address rule.
EXECUTE sp_delete_database_firewall_rule N'My Firewall Rule';
GO
After the command completes, enter
exitto exit sqlcmd. Remain connected over SSH.Back in the Azure portal, on the Networking pane for your SQL server, under Firewall rules, select add a firewall rule. Name the rule Allow appServer, enter the public IP address of the appServer VM for the Start IP and End IP, and then select OK.
Select Save.
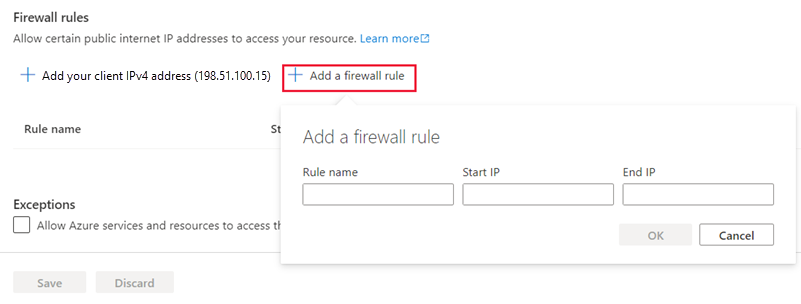
Back in Cloud Shell, on your appServer VM, try to connect to your database again.
sqlcmd -S tcp:[server-name].database.windows.net,1433 -d marketplaceDb -U '[username]' -P '[password]' -N -l 30At this point, you should be able to connect. The server-level rule allows access based on the public IP address of the appServer VM. If it's successful, you should see a sqlcmd prompt.
1>Enter
exitto exit sqlcmd. Remain connected over SSH.
You isolated connectivity to only the IP address you specified in the rule. This isolation works great, but can still be an administrative challenge as you add more systems that need to connect. It also requires a static IP or an IP from a defined IP address range.
If the IP address is dynamic and changes, you have to update the rule to ensure connectivity. The appServer VM is currently configured with a dynamic IP address. This IP address is likely to change at some point, breaking your access as soon as that happens. Now look at how virtual network rules can be beneficial in your configuration.
Use a server-level virtual network rule
In this case, because your VM is running in Azure, you can use a server-level virtual network rule to isolate access, and make it easy to enable future services to gain access to the database.
Back in the Azure portal and still on the Networking pane, under Virtual networks, select Add a virtual network rule.
The Create/Update virtual network rule dialog box appears. Set the following values.
Setting Value Name Leave the default value Subscription Concierge Subscription Virtual network appServerVNET Subnet name / Address prefix appServerSubnet / 10.0.0.0/24 Select Enable to enable the service endpoint on the subnet, then select OK after the endpoint is enabled to create the rule.
Remove the IP address rule. Select the ... next to your Allow appServer rule, select Delete, and then select Save.
Back in Cloud Shell, on your appServer VM, try to connect to your database again.
sqlcmd -S tcp:[server-name].database.windows.net,1433 -d marketplaceDb -U '[username]' -P '[password]' -N -l 30At this point, you should be able to connect. If it's successful, you see a sqlcmd prompt.
1>
What you did here effectively removes any public access to the SQL server. It permits access only from the specific subnet in the Azure virtual network that you defined. If you add more app servers in that subnet, no extra configuration is necessary. Any server in that subnet would have the ability to connect to the SQL server.
This configuration limits your exposure to services outside of your scope of control, and eases administration if you add more servers. This method is effective for securing network access to an Azure SQL Database.