Set up row-level security
Data-model developers set up RLS by creating one or more roles. A role has a unique name in the model, and it usually includes one or more rules. Rules enforce filters on model tables by using Data Analysis Expressions (DAX) filter expressions.
Note
By default, a data model has no roles. A data model without roles means that users (who have permission to query the data model) have access to all model data.
Tip
You can define a role that includes no rules. In this case, the role provides access to all rows of all model tables. This role setup would be suitable for an admin user who is allowed to view all data.
For models developed in Microsoft Power BI Desktop, you can create, validate, and manage roles in Power BI Desktop. For Microsoft Azure Analysis Services or SQL Server Analysis Services models, you can create, validate, and manage roles by using SQL Server Data Tools (SSDT).
Additionally, you can create and manage roles by using SQL Server Management Studio or by using an external tool, such as Tabular Editor.
Apply star schema design principals
The first step to achieving an effective RLS solution is to develop a well-designed model. We recommend that you apply star schema design principals to produce a model that comprises dimension and fact tables. Commonly, Power BI enforces rules to filter dimension tables, and model relationships will efficiently propagate those filters to fact tables.
The following image is the Tailspin Toys sales-analysis data model diagram. It shows a star schema design that includes a single fact table named Sales. The other four tables are dimension tables that support the analysis of sales measures by date, state, region, and product. Model relationships connect all tables. These relationships propagate filters (directly or indirectly) to the Sales table.
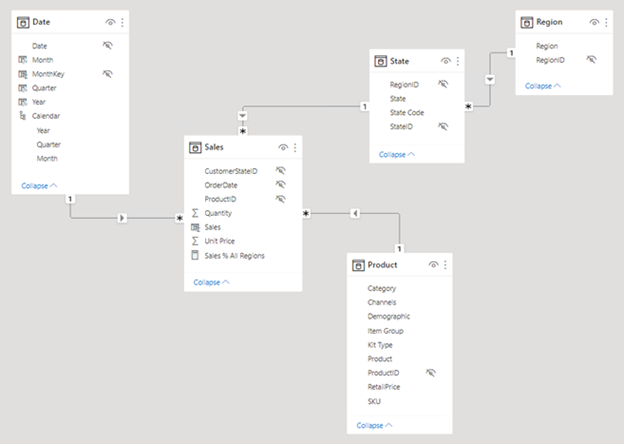
This model design supports examples that are presented in this module.
Define rules
Rule expressions are evaluated within row context. Row context means that the expression is evaluated for each row by using the column values of that row. When the expression returns TRUE, the user can "see" the row.
Tip
To learn more about row context, see the Add calculated tables and columns to Power BI Desktop models module. This module describes the process of adding model calculations, but it also includes a unit that introduces and describes row context.
You can define rules that are either static or dynamic.
Static rules
Static rules use DAX expressions that refer to constants.
Consider the following rule applied to the Region table that restricts data access to New England sales:
'Region'[Region] = "New England"
The following steps explain the Power BI's process enforcing the rule.
Filter the Region table, resulting in one visible row (for New England).
Use the model relationship to propagate the Region table filter to the State table, resulting in six visible rows (the New England region includes six states).
Use the model relationship to propagate the State table filter to the Sales table, resulting in thousands of visible rows (the sales facts for the states that belong to the New England region).
The simplest static rule that you can create restricts access to all table rows. Consider the following rule applied to the Sales Details table (not depicted in the model diagram):
FALSE()
This rule ensures that users can't access table data. The rule could be useful when salespeople are allowed to view aggregated sales results (from the Sales table), but not order-level details.
Defining static rules is simple and effective. Consider using static rules when you need to create only a few of them, as might be the case for Tailspin Toys, which has only six regions. However, be aware of some disadvantages: setting up static rules can involve significant effort to create and set up. Static rules also require you to update and republish the dataset when new regions are introduced.
If several rules exist for setup, and you anticipate new rules will be added in the future, consider using dynamic rules instead.
Dynamic rules
Dynamic rules use specific DAX functions that return environmental values (as opposed to constants). Environmental values are returned from the following specific DAX functions:
USERNAME or USERPRINCIPALNAME: When you're using the For your organization scenario, these functions return a text value that describes the authenticated user. When you're using the For your customers scenario, they return a text value that your app passes.
CUSTOMDATA: When you're using the For your organization scenario, this function returns the CustomData property that's passed in the connection string. When you're using the For your customers scenario, it returns a text value that your app passes.
Note
The USERNAME function will return the user in the format of DOMAIN\username when it's used in Power BI Desktop. However, when it's used in the Power BI service, it will return the format of the user principal name (UPN), such as username@tailspintoys.com. Alternatively, you can use the USERPRINCIPALNAME function, which always returns the user in the UPN format.
Consider a revised model design that now includes the (hidden) AppUser table. Each AppUser table row describes a username and region. A model relationship to the Region table propagates filters from the AppUser table.
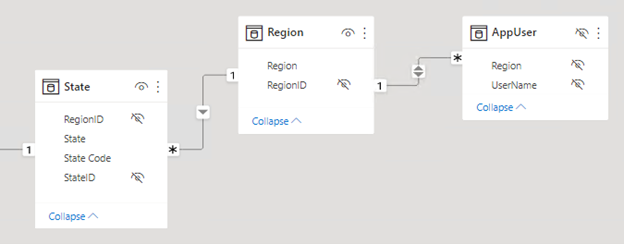
The following rule applied to the AppUser table restricts data access to the region(s) of the authenticated user:
'AppUser'[UserName] = USERPRINCIPALNAME()
Defining dynamic rules is simple and effective when a model table stores username values. Dynamic rules allow you to enforce a data-driven RLS design. For example, when salespeople are added to or removed from the AppUser table (or are assigned to different regions), this design approach works.
Important
When you're using the For your customers scenario, the USERNAME and USERPRINCIPALNAME functions don't need to return an actual user name. Instead, your app can pass any text value to filter the model.
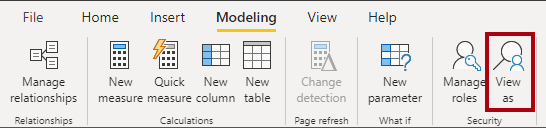
Validate roles
When you create roles, make sure that you test them to ensure that they apply the correct filters. For data models that are created in Power BI Desktop, the View as function will allow you to view the report when different roles are enforced and different username values are passed.
Set up role mappings
Role mapping is done differently, depending on the embedding scenario.
When using the For your organization scenario, you need to set up role mappings in advance of users accessing Power BI content. Role mapping involves assigning Microsoft Azure Active Directory security objects to roles. Security objects can be user accounts or security groups.
Tip
When possible, it's a good practice to map roles to security groups. That way, fewer mappings will exist, and then you can delegate the group membership management to the network administrators.
For Power BI Desktop developed models, role mapping is typically done in the Power BI service. For Azure Analysis Services or SQL Server Analysis Services models, role mapping is typically done in SQL Server Management Studio (SSMS).
When you're using the For your customers scenario, the app does role mapping at runtime. Your app logic sets one or more effective identities to enforce RLS. Setting effective identities is described later in this module.
For more information about setting up RLS, see the following articles: