Exercise - Set up a migration
In this unit, you create C# entity classes that map to tables in a local SQLite database. The EF Core migrations feature produces tables from those entities.
A migration provides a way to incrementally update the database schema.
Get the project files
To get started, get the project files. You have some options for how you get the project files:
- Use GitHub Codespaces
- Clone the GitHub repository
If you have a compatible container runtime installed, you also can use the Dev Containers extension to open the repository in a container with the tools preinstalled.
Use GitHub Codespaces
A codespace is an IDE hosted in the cloud. If you're using GitHub Codespaces, go to the repository in your browser. Select Code, and then create a new codespace in the main branch.
Clone the GitHub repository
If you aren't using GitHub Codespaces, you can clone the project GitHub repo, then open the files as a folder in Visual Studio Code.
Open a command terminal, and then clone the project from GitHub by using the command prompt:
git clone https://github.com/MicrosoftDocs/mslearn-persist-data-ef-coreGo to the mslearn-persist-data-ef-core folder, and then open the project in Visual Studio Code:
cd mslearn-persist-data-ef-core
code .
Review the code
Now that you have the project files to work with, let's see what's in the project and review the code.
- The ASP.NET Core web API project is located in the ContosoPizza directory. The file paths we refer to in this module are relative to the ContosoPizza directory.
- Services/PizzaService.cs is a service class that defines create, read, update, and delete (CRUD) methods. All the methods currently throw
System.NotImplementedException. - In Program.cs,
PizzaServiceis registered with the ASP.NET Core dependency injection system. - Controllers/PizzaController.cs is a value for
ApiControllerthat exposes an endpoint for HTTP POST, GET, PUT, and DELETE verbs. These verbs call the corresponding CRUD methods onPizzaService.PizzaServiceis injected into thePizzaControllerconstructor. - The Models folder contains the models that
PizzaServiceandPizzaControlleruse. - The entity models, Pizza.cs, Topping.cs, and Sauce.cs, have the following relationships:
- A pizza can have one or more toppings.
- A topping can be used on one or on many pizzas.
- A pizza can have one sauce, but a sauce can be used on many pizzas.
Build the app
To build the app in Visual Studio Code:
On the Explorer pane, right-click the ContosoPizza directory and select Open in Integrated Terminal.
A terminal pane that is scoped to the ContosoPizza directory opens.
Build the app by using the following command:
dotnet buildThe code should build with no warnings or errors.
Add NuGet packages and EF Core tools
The database engine you work with in this module is SQLite. SQLite is a lightweight, file-based database engine. It's a good choice for development and testing, and it's also a good choice for small-scale production deployments.
Note
As mentioned earlier, database providers in EF Core are pluggable. SQLite is a good choice for this module because it's lightweight and cross-platform. You can use the same code to work with different database engines, such as SQL Server and PostgreSQL. You can even use multiple database engines in the same app.
Before you start, add the required packages:
In the terminal pane, run the following command:
dotnet add package Microsoft.EntityFrameworkCore.SqliteThis command adds the NuGet package that contains the EF Core SQLite database provider and all its dependencies, including the common EF Core services.
Next, run this command:
dotnet add package Microsoft.EntityFrameworkCore.DesignThis command adds packages that are required for the EF Core tools.
To finish, run this command:
dotnet tool install --global dotnet-efThis command installs
dotnet ef, the tool you use to create migrations and scaffolding.Tip
If
dotnet efis already installed, you can update it by runningdotnet tool update --global dotnet-ef.
Scaffold models and DbContext
Now you add and configure a DbContext implementation. DbContext is a gateway through which you can interact with the database.
Right-click the ContosoPizza directory and add a new folder called Data.
In the Data folder, create a new file named PizzaContext.cs. Add the following code to the empty file:
using Microsoft.EntityFrameworkCore;
using ContosoPizza.Models;

namespace ContosoPizza.Data;

public class PizzaContext : DbContext
{
    public PizzaContext (DbContextOptions<PizzaContext> options)
        : base(options)
    {
    }

    public DbSet<Pizza> Pizzas => Set<Pizza>();
    public DbSet<Topping> Toppings => Set<Topping>();
    public DbSet<Sauce> Sauces => Set<Sauce>();
}
In the preceding code:
- The constructor accepts a parameter of type
DbContextOptions<PizzaContext>. The constructor allows external code to pass in the configuration so that the sameDbContextcan be shared between test and production code, and even be used with different providers. - The
DbSet<T>properties correspond to tables to create in the database. - The table names match the
DbSet<T>property names in thePizzaContextclass. You can override this behavior if needed. - When instantiated,
PizzaContextexposes thePizzas,Toppings, andSaucesproperties. Changes you make to the collections that those properties expose are propagated to the database.
- The constructor accepts a parameter of type
In Program.cs, replace
// Add the PizzaContextwith the following code:builder.Services.AddSqlite<PizzaContext>("Data Source=ContosoPizza.db");The preceding code:
- Registers
PizzaContextwith the ASP.NET Core dependency injection system. - Specifies that
PizzaContextuses the SQLite database provider. - Defines a SQLite connection string that points to a local file, ContosoPizza.db.
Note
SQLite uses local database files, so it's okay to hard-code the connection string. For network databases like PostgreSQL and SQL Server, you should always store your connection strings securely. For local development, use Secret Manager. For production deployments, consider using a service like Azure Key Vault.
- Registers
Also in Program.cs, replace
// Additional using declarationswith the following code.using ContosoPizza.Data;This code resolves dependencies in the previous step.
Save all your changes. GitHub Codespaces saves your changes automatically.
Build the app in the terminal by running
dotnet build. The build should succeed with no warnings or errors.
Create and run a migration
Next, create a migration that you can use to create your initial database.
In the terminal scoped to the ContosoPizza project folder, run the following command to generate a migration for creating the database tables:
dotnet ef migrations add InitialCreate --context PizzaContextIn the preceding command:
- The migration is named: InitialCreate.
- The
--contextoption specifies the name of the class in the ContosoPizza project, which derives fromDbContext.
A new Migrations directory appears in the ContosoPizza project root. The directory contains a <timestamp>_InitialCreate.cs file that describes the database changes to be translated to a Data Definition Language (DDL) change script.
Run the following command to apply the InitialCreate migration:
dotnet ef database update --context PizzaContextThis command applies the migration. ContosoPizza.db doesn't exist, so this command creates the migration in the project directory.
Tip
All platforms support the
dotnet eftool. In Visual Studio on Windows, you can use theAdd-MigrationandUpdate-DatabasePowerShell cmdlets in the integrated Package Manager Console window.
Inspect the database
EF Core created a database for your app. Next, let's take a look inside the database by using the SQLite extension.
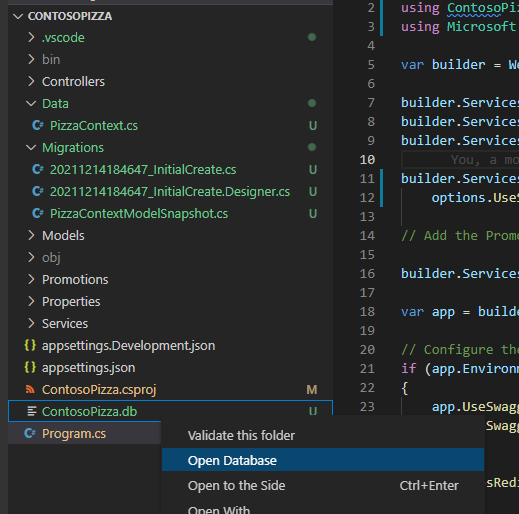
On the Explorer pane, right-click the ContosoPizza.db file and select Open Database.

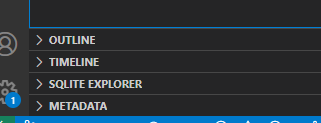
A SQLite Explorer folder appears in the Explorer pane.

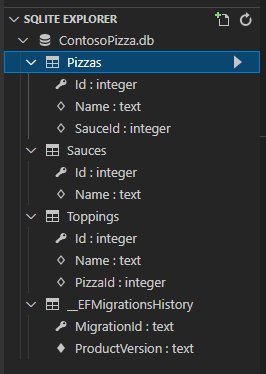
Select the SQLite Explorer folder to expand the node and all its child nodes. Right-click ContosoPizza.db and select Show Table 'sqlite_master' to view the full database schema and constraints that the migration created.

- Tables that correspond to each entity were created.
- Table names were taken from the names of the
DbSetproperties on thePizzaContext. - Properties named
Idwere inferred to be autoincrementing primary key fields. - The EF Core primary key and foreign key constraint naming conventions are
PK_<primary key property>andFK_<dependent entity>_<principal entity>_<foreign key property>, respectively. The<dependent entity>and<principal entity>placeholders correspond to the entity class names.
Note
Like ASP.NET Core MVC, EF Core uses a convention over configuration approach. EF Core conventions shorten development time by inferring the developer's intent. For example, EF core infers a property named
Idor<entity name>Idto be the generated table's primary key. If you choose not to adopt the naming convention, you must annotate the property with the[Key]attribute or configure it as a key in theOnModelCreatingmethod of theDbContext.
Change the model and update the database schema
Your manager at Contoso Pizza gives you some new requirements, so you have to change your entity models. In the following steps, you modify the models by using mapping attributes (sometimes called data annotations).
In Models\Pizza.cs, make the following changes:
- Add a
usingdirective forSystem.ComponentModel.DataAnnotations. - Add a
[Required]attribute before theNameproperty to mark the property as required. - Add a
[MaxLength(100)]attribute before theNameproperty to specify a maximum string length of 100.
Your updated Pizza.cs file should look like the following code:
using System.ComponentModel.DataAnnotations; namespace ContosoPizza.Models; public class Pizza { public int Id { get; set; } [Required] [MaxLength(100)] public string? Name { get; set; } public Sauce? Sauce { get; set; } public ICollection<Topping>? Toppings { get; set; } }- Add a
In Models\Sauce.cs, make the following changes:
- Add a
usingdirective forSystem.ComponentModel.DataAnnotations. - Add a
[Required]attribute before theNameproperty to mark the property as required. - Add a
[MaxLength(100)]attribute before theNameproperty to specify a maximum string length of 100. - Add a
boolproperty namedIsVegan.
Your updated Sauce.cs file should look like the following code:
using System.ComponentModel.DataAnnotations; namespace ContosoPizza.Models; public class Sauce { public int Id { get; set; } [Required] [MaxLength(100)] public string? Name { get; set; } public bool IsVegan { get; set; } }- Add a
In Models\Topping.cs, make the following changes:
Add
usingdirectives forSystem.ComponentModel.DataAnnotationsandSystem.Text.Json.Serialization.Add a
[Required]attribute before theNameproperty to mark the property as required.Add a
[MaxLength(100)]attribute before theNameproperty to specify a maximum string length of 100.Add a
decimalproperty namedCaloriesimmediately after theNameproperty.Add a
Pizzasproperty of typeICollection<Pizza>?. This change makesPizza-Toppinga many-to-many relationship.Add a
[JsonIgnore]attribute to thePizzasproperty.Important
This attribute prevents
Toppingentities from including thePizzasproperty when the web API code serializes the response to JSON. Without this change, a serialized collection of toppings would include a collection of every pizza that uses the topping. Each pizza in that collection would contain a collection of toppings, which each would again contain a collection of pizzas. This type of infinite loop is called a circular reference and can't be serialized.
Your updated Topping.cs file should look like the following code:
using System.ComponentModel.DataAnnotations;
using System.Text.Json.Serialization;

namespace ContosoPizza.Models;

public class Topping
{
    public int Id { get; set; }

    [Required]
    [MaxLength(100)]
    public string? Name { get; set; }

    public decimal Calories { get; set; }

    [JsonIgnore]
    public ICollection<Pizza>? Pizzas { get; set; }
}
Save all your changes and run
dotnet build.Run the following command to generate a migration for creating the database tables:
dotnet ef migrations add ModelRevisions --context PizzaContextThis command creates a migration named: ModelRevisions.
Note
You'll see this message: An operation was scaffolded that may result in the loss of data. Please review the migration for accuracy. This message appeared because you changed the relationship from
PizzatoToppingfrom one-to-many to many-to-many, which requires that an existing foreign-key column is dropped. Because you don't yet have any data in your database, this change isn't problematic. However, in general, it's a good idea to check the generated migration when this warning appears to make sure that the migration doesn't delete or truncate any data.Run the following command to apply the ModelRevisions migration:
dotnet ef database update --context PizzaContextOn the title bar of the SQLite Explorer folder, select the Refresh Databases button.

In the SQLite Explorer folder, right-click ContosoPizza.db. Select Show Table 'sqlite_master' to view the full database schema and constraints.
Important
The SQLite extension reuses open SQLite tabs.
- A
PizzaToppingjoin table was created to represent the many-to-many relationship between pizzas and toppings. - New fields were added to
ToppingsandSauces.Caloriesis defined as atextcolumn because SQLite doesn't have a matchingdecimaltype.- Similarly,
IsVeganis defined as anintegercolumn. SQLite doesn't define abooltype. - In both cases, EF Core manages the translation.
- The
Namecolumn in each table was markednot null, but SQLite doesn't have aMaxLengthconstraint.
Tip
EF Core database providers map a model schema to the features of a specific database. Although SQLite doesn't implement a corresponding constraint for
MaxLength, other databases like SQL Server and PostgreSQL do.- A
In the SQLite Explorer folder, right-click the
_EFMigrationsHistorytable and select Show Table. The table contains a list of all migrations that are applied to the database. Because you ran two migrations, there are two entries: one for the InitialCreate migration and another for ModelRevisions.
Note
This exercise used mapping attributes (data annotations) to map models to the database. As an alternative to mapping attributes, you can use the ModelBuilder fluent API to configure models. Both approaches are valid, but some developers prefer one approach over the other.
You used migrations to define and update a database schema. In the next unit, you'll finish the methods in PizzaService that manipulate data.