How to organize your project
Now that you added issues and pull requests to your Project, it's time to organize to keep track of the great work you and your team are doing.
In this unit, you learn how to:
- Create a field to track and group by priority.
- Add an iteration field.
- Create a board view.
Create a field to track and group by priority
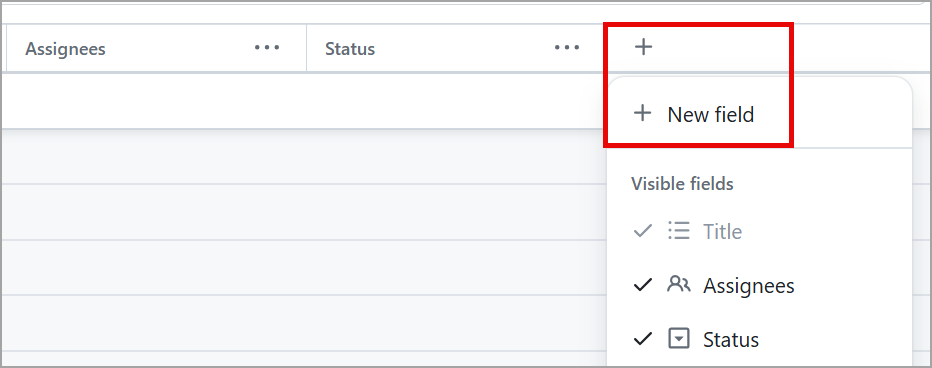
To group a set of issues and pull requests by priority, you need to first create a new field.
In the table view, in the rightmost field header, select +.
Select New field.
Type the name of your field. In this case, it's Priority.
Select the Field Type drop-down.
To create your own classification for your new field, select the Single select option.
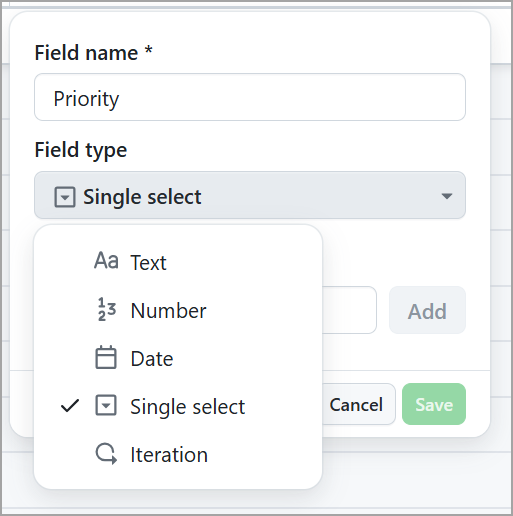
Screenshot of the drop-down menu for a New Field that contains Text, Number, Date, Single select, and Iteration with the Single Select option highlighted.
In the Options text box, start to add your different priority levels. You can label them as Urgent, High, Medium, and Low.
Select Save.
Now that you have your priority classification set up, you need to classify your issues and pull requests based on priority. To make a classification, select the issue or pull request you want to classify in the field row titled Priority. Now, in the drop-down field, select the priority you want to choose for this particular issue or pull request.
Repeat for your remaining pull requests and issues.
Great!
Now, let's group your issues and pull requests by priority to make it easier to focus on urgent and high priority items.
- Select the down arrow next to the name of your currently opened view.
- Select the Group by option.
- Select Priority.
Now you should be able to view issues and pull requests based on the priority you assigned them. One of the great features of this particular view is you can now drag and drop issues into new priority fields easily.
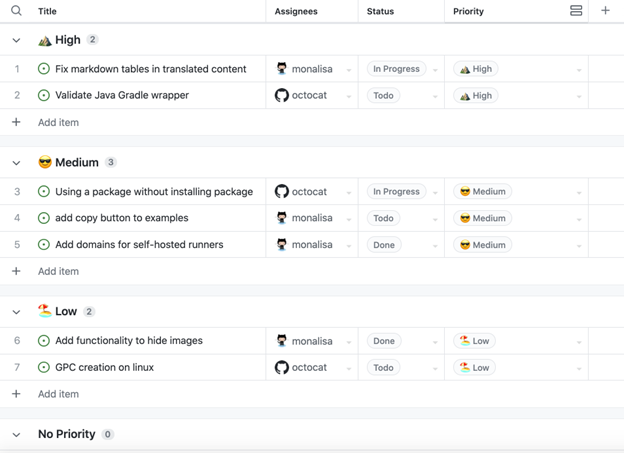
Screenshot example of Priority Classification within Project List view with Issues and Pull Requests that are organized and grouped as High, Medium, and Low classifications.
Now that you have your work prioritized, let's tackle timelines and iterations.
If you want to save this view, select the Save changes button on the top-right of the list view.
Add an iteration field
Adding an iteration field to your Project can help you and your team visualize the balance of upcoming work in order to help everyone stay on track. An iteration field enables you to set up phases for your tasks in a tangible timeframe to keep you and your team organized.
To add an iteration field, go to your Project's table view.
In the rightmost field header, select +.
Select New field.
Add a Field name, such as Project Phase or Sprint.
Under Field Type, select Iteration.
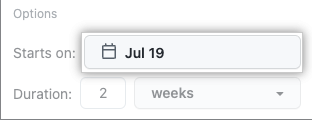
Choose a Starts On date.
Change the Duration of each iteration by typing a new number, and select the drop-down for either days or weeks as follows.
Select Save and create.
Once you have your iteration field set up, you can now assign what iteration phase you want each of your issues and pull requests to fall under.
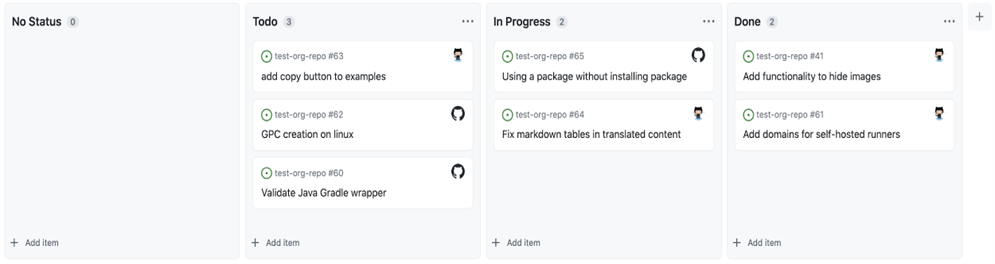
Now that you've prioritized and organized your Project, let's take a look at how to view your Project from a board view perspective.
Create a board view
A board view of your Project enables you to view upcoming tasks in a more visual way.
Let's walk through how to get your board view up and running.
- On the currently open view, select the down arrow.
- Under Layout, select Board. When you change the layout, your Project displays an indicator to show the view was modified.
- Select the Save button at the top-right of the board.
- You can rename the view by double-clicking the view's tab, and selecting out of the tab to automatically save.
- Note these steps can also be accomplished by selecting New View to the right of your existing views.
Now, you can drag and drop issues and pull requests to the various columns.