Collect content for a case
Collections in eDiscovery (Premium) allow eDiscovery managers to search custodial data sources (such as mailboxes and SharePoint sites). They can also search non-custodial data sources (such as group mailboxes and Teams) and use specific search criteria (such as keywords and date ranges) to define the scope of their search. This helps in estimating the content that might be relevant to a case.
Benefits of collections
- Efficient scoping: Collections provide an estimate of the content, helping managers make informed decisions about the size and scope of relevant data.
- Automated processes: Automating the collection process reduces the time and effort required to manually manage data preservation.
- Comprehensive search: Collections can search across various data sources and content types, including email, documents, and Teams conversations.
Workflow for creating and managing collections

The workflow for creating and managing collections in eDiscovery (Premium) involves several key steps:
1. Create and run a collection estimate:
- Define data sources: Identify custodial and non-custodial data sources to search. You can also include extra data sources that aren't to the case.
- Configure search query: Use keywords, properties, and conditions to build search queries that return content likely relevant to the case.
- Submit collection: Create an estimate of the collection, including data volume, content locations, and search query hits.
2. Review estimate and statistics: After you create a collection estimate and run it, the next step is to view collection statistics. These statistics help verify whether relevant content is being found and identify content locations with the most hits. You can also review a sample of the search results to ensure they are within the scope of the investigation.
3. Revise and rerun the collection estimate: Based on the estimates and statistics returned by the collection, you might need to refine the search. Adjust the data sources and search query to expand or narrow the collection scope. Update and rerun the collection estimate until you're confident it contains the most relevant content.
4. Commit the collection estimate to a review set: When satisfied with the collection results:
- Finalize collection scope: Ensure the collection returns the type of content relevant to the case.
- Commit to review set: Add the collection to a review set, including options for chat conversations, cloud attachments, and document versions.
- Processing: The content undergoes more processing during ingestion into the review set, with OCR applied to extract text from images.
5. Review collection overview: After you commit a collection to a review set, detailed information about the collection is retained, providing a historical record of the collected items. This record includes statistics about extracted items, deep indexing, the search query used, and the content locations from which items were collected.
Managing collections and data sources
Viewing and editing custodian details, reindexing custodian data, and releasing custodians are essential tasks in managing collections. The Data sources tab lists all custodians added to the case. Select a custodian to view detailed information. To update data sources, choose Edit source, adjust data locations and hold settings, then submit the changes.
Reindexing ensures comprehensive and accurate search results by organizing data for quick search and retrieval. Select the custodian and choose Update index to address partially indexed items. When a case is closed or a custodian is no longer relevant, select the custodian and choose Release to remove holds and update the custodian's status.
If the hold status isn't correctly applied, select the custodians and choose the Retry hold action.
Create and manage collection estimates
Before creating a collection estimate, add custodians and non-custodial data sources to the case. Ensure you have the necessary permissions to create a collection estimate. Save your progress as a draft collection and complete it later if needed. To create a collection estimate:
- Navigate to eDiscovery > Premium in the Microsoft Purview portal or Microsoft Purview compliance portal.
- Select the Cases tab and open an eDiscovery (Premium) case, then go to the Collections tab.
- Select New collection to start the collection creation process.
- Enter a name (required) and description (optional) for the collection. The name can't be changed after the collection is created, but the description can be modified.
- On the Custodial data sources page, choose to either select specific custodians added to the case or use the Select all option to search all custodians added to the case.
- On the Non-custodial data sources page, select specific non-custodial data sources added to the case or use the Select all option to select all non-custodial data sources added to the case.
- On the Additional locations page, select other mailboxes and sites to search as part of the collection.
- Create the search query on the Search query page, using keywords, property pairs, or a keyword list. Add search conditions to narrow the scope of the collection.
- Review and submit the collection estimate. The system creates an estimate, displaying statistics and sample results for review.
When committing a collection estimate to a review set, configure settings such as conversation threading, cloud attachments, and document versions. Add the collection to a new or existing review set, and select Commit to finalize the process.
Manage collection estimates
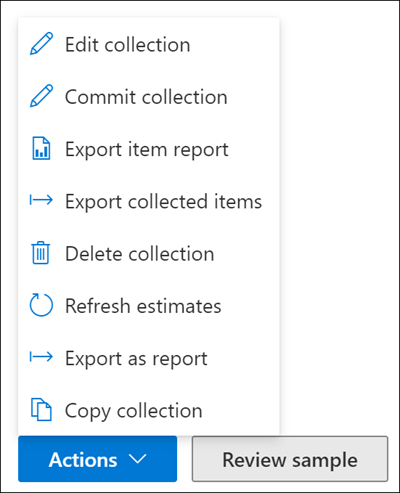
Use the Actions menu on the collection estimate flyout page to perform various management tasks like editing the collection, committing the collection to a review set, exporting reports, and deleting the collection estimate. After a collection estimate is committed to a review set, only the Copy collection and Export as report options are available.

What happens after you commit a collection estimate
Once a collection estimate is committed to a review set, several important processes and reviews take place:
- The review set is created and displayed on the Review sets tab.
- The collection search query is rerun to collect the most recent items.
- The progress of the collection commitment is displayed on the collection estimate flyout page.
- Items are processed, with optical character recognition (OCR) applied to extract text from images.
- The collection status is updated to Committed.
Review collection statistics and reports
After a collection is committed to a review set, various statistics and reports become available for review:
- Summary tab: Contains information about the collection items, estimates, indexing, file types, and more.
- Data sources tab: Displays information about custodial and non-custodial data sources.
- Search statistics tab: Preserves historical statistics from the collection estimate for comparison.
Differences between collection estimates and actual committed collections
It's common to observe differences between collection estimates and the actual number of items committed to a review set. These differences can arise due to:
- Child items: Additional items such as attachments might increase the number of items in the review set.
- Duplicate items: Items already in the review set aren't added again.
- Collection configuration options: Options selected during the commit process might affect the number of items added.
- Estimate vs. actual results: Differences might arise due to changes in the data between estimating and committing the collection.
Explore how to create a collection
View a video version of the interactive guide (captions available in more languages).
Be sure to select the full screen option in the video player.
