Exercise - Deploy a web application
At your toy company, your website development team committed the latest version of the website to your Git repository. Now, you're ready to update your pipeline to build the website, and to deploy it to Azure App Service.
In this process, you do the following tasks:
- Add a new pipeline template for the build job.
- Update the pipeline to include the build job.
- Add a new smoke test.
- Update the deployment stage to deploy the application.
- Run the pipeline.
Add a pipeline template for the build job
Add a new job definition that contains the steps required to build the website application.
Open Visual Studio Code.
In the deploy/pipeline-templates folder, create a new file named build.yml.
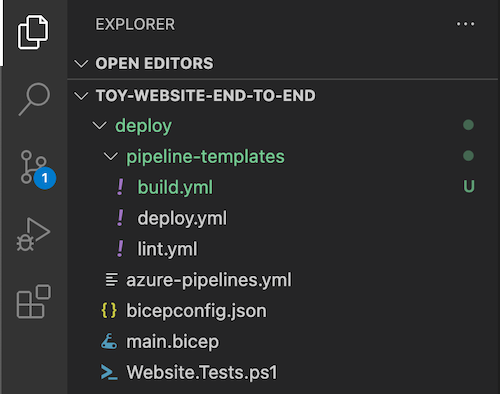
Add the following content to the build.yml pipeline template file:
jobs:
- job: Build
  displayName: Build application and database
  pool:
    vmImage: windows-latest

  steps:

  # Build, copy, and publish the website.
  - task: DotNetCoreCLI@2
    displayName: Build publishable website
    inputs:
      command: 'publish'
      publishWebProjects: true

  - task: CopyFiles@2
    displayName: Copy publishable website
    inputs:
      sourceFolder: '$(Build.SourcesDirectory)/src/ToyCompany/ToyCompany.Website/bin'
      contents: '**/publish.zip'
      targetFolder: '$(Build.ArtifactStagingDirectory)/website'
      flattenFolders: true

  - task: PublishBuildArtifacts@1
    displayName: Publish website as pipeline artifact
    inputs:
      pathToPublish: '$(Build.ArtifactStagingDirectory)/website'
      artifactName: 'website'
The job runs a build step to turn the website application's source code into a compiled file that's ready to run in Azure. The job then copies the compiled artifact to a temporary staging folder and publishes it as a pipeline artifact.
Save your changes to the file.
Rename the first pipeline stage, and add a build job
Open the azure-pipelines.yml file in the deploy folder.
Modify the Lint stage. Rename it to Build, and add a build job that uses the build.yml pipeline template that you created.
trigger:
  batch: true
  branches:
    include:
    - main

pool:
  vmImage: ubuntu-latest

stages:

- stage: Build
  jobs:
  # Build the Visual Studio solution.
  - template: pipeline-templates/build.yml

  # Lint the Bicep file.
  - template: pipeline-templates/lint.yml

# Deploy to the test environment.
- template: pipeline-templates/deploy.yml
  parameters:
    environmentType: Test

# Deploy to the production environment.
- template: pipeline-templates/deploy.yml
  parameters:
    environmentType: Production
Save your changes to the file.
Update the smoke test file
The website developers added a health endpoint to the website. This endpoint checks that the website is online and that it can reach the database. Here, you add a new smoke test to invoke the health check from your deployment pipeline.
Open the Website.Tests.ps1 file in the deploy folder.
Add a new test case that invokes the health check. The test case fails if the response code isn't 200, which indicates success.
param(
  [Parameter(Mandatory)]
  [ValidateNotNullOrEmpty()]
  [string] $HostName
)

Describe 'Toy Website' {

    It 'Serves pages over HTTPS' {
      $request = [System.Net.WebRequest]::Create("https://$HostName/")
      $request.AllowAutoRedirect = $false
      $request.GetResponse().StatusCode |
        Should -Be 200 -Because "the website requires HTTPS"
    }

    It 'Does not serves pages over HTTP' {
      $request = [System.Net.WebRequest]::Create("http://$HostName/")
      $request.AllowAutoRedirect = $false
      $request.GetResponse().StatusCode |
        Should -BeGreaterOrEqual 300 -Because "HTTP is not secure"
    }

    It 'Returns a success code from the health check endpoint' {
      $response = Invoke-WebRequest -Uri "https://$HostName/health" -SkipHttpErrorCheck
      Write-Host $response.Content
      $response.StatusCode |
        Should -Be 200 -Because "the website and configuration should be healthy"
    }

}
Save your changes to the file.
Add output to Bicep file
You want to add a deployment step that publishes your website to Azure App Service, but the publish step requires the name of the App Service app. Here, you expose the app name as an output from your Bicep file.
Open the main.bicep file in the deploy folder.
At the end of the file contents, add the App Service app's name as an output.
output appServiceAppName string = appServiceApp.name
output appServiceAppHostName string = appServiceApp.properties.defaultHostName
Save your changes to the file.
Update deployment stage
Open the deploy.yml file in the deploy/pipeline-templates folder.
In the definition of the Deploy stage's deployment job (near Line 59) configure the job to use the Windows hosted agent pool:
- stage: Deploy_${{parameters.environmentType}}
  displayName: Deploy (${{parameters.environmentType}} Environment)
  jobs:
  - deployment: DeployWebsite
    displayName: Deploy website
    pool:
      vmImage: windows-latest
    variables:
    - group: ToyWebsite${{parameters.environmentType}}
    environment: ${{parameters.environmentType}}
    strategy:
Some of the pipeline steps you add later to work with your database require the Windows operating system to run. You can use different agent pools for different jobs in your pipeline, so the other jobs continue to use the Ubuntu Linux pipeline agent pool.
In the Deploy job's SaveDeploymentOutputs step, add a new pipeline variable with the value of the app name from the Bicep deployment's output:
- bash: |
    echo "##vso[task.setvariable variable=appServiceAppName]$(echo $DEPLOYMENT_OUTPUTS | jq -r '.appServiceAppName.value')"
    echo "##vso[task.setvariable variable=appServiceAppHostName;isOutput=true]$(echo $DEPLOYMENT_OUTPUTS | jq -r '.appServiceAppHostName.value')"
  name: SaveDeploymentOutputs
  displayName: Save deployment outputs into variables
  env:
    DEPLOYMENT_OUTPUTS: $(deploymentOutputs)
Notice that the
appServiceAppHostNamevariable has theisOutput=trueproperty applied to it, because that variable is used in the smoke test stage. TheappServiceAppNamevariable is set and used in the same pipeline stage and job. So, it doesn't need theisOutput=truesetting.At the end of the Deploy job contents, add a new step to deploy the app to Azure App Service:
steps:
  - checkout: self

  - task: AzureResourceManagerTemplateDeployment@3
    name: DeployBicepFile
    displayName: Deploy Bicep file
    inputs:
      connectedServiceName: ToyWebsite${{parameters.environmentType}}
      deploymentName: $(Build.BuildNumber)
      location: ${{parameters.deploymentDefaultLocation}}
      resourceGroupName: $(ResourceGroupName)
      csmFile: deploy/main.bicep
      overrideParameters: >
        -environmentType $(EnvironmentType)
        -reviewApiUrl $(ReviewApiUrl)
        -reviewApiKey $(ReviewApiKey)
      deploymentOutputs: deploymentOutputs

  - bash: |
      echo "##vso[task.setvariable variable=appServiceAppName]$(echo $DEPLOYMENT_OUTPUTS | jq -r '.appServiceAppName.value')"
      echo "##vso[task.setvariable variable=appServiceAppHostName;isOutput=true]$(echo $DEPLOYMENT_OUTPUTS | jq -r '.appServiceAppHostName.value')"
    name: SaveDeploymentOutputs
    displayName: Save deployment outputs into variables
    env:
      DEPLOYMENT_OUTPUTS: $(deploymentOutputs)

  - task: AzureRmWebAppDeployment@4
    name: DeployWebsiteApp
    displayName: Deploy website
    inputs:
      appType: webApp
      ConnectionType: AzureRM
      azureSubscription: ToyWebsite${{parameters.environmentType}}
      ResourceGroupName: $(ResourceGroupName)
      WebAppName: $(appServiceAppName)
      Package: '$(Pipeline.Workspace)/website/publish.zip'
Note
Be careful with the indentation of the YAML file, ensuring that the new deployment step is indented at the same level as the
DeployBicepFilestep. If you're not sure, copy the whole deploy.yml file contents from the example in the next step.Notice that you didn't explicitly download the artifact in the pipeline definition. Because you use a deployment job, Azure Pipelines automatically downloads the artifact for you.
Verify the deploy.yml file contents, and commit your changes
Verify that your deploy.yml file looks like the following example:
parameters:
- name: environmentType
  type: string
- name: deploymentDefaultLocation
  type: string
  default: westus3

stages:

- ${{ if ne(parameters.environmentType, 'Production') }}:
  - stage: Validate_${{parameters.environmentType}}
    displayName: Validate (${{parameters.environmentType}} Environment)
    jobs:
    - job: ValidateBicepCode
      displayName: Validate Bicep code
      variables:
      - group: ToyWebsite${{parameters.environmentType}}
      steps:
        - task: AzureResourceManagerTemplateDeployment@3
          name: RunPreflightValidation
          displayName: Run preflight validation
          inputs:
            connectedServiceName: ToyWebsite${{parameters.environmentType}}
            location: ${{parameters.deploymentDefaultLocation}}
            deploymentMode: Validation
            resourceGroupName: $(ResourceGroupName)
            csmFile: deploy/main.bicep
            overrideParameters: >
              -environmentType $(EnvironmentType)
              -reviewApiUrl $(ReviewApiUrl)
              -reviewApiKey $(ReviewApiKey)

- ${{ if eq(parameters.environmentType, 'Production') }}:
  - stage: Preview_${{parameters.environmentType}}
    displayName: Preview (${{parameters.environmentType}} Environment)
    jobs:
    - job: PreviewAzureChanges
      displayName: Preview Azure changes
      variables:
      - group: ToyWebsite${{parameters.environmentType}}
      steps:
        - task: AzureCLI@2
          name: RunWhatIf
          displayName: Run what-if
          inputs:
            azureSubscription: ToyWebsite${{parameters.environmentType}}
            scriptType: 'bash'
            scriptLocation: 'inlineScript'
            inlineScript: |
              az deployment group what-if \
                --resource-group $(ResourceGroupName) \
                --template-file deploy/main.bicep \
                --parameters environmentType=$(EnvironmentType) \
                             reviewApiUrl=$(ReviewApiUrl) \
                             reviewApiKey=$(ReviewApiKey)

- stage: Deploy_${{parameters.environmentType}}
  displayName: Deploy (${{parameters.environmentType}} Environment)
  jobs:
  - deployment: DeployWebsite
    displayName: Deploy website
    pool:
      vmImage: windows-latest
    variables:
    - group: ToyWebsite${{parameters.environmentType}}
    environment: ${{parameters.environmentType}}
    strategy:
      runOnce:
        deploy:
          steps:
            - checkout: self

            - task: AzureResourceManagerTemplateDeployment@3
              name: DeployBicepFile
              displayName: Deploy Bicep file
              inputs:
                connectedServiceName: ToyWebsite${{parameters.environmentType}}
                deploymentName: $(Build.BuildNumber)
                location: ${{parameters.deploymentDefaultLocation}}
                resourceGroupName: $(ResourceGroupName)
                csmFile: deploy/main.bicep
                overrideParameters: >
                  -environmentType $(EnvironmentType)
                  -reviewApiUrl $(ReviewApiUrl)
                  -reviewApiKey $(ReviewApiKey)
                deploymentOutputs: deploymentOutputs

            - bash: |
                echo "##vso[task.setvariable variable=appServiceAppName]$(echo $DEPLOYMENT_OUTPUTS | jq -r '.appServiceAppName.value')"
                echo "##vso[task.setvariable variable=appServiceAppHostName;isOutput=true]$(echo $DEPLOYMENT_OUTPUTS | jq -r '.appServiceAppHostName.value')"
              name: SaveDeploymentOutputs
              displayName: Save deployment outputs into variables
              env:
                DEPLOYMENT_OUTPUTS: $(deploymentOutputs)

            - task: AzureRmWebAppDeployment@4
              name: DeployWebsiteApp
              displayName: Deploy website
              inputs:
                appType: webApp
                ConnectionType: AzureRM
                azureSubscription: ToyWebsite${{parameters.environmentType}}
                ResourceGroupName: $(ResourceGroupName)
                WebAppName: $(appServiceAppName)
                Package: '$(Pipeline.Workspace)/website/publish.zip'

- stage: SmokeTest_${{parameters.environmentType}}
  displayName: Smoke Test (${{parameters.environmentType}} Environment)
  jobs:
  - job: SmokeTest
    displayName: Smoke test
    variables:
      appServiceAppHostName: $[ stageDependencies.Deploy_${{parameters.environmentType}}.DeployWebsite.outputs['DeployWebsite.SaveDeploymentOutputs.appServiceAppHostName'] ]
    steps:
      - task: PowerShell@2
        name: RunSmokeTests
        displayName: Run smoke tests
        inputs:
          targetType: inline
          script: |
            $container = New-PesterContainer `
              -Path 'deploy/Website.Tests.ps1' `
              -Data @{ HostName = '$(appServiceAppHostName)' }
            Invoke-Pester `
              -Container $container `
              -CI

      - task: PublishTestResults@2
        name: PublishTestResults
        displayName: Publish test results
        condition: always()
        inputs:
          testResultsFormat: NUnit
          testResultsFiles: 'testResults.xml'
Save your changes to the file.
In the Visual Studio Code terminal, commit and push your changes to your Git repository by running the following commands:
git add .
git commit -m "Build and deploy website application"
git push
Run the pipeline
In your browser, go to Pipelines.
Select the most recent run of your pipeline.

Wait until the Build stage finishes successfully.
The pipeline pauses before it runs the Validate (Test Environment) stage because the pipeline needs permission to use the variable group that the stage refers to. You need to approve the pipeline's access to the variable group, because you're running the pipeline in this project for the first time. When you run the pipeline again, you don't need to approve access to the same variable group.
Select View.
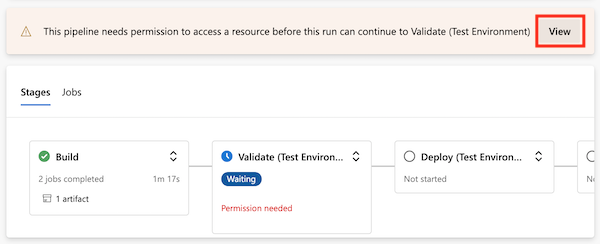
Select Permit.
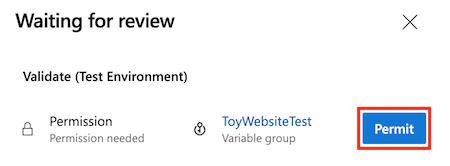
Select Permit.
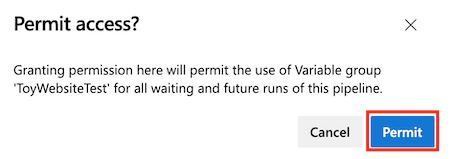
The Validate (Test Environment) stage finishes successfully.
The pipeline continues and the Deploy (Test Environment) stage finishes successfully. The pipeline then runs the Smoke Test (Test Environment) stage, but the smoke test stage fails.
Select the Smoke Test (Test Environment) stage to open the pipeline log.
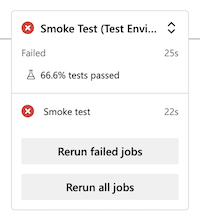
Select the Run smoke tests step to view the associated section of the pipeline log.
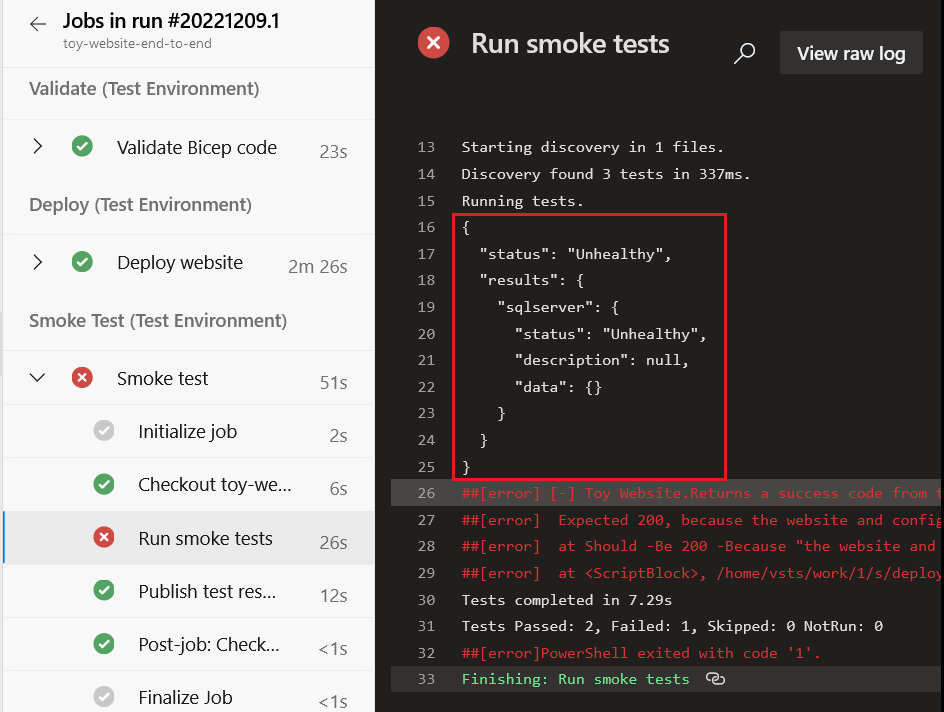
Notice that the pipeline log includes the health check response. The response indicates that there's a problem with the application's communication with Azure SQL Database. The database isn't deployed or configured yet, which is why the website can't access it. In the next exercise, you fix this configuration issue.