Explore personalization functionality
In Dynamics 365, the word personalization is used to indicate noncode changes to the system, especially in the user interface. It applies especially to individual users. The word customization typically indicates code written by a developer, usually for all users. This isn't a hard and fast rule, and can be set otherwise. For example, personalizations may be applied to multiple users (for example, all users in a particular role).
Changing your default company
Earlier, we discussed changing the company we're currently logged into. What if we want to change our default to that company, so that we don’t need to change it each time we log in?
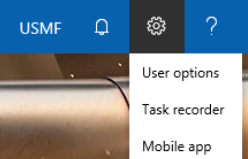
You can also change your default company: Select the gear icon in the top right of your screen, and choose User options.
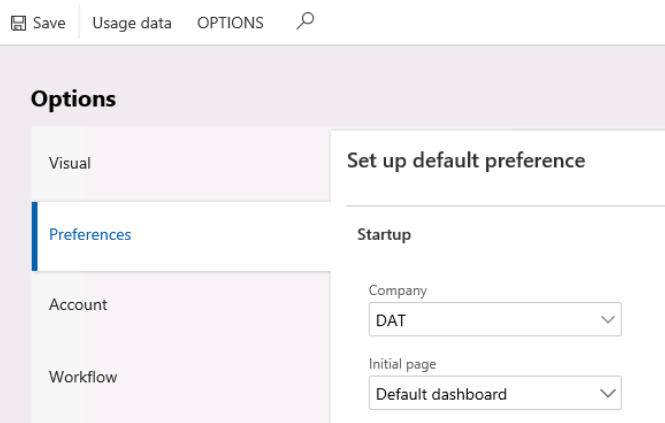
In the Options screen, select the Preferences tab and change the Startup Company.
User options form
In this form, you have many options for customizing the user experience:
Visual
Color theme
Size
Preferences
Startup
Company
Default view/edit mode
Initial page
Language and country/region preferences
Language
Time zone
Date, time, and number format
Country/region
Miscellaneous
Document handling enabled Y/N
URL Manipulations: Automatically update query parameter Y/N
Accessibility
- Enhanced tab sequence Y/N
- Show tooltips on focus Y/N
Task management
- Show task list on default dashboard Y/N
Account
Account
User ID (display only, no edit)
Network domain (display only, no edit)
Name
Telemetry ID (display only, no edit)
Alias (display only, no edit)
Email provider selection
Email provider ID
Email – used in notifications and document handling
Electronic signature
Signature enabled Y/N
Valid certificate Y/N
There are also buttons to designate an approver and get a certificate
Workflow
Notifications
Send notifications in email Y/N
Line item workflow notification type (individual or grouped notifications)
Alternate email
Send notifications to Action Center Y/N
Delegation
- Here, delegates can be added and removed
Form personalization
Form personalization is launched from one of two places:
From any form in the user interface: Right click in a field or grid and select Personalize.

The resulting pop-up lets you:
Hide (the field)
Include in FastTab summary
Skip in Tab key sequence
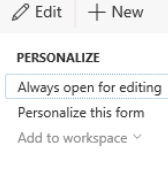
Personalize this form
The last option gives you many more options, including one to add fields to the form.

From the Options tab (you may need to select the ellipsis … to see it) select Personalize this form