Exercise - Share data in Blazor applications
Now that your app is connected to a database, it's time to add the ability to order and configure a customer's pizza.
Blazing Pizza wants you to build the ability for customers to change the size of their special pizzas. You need to store the order, and you've chosen to store the application state in a container service.
In this exercise, you'll pass data to a new order configuration component and see how to store the app's state in an OrderState scoped service.
Add a new order configuration dialog
Stop the app if it's still running.
In Visual Studio Code, right-click the Shared folder and select New File.
Enter ConfigurePizzaDialog.razor as the filename.
Enter this code for the UI of the new ordering component:
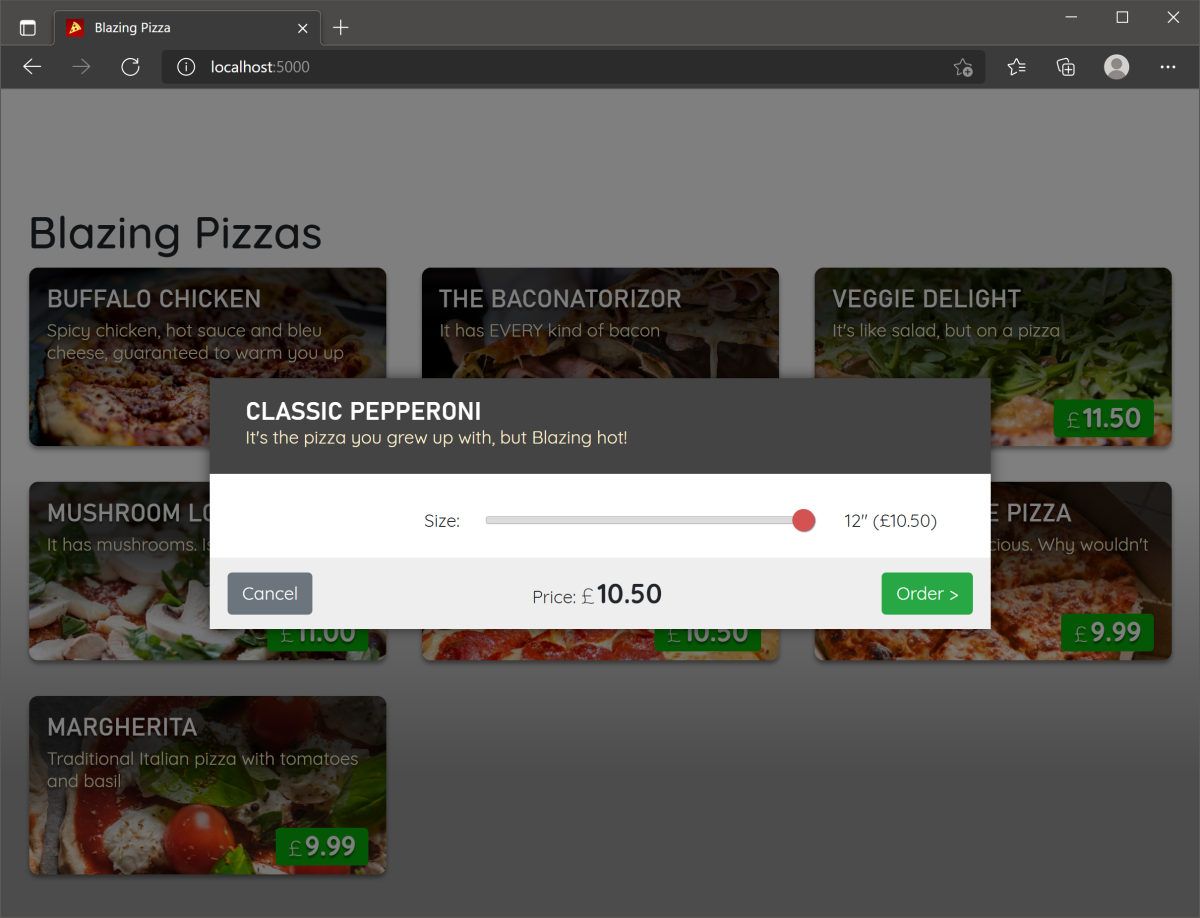
@inject HttpClient HttpClient

<div class="dialog-container">
    <div class="dialog">
        <div class="dialog-title">
            <h2>@Pizza.Special.Name</h2>
            @Pizza.Special.Description
        </div>
        <form class="dialog-body">
            <div>
                <label>Size:</label>
                <input type="range" min="@Pizza.MinimumSize" max="@Pizza.MaximumSize" step="1" />
                <span class="size-label">
                    @(Pizza.Size)" (£@(Pizza.GetFormattedTotalPrice()))
                </span>
            </div>
        </form>

        <div class="dialog-buttons">
            <button class="btn btn-secondary mr-auto" >Cancel</button>
            <span class="mr-center">
                Price: <span class="price">@(Pizza.GetFormattedTotalPrice())</span>
            </span>
            <button class="btn btn-success ml-auto" >Order ></button>
        </div>
    </div>
</div>
This component is a dialog that shows the selected special pizza and allows the customer to select the pizza size.
The component needs a special pizza from the index page component to access a pizza's member values.
Add the Blazor
@codeblock to allow parameters to be passed into the component:@code { [Parameter] public Pizza Pizza { get; set; } }
Order a pizza
When a customer selects a pizza, the dialog should allow them to change the size of their pizza. Let's enhance the index.razor control to add this interactivity.
In the file explorer, expand Pages, and then select Index.razor.
Add this code in the
@codeblock under theList<PizzaSpecial>variable:Pizza configuringPizza; bool showingConfigureDialog;Add this code to create a pizza under the
OnInitializedAsync()method:void ShowConfigurePizzaDialog(PizzaSpecial special) { configuringPizza = new Pizza() { Special = special, SpecialId = special.Id, Size = Pizza.DefaultSize }; showingConfigureDialog = true; }Allow the webpage to call the server-side
ShowConfigurePizzaDialogmethod by allowing customers to select a pizza's<li>tag. Replace the<li>line with this code:<li @onclick="@(() => ShowConfigurePizzaDialog(special))" style="background-image: url('@special.ImageUrl')">When a customer selects a pizza, the server executes the
ShowConfigurePizzaDialogmethod that creates a pizza with the special pizza data and sets theshowingConfigureDialogvariable totrue.The page needs a way to display the new
ConfigurePizzaDialogcomponent. Add this code above the@codeblock:@if (showingConfigureDialog) { <ConfigurePizzaDialog Pizza="configuringPizza" /> }The whole
index.razorfile should now look like this example:@page "/" @inject HttpClient HttpClient @inject NavigationManager NavigationManager <div class="main"> <h1>Blazing Pizzas</h1> <ul class="pizza-cards"> @if (specials != null) { @foreach (var special in specials) { <li @onclick="@(() => ShowConfigurePizzaDialog(special))" style="background-image: url('@special.ImageUrl')"> <div class="pizza-info"> <span class="title">@special.Name</span> @special.Description <span class="price">@special.GetFormattedBasePrice()</span> </div> </li> } } </ul> </div> @if (showingConfigureDialog) { <ConfigurePizzaDialog Pizza="configuringPizza" /> } @code { List<PizzaSpecial> specials = new(); Pizza configuringPizza; bool showingConfigureDialog; protected override async Task OnInitializedAsync() { specials = await HttpClient.GetFromJsonAsync<List<PizzaSpecial>>(NavigationManager.BaseUri + "specials"); } void ShowConfigurePizzaDialog(PizzaSpecial special) { configuringPizza = new Pizza() { Special = special, SpecialId = special.Id, Size = Pizza.DefaultSize }; showingConfigureDialog = true; } }Select F5 or select Run. Then select Start Debugging.
Select a pizza and watch the new dialog appear.
Handle the state of an order
At the moment, the app shows the configuration dialog but doesn't allow you to cancel or move on to ordering the pizza. To manage the state of the order, you'll add a new order state container service.
Stop the app if it's still running.
Create a new folder in the BlazingPizza folder. Name it Services.
Create a new file in the Services folder. Name it OrderState.cs.
Enter this code for the class:
namespace BlazingPizza.Services;

public class OrderState
{
    public bool ShowingConfigureDialog { get; private set; }
    public Pizza ConfiguringPizza { get; private set; }
    public Order Order { get; private set; } = new Order();

    public void ShowConfigurePizzaDialog(PizzaSpecial special)
    {
        ConfiguringPizza = new Pizza()
        {
            Special = special,
            SpecialId = special.Id,
            Size = Pizza.DefaultSize,
            Toppings = new List<PizzaTopping>(),
        };

        ShowingConfigureDialog = true;
    }

    public void CancelConfigurePizzaDialog()
    {
        ConfiguringPizza = null;

        ShowingConfigureDialog = false;
    }

    public void ConfirmConfigurePizzaDialog()
    {
        Order.Pizzas.Add(ConfiguringPizza);
        ConfiguringPizza = null;

        ShowingConfigureDialog = false;
    }
}
You'll see that there's code currently in the index.razor component that we can move into the new class. The next step is to make this service available in the app.
In the file explorer, select Program.cs.
In the part of the file with the lines that start with
builder.Services., add this line:builder.Services.AddScoped<OrderState>();From the previous exercise, we added our database context here. This code adds the new
OrderStateservice. With this code in place, we can now use it in theindex.razorcomponent.Add the following
usingdirective to the top of the file to resolve theOrderStateclass:using BlazingPizza.Services;In the file explorer, expand Pages, and then select Index.razor.
At the top of the file, under
@inject NavigationManager NavigationManager, add this code:@using BlazingPizza.Services @inject OrderState OrderStateRemove
configuringPizza,showingConfigureDialog, andShowConfigurePizzaDialog()from the@codeblock. It should now look like this:@code { List<PizzaSpecial> specials = new List<PizzaSpecial>(); protected override async Task OnInitializedAsync() { specials = await HttpClient.GetFromJsonAsync<List<PizzaSpecial>>(NavigationManager.BaseUri + "specials"); } }There are now errors where all the code references what's been deleted.
Change the call to
ShowConfigurePizzaDialog(special))to use the OrderState version:<li @onclick="@(() => OrderState.ShowConfigurePizzaDialog(special))" style="background-image: url('@special.ImageUrl')">Change the reference to the Boolean
showingConfigureDialog:@if (OrderState.ShowingConfigureDialog)Change the parameter by using
configuringPizza:<ConfigurePizzaDialog Pizza="OrderState.ConfiguringPizza" />Select F5 or select Run. Then select Start Debugging.
If everything is correct, you won't see any difference. The dialog displays as it did before.
Cancel and make pizza orders
You might have noticed in the OrderState class two methods that we haven't used yet. The CancelConfigurePizzaDialog and ConfirmConfigurePizzaDialog methods close the dialog, and add the pizza to an Order object if the customer has confirmed the order. Let's connect these methods to the configuration dialog buttons.
Stop the app if it's still running.
In the file explorer, expand Shared. Then select ConfigurePizzaDialog.razor.
In the
@codeblock, add two new parameters:@code { [Parameter] public Pizza Pizza { get; set; } [Parameter] public EventCallback OnCancel { get; set; } [Parameter] public EventCallback OnConfirm { get; set; } }The buttons can now have
@onclickdirectives added. Change the current code for the dialog buttons to this markup:<div class="dialog-buttons"> <button class="btn btn-secondary mr-auto" @onclick="OnCancel">Cancel</button> <span class="mr-center"> Price: <span class="price">@(Pizza.GetFormattedTotalPrice())</span> </span> <button class="btn btn-success ml-auto" @onclick="OnConfirm">Order ></button> </div>The last step is to pass the
OrderStatemethods for canceling and confirming orders. In the file explorer, expand Pages. Then select Index.razor.Change the code for the call to the
ConfigurePizzaDialogcomponent:<ConfigurePizzaDialog Pizza="OrderState.ConfiguringPizza" OnCancel="OrderState.CancelConfigurePizzaDialog" OnConfirm="OrderState.ConfirmConfigurePizzaDialog" />Select F5 or select Run. Then select Start Debugging.
The app should now let customers cancel or add a configured pizza to an order. We have no way to show the current order or update the prices when the pizza size is changed. We'll add these features in the next exercise.