Connect to an Azure Data Lake
As we saw in the previous unit, using Power Query to import data is an ideal scenario when you have data that might require ETL (Extract, Transform, Load) before it can be consumed. Importing with Power Query is also a good option when working with less than 5 million records and complex data transformation is required. Another option for ingesting data is to connect to an Azure Data Lake. Unlike importing with Power Query, Azure Data Lakes can be used to support both small and large data volumes and are used in scenarios where no ETL is required.
Note
If ETL is required for Azure Data Lake sources, it should be handled outside of Customer Insights - Data and done prior to data ingestion. It can be done via applications such as Azure Data Factory/Databricks/HDInsight.
Things to consider before deciding to use an Azure Data Lake
Unlike importing data, connecting to an Azure Data Lake folder doesn't copy the data into Customer Insights - Data. This supports Azure Data Lake Gen2 storage accounts exclusively. You can't use Azure Data Lake Gen1 storage accounts to ingest data. The data in your Azure Data Lake needs to follow the CDM standard. Other formats aren't supported at the time of this module publication.
Important
The Azure Data Lake you connect to and ingest data from must be in the same Azure region as the Dynamics 365 Customer Insights - Data environment. You cannot connect to an Azure Data Lake in a different Azure region. You can find the Azure region for your Customer Insights - Data environment by accessing About from the System settings.
Connect to an Azure Data Lake
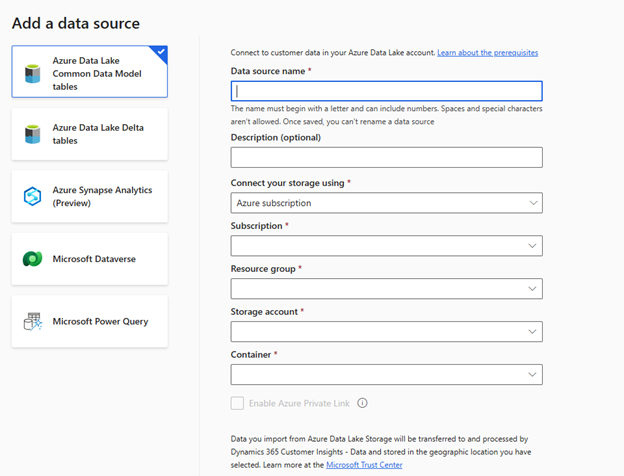
To connect to an Azure Data Lake, you need to provide:
Data source name: Defines the name of your data source as it is displayed in the Customer Insights – Data user interface.
Connect your storage using: Defines how you want to connect to your Azure Data Lake storage. You can choose:
Azure resource: Specify the Resource ID of the Azure Resource you want to connect to.
Azure subscription: Specify the Azure Subscription that you want to connect to. You need to provide the following other details.
Resource group: Defines the resource group that you want to connect to.
Storage account: Defines the storage account in the resource group that you want to use.
Container: Defines the container that contains the data and schema (model.json or manifest.json file) to import data from.
Any model.json file associated with another data source in the instance doesn't show in the list. Once selected, you're provided with a list of available tables in the model.json file. You can select which tables you want to ingest from the data source.
Note
A model.json file can only associate with one data source in the same instance. However, the same model.json file can be used for data sources in multiple instances.
Editing an Azure Data Lake Storage data source
It's possible to make changes to an Azure Data Lake Storage data source folder. You can update the access key for the storage account that contains the Azure Data Lake folder and change the model.json file. If you want to connect to a different container in the same storage account or change the account name, create a new data source connection.
For more detailed instructions on working with an Azure Data Lake, see Connect to a data lake in Azure Data Lake Storage.
