Customize connection strings by using .NET Aspire manifests
Deployment tools like Visual Studio or the Azure Developer CLI create manifest files that describe the contents of a .NET Aspire solution. If you want to customize your deployment, you can make changes to the manifest file directly.
In your outdoor equipment retailer, you've decided to use an existing Azure Cache for Redis instance to host the output cache for your web app microservice. You want to ensure that the web app service connects to the correct instance of Azure Cache for Redis.
In this unit, you'll learn how to alter connection strings to backing services in the .NET Aspire manifest file.
Generate a manifest file by using the .NET CLI
During local development and debugging, .NET Aspire doesn't create a manifest file. When it comes to deployment, .NET must describe the contents of the .NET Aspire solution, including its microservices, backing services, and configuration. The manifest file serves this purpose. It describes the solution in JSON format.
To create the manifest file, both Visual Studio and the Azure Developer CLI run a .NET CLI run command with a specific target. You can manually run the same command to create your own manifest file like this:
dotnet run --project eShop.AppHost\eShop.AppHost.csproj `
    --publisher manifest `
    --output-path ../aspire-manifest.json
Note
Make sure you specify the app host project with the --project option.
The command produces output similar to this text:
Building...
info: Aspire.Hosting.DistributedApplication[0]
      Aspire version: 8.0.1+a6e341ebbf956bbcec0dda304109815fcbae70c9
info: Aspire.Hosting.Publishing.ManifestPublisher[0]
      Published manifest to: C:\repos\eShop\aspire-manifest.json
You can also use a launch profile to run the dotnet command. A launch profile is a group of settings that configures a .NET project when it runs. For example, the .NET Aspire Starter template creates these launch profiles:
"profiles": {
  "https": {
    "commandName": "Project",
    "dotnetRunMessages": true,
    "launchBrowser": true,
    "applicationUrl": "https://localhost:17170;http://localhost:15281",
    "environmentVariables": {
      "ASPNETCORE_ENVIRONMENT": "Development",
      "DOTNET_ENVIRONMENT": "Development",
      "DOTNET_DASHBOARD_OTLP_ENDPOINT_URL": "https://localhost:21147",
      "DOTNET_RESOURCE_SERVICE_ENDPOINT_URL": "https://localhost:22239"
    }
  },
  "http": {
    "commandName": "Project",
    "dotnetRunMessages": true,
    "launchBrowser": true,
    "applicationUrl": "http://localhost:15281",
    "environmentVariables": {
      "ASPNETCORE_ENVIRONMENT": "Development",
      "DOTNET_ENVIRONMENT": "Development",
      "DOTNET_DASHBOARD_OTLP_ENDPOINT_URL": "http://localhost:19197",
      "DOTNET_RESOURCE_SERVICE_ENDPOINT_URL": "http://localhost:20233"
    }
  }
}
Add a launch profile to create a manifest file with JSON code similar to this text:
"profiles": {
  "generate-manifest": {
    "commandName": "Project",
    "launchBrowser": false,
    "dotnetRunMessages": true,
    "commandLineArgs": "--publisher manifest --output-path aspire-manifest.json"
  }
}
In Visual Studio, you can then choose the generate-manifest profile when you start debugging. At the command line, use the --launch-profile option:
dotnet run --launch-profile generate-manifest
Format of the manifest file
The manifest is a JSON file with a single top-level element named resources. Within that object you find one object for each microservice and backing service. For each of these objects, settings include connection strings, environment variables, and container image names.
Here's an example manifest for the .NET Aspire Starter template with no modifications. The solution uses a Redis cache:
{
  "resources": {
    "cache": {
      "type": "container.v0",
      "connectionString": "{cache.bindings.tcp.host}:{cache.bindings.tcp.port}",
      "image": "docker.io/library/redis:7.2",
      "bindings": {
        "tcp": {
          "scheme": "tcp",
          "protocol": "tcp",
          "transport": "tcp",
          "targetPort": 6379
        }
      }
    },
    "apiservice": {
      "type": "project.v0",
      "path": "AspireStarter.ApiService/AspireStarter.ApiService.csproj",
      "env": {
        "OTEL_DOTNET_EXPERIMENTAL_OTLP_EMIT_EXCEPTION_LOG_ATTRIBUTES": "true",
        "OTEL_DOTNET_EXPERIMENTAL_OTLP_EMIT_EVENT_LOG_ATTRIBUTES": "true",
        "OTEL_DOTNET_EXPERIMENTAL_OTLP_RETRY": "in_memory",
        "ASPNETCORE_FORWARDEDHEADERS_ENABLED": "true"
      },
      "bindings": {
        "http": {
          "scheme": "http",
          "protocol": "tcp",
          "transport": "http"
        },
        "https": {
          "scheme": "https",
          "protocol": "tcp",
          "transport": "http"
        }
      }
    },
    "webfrontend": {
      "type": "project.v0",
      "path": "AspireStarter.Web/AspireStarter.Web.csproj",
      "env": {
        "OTEL_DOTNET_EXPERIMENTAL_OTLP_EMIT_EXCEPTION_LOG_ATTRIBUTES": "true",
        "OTEL_DOTNET_EXPERIMENTAL_OTLP_EMIT_EVENT_LOG_ATTRIBUTES": "true",
        "OTEL_DOTNET_EXPERIMENTAL_OTLP_RETRY": "in_memory",
        "ASPNETCORE_FORWARDEDHEADERS_ENABLED": "true",
        "ConnectionStrings__cache": "{cache.connectionString}",
        "services__apiservice__http__0": "{apiservice.bindings.http.url}",
        "services__apiservice__https__0": "{apiservice.bindings.https.url}"
      },
      "bindings": {
        "http": {
          "scheme": "http",
          "protocol": "tcp",
          "transport": "http",
          "external": true
        },
        "https": {
          "scheme": "https",
          "protocol": "tcp",
          "transport": "http",
          "external": true
        }
      }
    }
  }
}
Connection strings and binding references
In the manifest example, there are three resources:
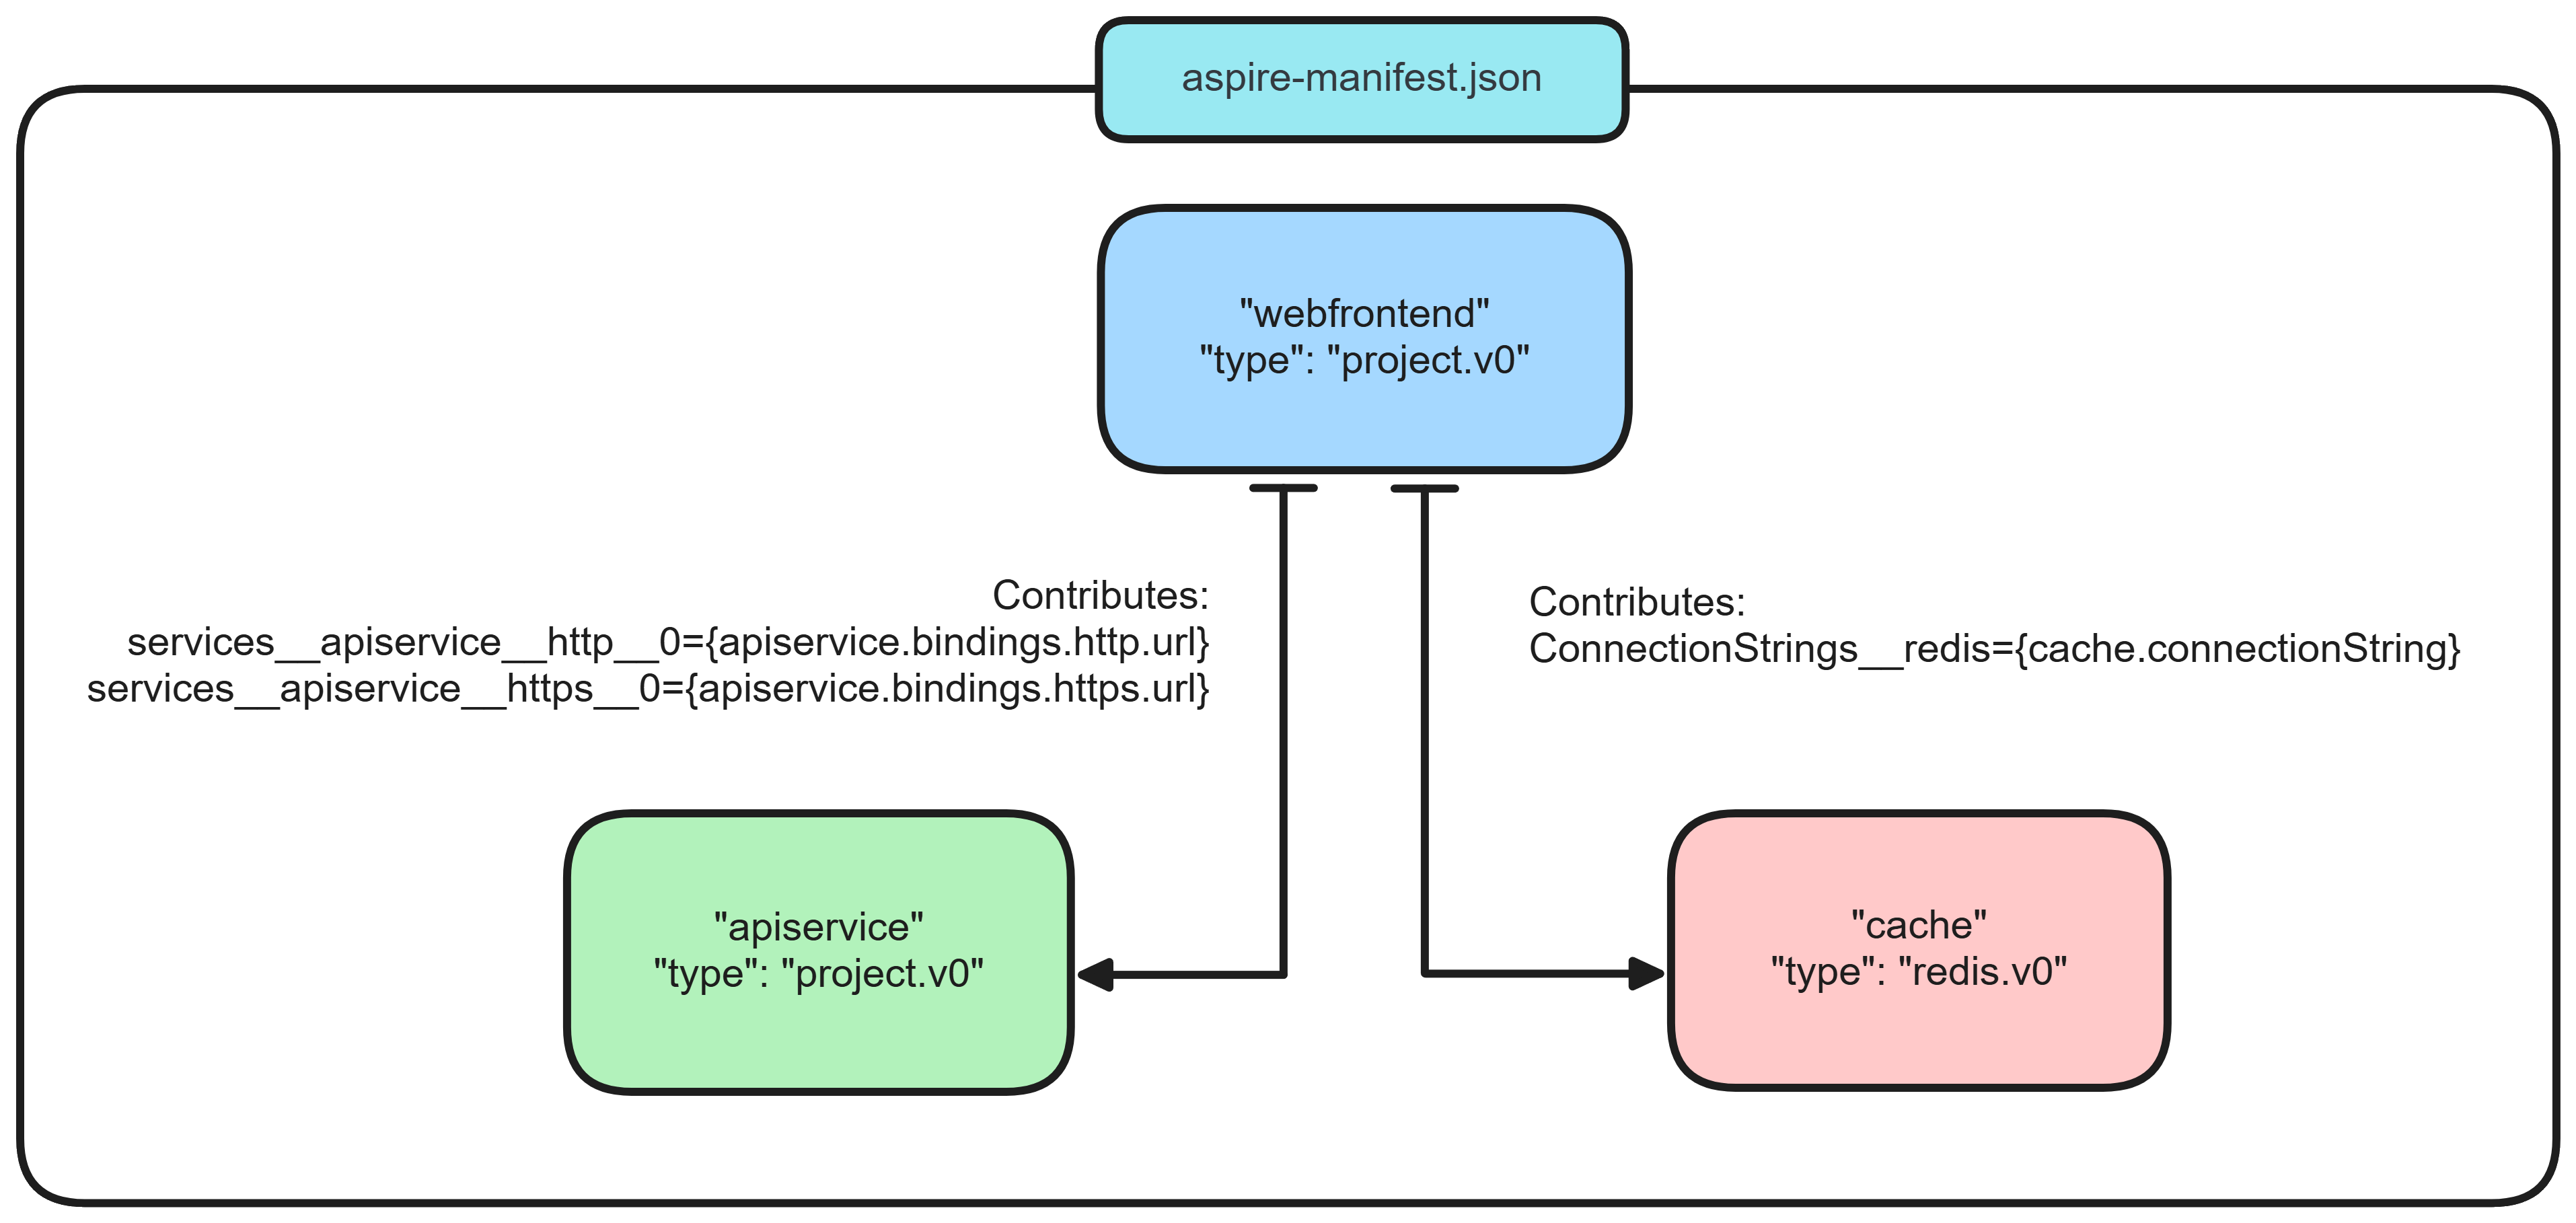
webfrontend: This resource is the microservice that presents a web interface to customers.apiservice: This resource is the REST API that thewebfrontendcalls. In the template, this call is to obtain weather data.cache: This resource is the Redis cache, used to optimize the performance of thewebfrontendmicroservice.
Notice that each of the three resources includes a bindings section that specifies protocols you can use to connect to that resource.
In the app host's Program.cs file, the webfrontend project depends on both the cache and the apiservice:
var cache = builder.AddRedis("cache");

var apiService = builder.AddProject<Projects.AspireStarter_ApiService>("apiservice");

builder.AddProject<Projects.AspireStarter_Web>("webfrontend")
    .WithExternalHttpEndpoints()
    .WithReference(cache)
    .WithReference(apiService);
In the manifest file, these dependencies are expressed as environment variables:
"env": {
  "ConnectionStrings__cache": "{cache.connectionString}",
  "services__apiservice__http__0": "{apiservice.bindings.http.url}",
  "services__apiservice__https__0": "{apiservice.bindings.https.url}"
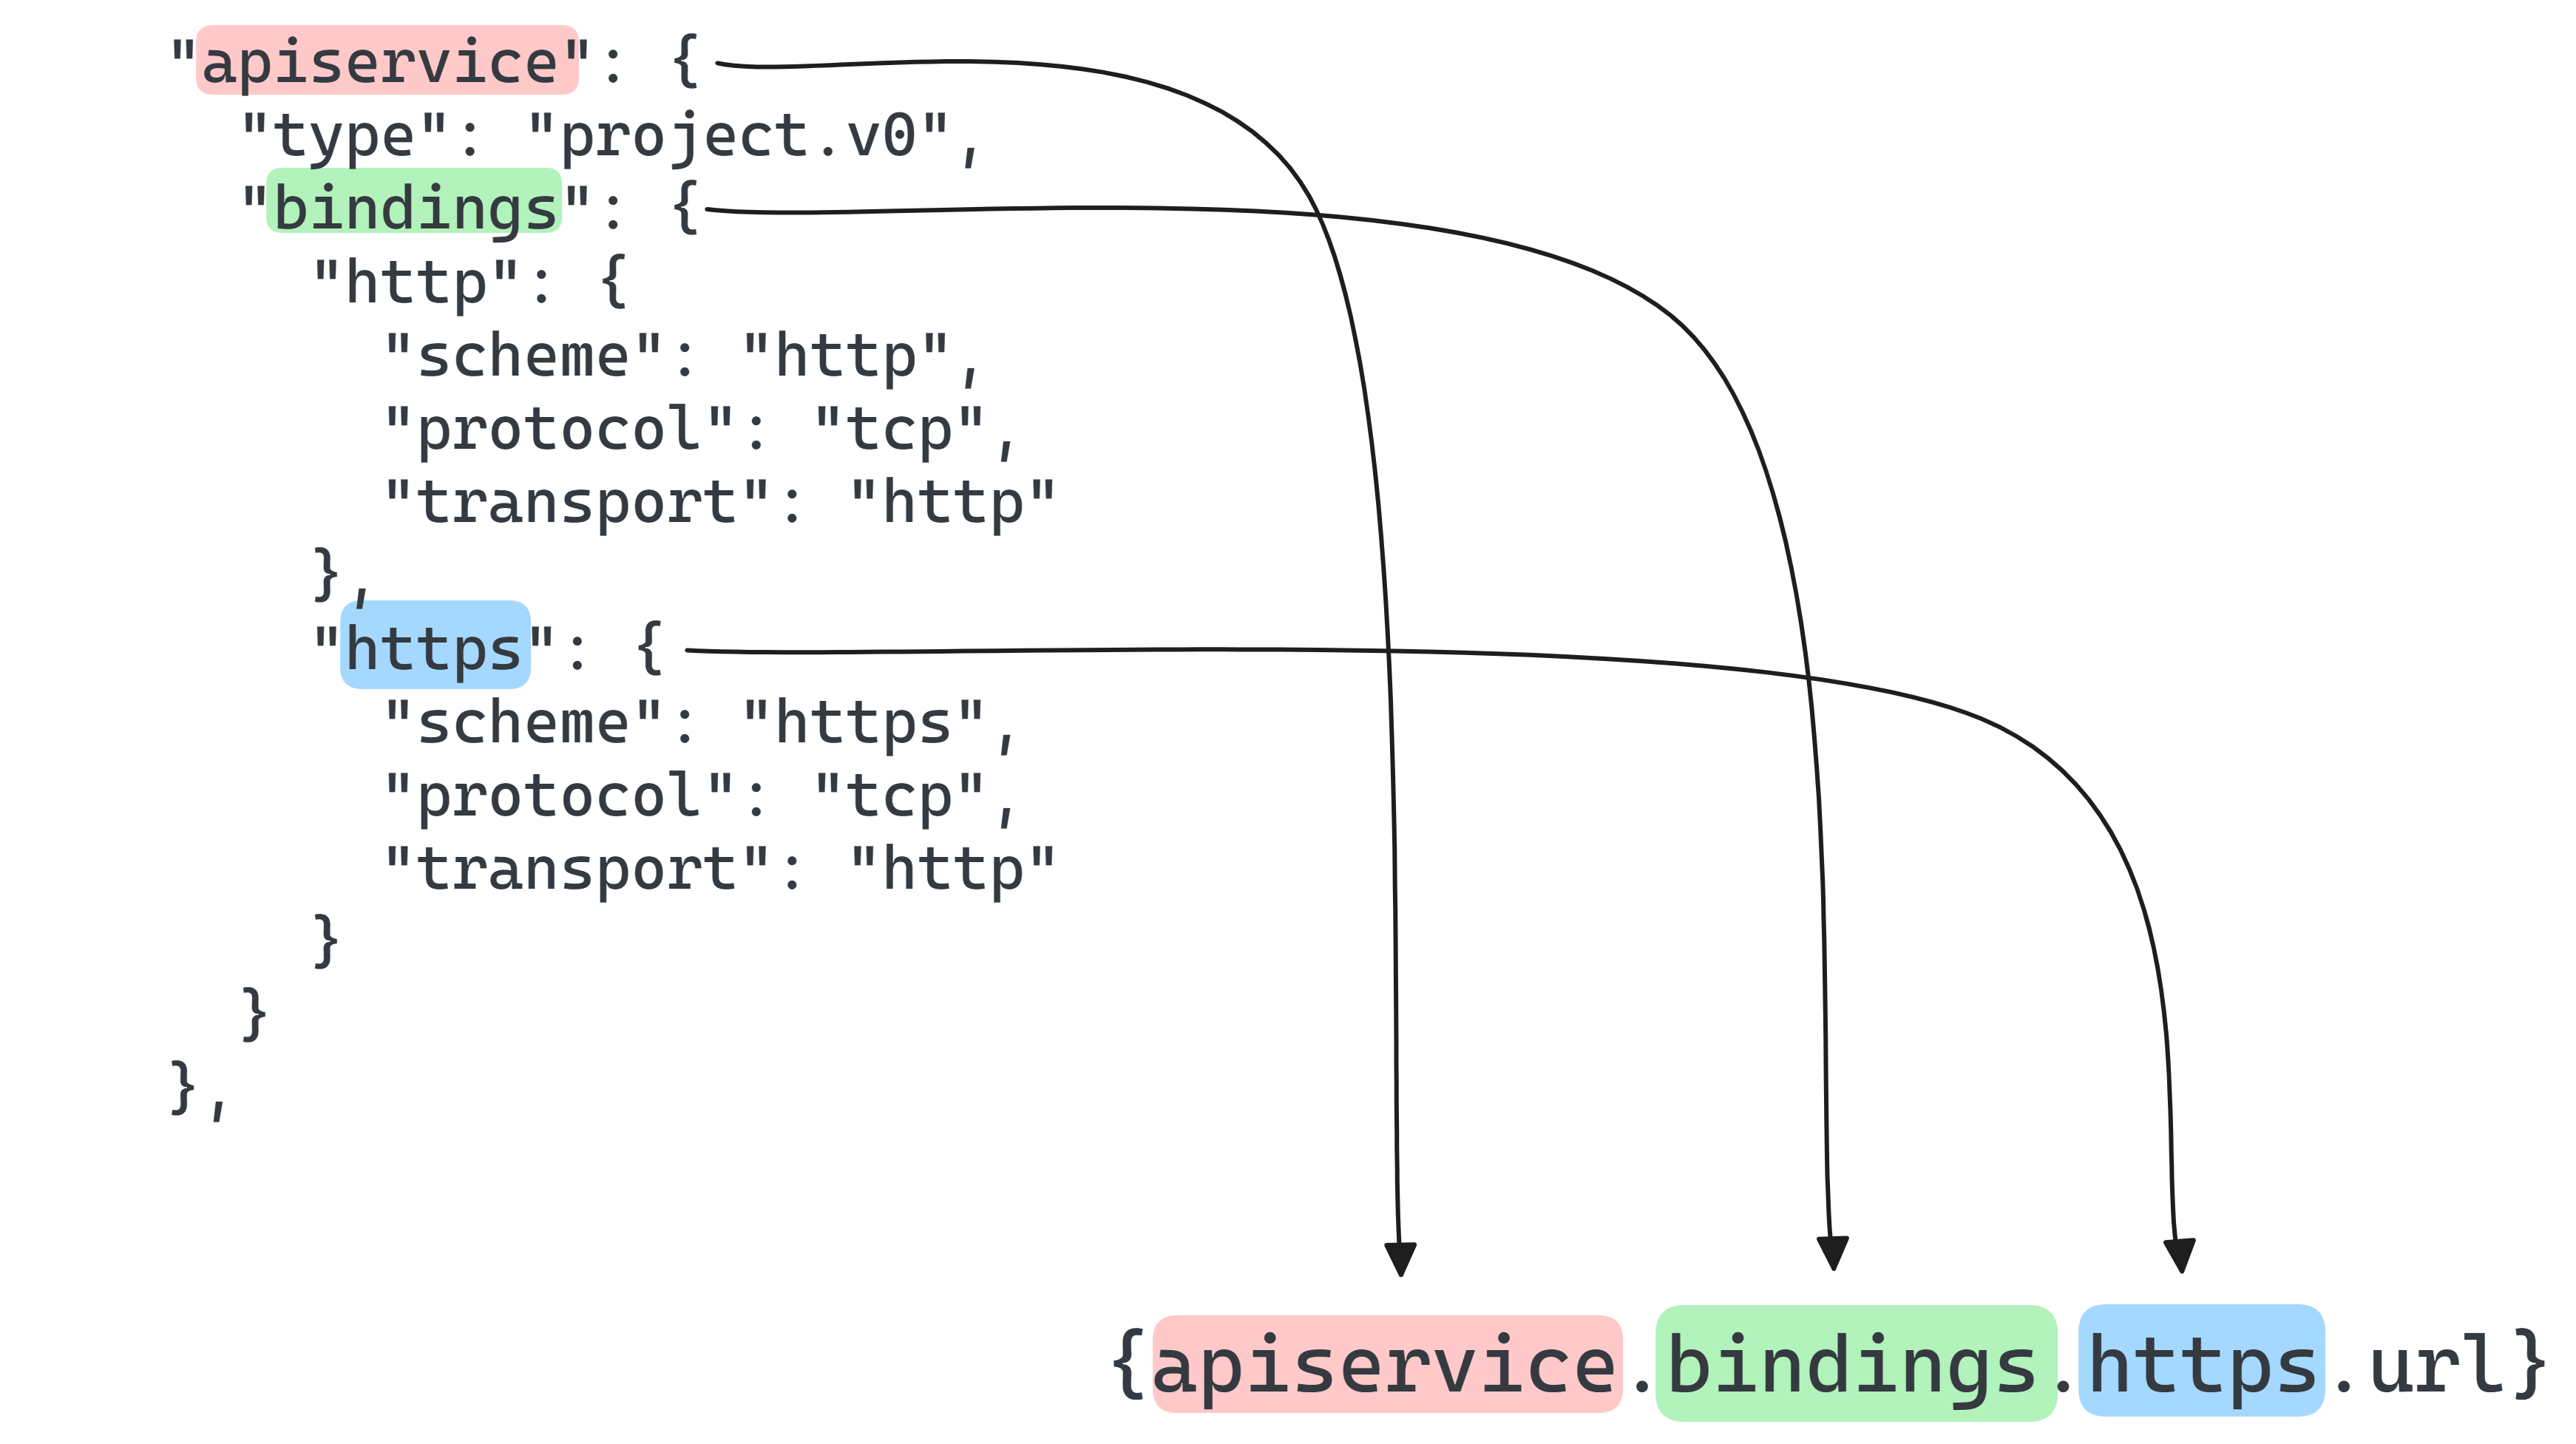
}
The dependencies use placeholder strings that reference the structure of the manifest file. For example, the third dependency references the API service HTTPS binding:

