Set up leave and absence
As you continue to manage all benefits for your employees, leave of absence is essential to your employees well being. You're able to create working time calendar and all necessary items to ensure leave of absences are processed without failure.
Create a working time calendar
A working time calendar in Dynamics 365 Human Resources shows the days and hours that employees work in your organization. When an employee submits a time-off request, they don't have to worry about holidays and closures.
To streamline time-off requests, configure these items for your organization:
Working time calendar
Holidays and closures
Non-work time
You can add the last two items while you're setting up a working time calendar. You can also configure or update them separately.
Set up at least one working time calendar that shows your days and hours of operation. If you have locations in multiple countries and regions, you might want to set up a working time calendar for each area.
In Human Resources, select Organization administration.
Select New, enter a calendar and name for your calendar, and then select Create new calendar.
Under Generation options, select the work days for your organization and then enter work times.
To add a holiday or closure, select the Add button next to Holidays and closures.
To add non-work time, such as lunches or breaks, select Add under NON-WORK TIME and then enter the name and time range.
Under Days, select Generate to generate the days in your calendar. Enter the date range for your calendar and then select Generate days.
To add work schedules, under Work schedule, select Add and then enter the times for each work schedule.
Select Save.
Add holidays and non-work times
You can add or change holidays and closures separately from a working time calendar.
On the Organization administration page, select Holidays and closures.
Select New, enter a name, description for the holiday or closure, and then select Save.
Under Dates, select New and add each holiday or non-work day for that set of holidays and closures.
Select Save.
You can add or change non-work times separately from a working time calendar.
On the Organization administration page, select Non-work time.
Select New, enter a name and time range for the non-work time, and then select Save.
Configure leave and absence types
Leave types in Dynamics 365 Human Resources define the types of absences that employees can report. You can tailor leave types according to the needs of your organization. Examples of leave types include:
Paid time off (PTO)
Unpaid leave
Paid vacation
Sick leave
Medical leave
Family leave
Short-term disability
Bereavement leave
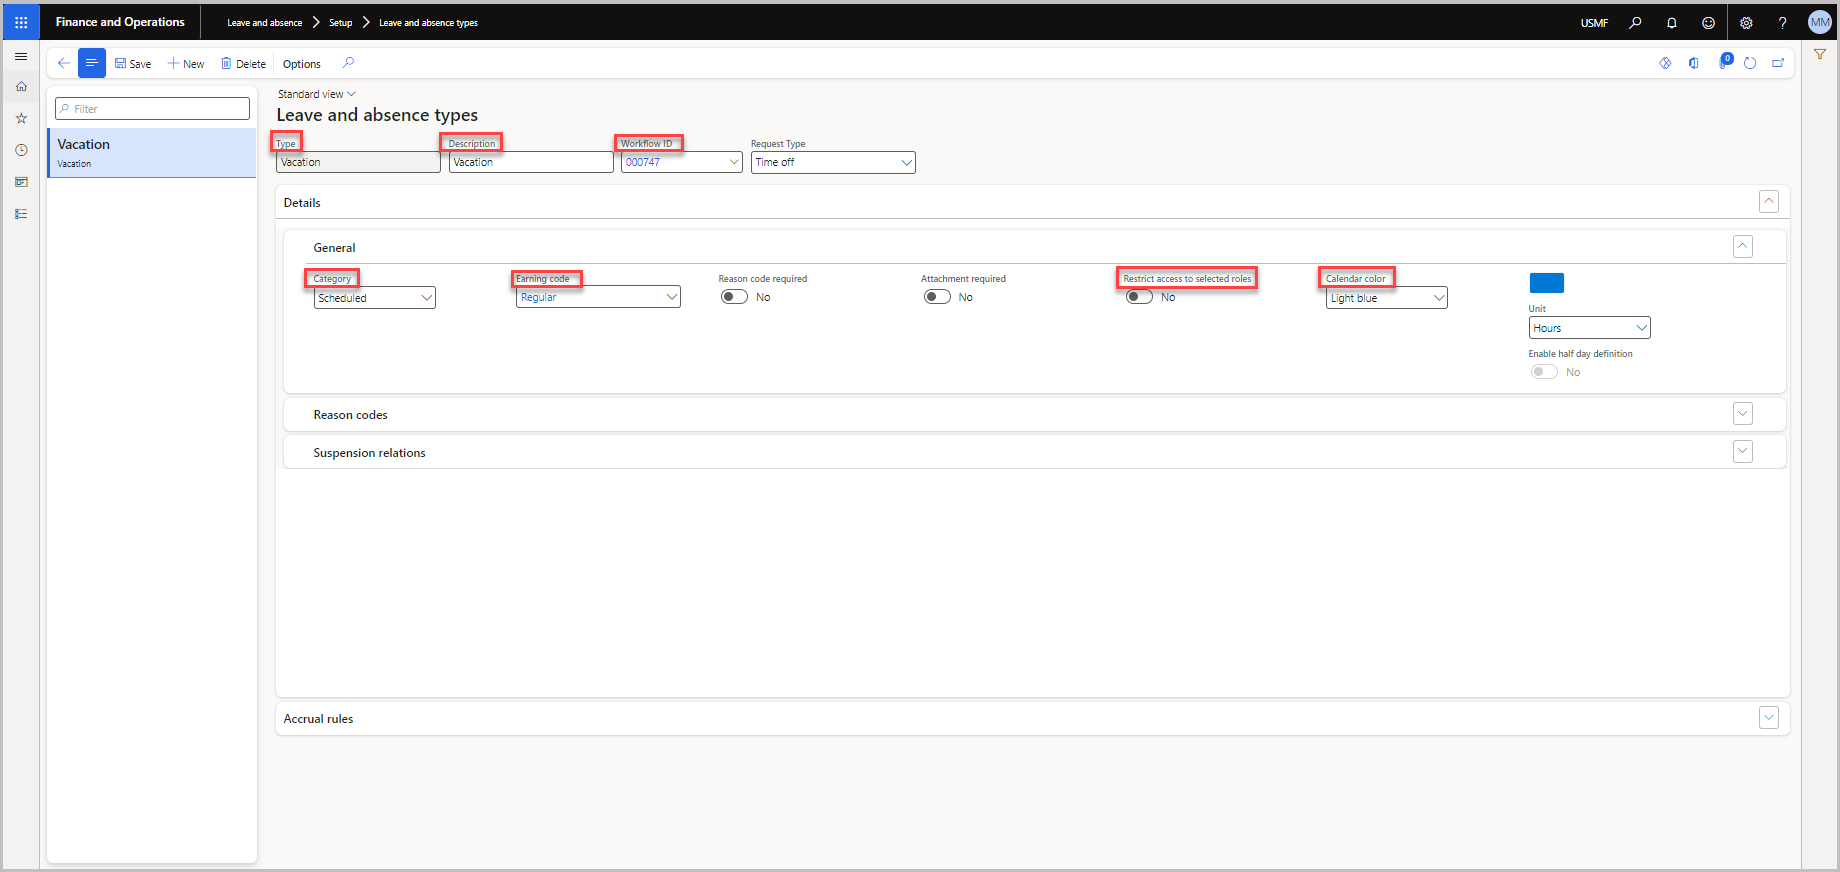
Go to Leave and absence > Setup > Leave and absence types.
Select New.
Enter a name for the leave type under Type, select a workflow from Workflow ID, and then enter a description under Description.
In General, select None, Scheduled, or Unscheduled from the Category dropdown list.
Select an earning code from the Earning code dropdown list.
Under Reason code required, choose whether you want to require a reason code. If you want to require reason codes, you might need to add them. Under Reason codes, select Add, select a reason code, and then select the Enabled option next to it.
Under Restrict access to selected roles, choose whether you want to restrict access.
Note
If you choose to restrict access and then select the security roles under Security roles for this leave type. The security roles are defined in the workflow that you selected under Workflow ID previously in this procedure.
Under Calendar color, choose what color to display on leave and absence calendars for this leave type.
Under Suspension relations, choose if you want to have this leave type suspend another leave type or suspended by another leave type. When a leave of absence request is submitted for the suspending leave type, a leave suspension is automatically created for the suspended leave type.
Select Save.
Configure leave type rules
To configure leave type rules, follow these steps:
On the Accrual rules tab of a leave and absence type, set rounding options for the leave type. Options include None, Up, Down, and Nearest. You can also set rounding precision for the leave type.
Set Holiday correction for the leave type. When you select this option, Human Resources uses the number of holidays that fall on a work day to determine how to accrue time off for the leave type. For example, if a holiday such as Christmas Day falls on a Monday, Human Resources subtracts one day from the leave type when processing accruals.
Set Carry-forward leave type for the leave type. When you select this option, any carry-forward balances are transferred to the specified leave type. You also need to include the carry-forward leave type in the leave and absence plan.
Define Expiration rules for the leave type. When you configure this option, you can choose the Time unit of days, or months and set the duration for the expiry. You can also set the effective date of the expiration rule. The effective date is used to determine when to start running the batch job that processes the leave expiration or the date when the rule takes effect. The expiration will always happen on the leave plan start date after the batch job has been set to process. For example, the plan start date might be 1/1/2021, but the rule wasn't created until 6/1/2021. By setting the effective date to 6/1/2021, the rule will be processed on the next year boundary, or 1/1/2022. Any leave balances that exist at the time of expiry are subtracted from the leave type and are reflected in the leave balance.
Managers will also have the ability to mandate attachments for leave of absence requests, hide leave balances for certain leave types, and allow for open-ended leave in which return dates may be confirmed later.
