Deploy the Healthcare data pipeline template
The Healthcare data pipeline template is a data management capability in Microsoft Cloud for Healthcare. You can deploy this template from Microsoft Cloud Solution Center. This template deploys an app from Azure Logic Apps with a blob trigger to asynchronously process bundles in the blob storage.
You can deploy the resources that are outlined in the following table by using the Healthcare data pipeline template.
| Resource | Description |
|---|---|
| Managed identity | The name of the managed identity follows a specific format: miUniqueValue. The prefix mi stands for managed identity, and the suffix UniqueValue is a random string ensuring that the name isn't duplicated. The deployed logic app is assigned this managed identity. The managed identity is also granted access to the storage account, FHIR server, and the Dataverse environment. |
| Azure storage account | The name of the storage account follows a specific format: saUniqueValue. The prefix sa stands for storage account, and the suffix UniqueValue is a random string ensuring that the name isn't duplicated. Along with the storage account, the template also deploys the three containers, namely bundles, bundlesarchive, and bundleserror. |
| Role assignment | Assigns the Storage Blob Data Contributor role on the storage account to the managed identity. |
| Microsoft Azure Event Grid | The name of the Event Grid follows a specific format: egUniqueValue. The prefix eg stands for Event Grid, and the suffix UniqueValue is a random string ensuring that the name isn't duplicated. All blob events are posted to this Event Grid. |
| Microsoft Azure Service Bus | The name of the Service Bus follows a specific format: sbUniqueValue. The Event Grid posts events to the Service Bus queue named bundleCreated. |
| Authorization rule | Creates a listen authorization rule on the Service Bus with the name bundleauthlisten. |
| Azure Logic Apps | Uses the Consumption hosting plan type to create a logic app workflow that triggers off the Service Bus events. This logic app posts the bundles to the created endpoints. |
The following diagram shows the design of the pipeline that deploys through the template.
When a bundle is placed in the bundles container of the deployed Azure storage account, a BlobCreated event is created and posted to the Azure Service Bus through Azure Event Grid topics, triggering a logic app run. The logic app fetches the bundle and posts it to the configured endpoints. If the run is successful, the bundle is moved to the bundlesarchive folder and a blob with the name originalblobname_result.json is created in the same folder. If the run results in an error, the bundle is moved to the bundleserror folder and a blob with the name originalblobname_result.json is created in that folder.
Deploy Healthcare data pipeline template
In this task, you use Microsoft Cloud Solution Center to deploy Healthcare data pipeline template.
Sign in to your Microsoft 365 tenant as a user with a contributor role on the Resource Group to which the template will be deployed, open a new browser tab and then go to Microsoft Cloud Solution Center.
Note
You must contact your system administrator to get the required permissions to deploy the Healthcare data pipeline template.
Note
The Global Administrator role is an extremely privileged role that is meant to be a break glass account for emergency use. Allowing only the Global Administrator role to perform a task or use a feature can lead to a proliferation of Global Administrator roles assigned and forces an organization and its tenant to be overprivileged. Hence you must create alternative lower privileged roles and use those roles to perform a task or use the feature.
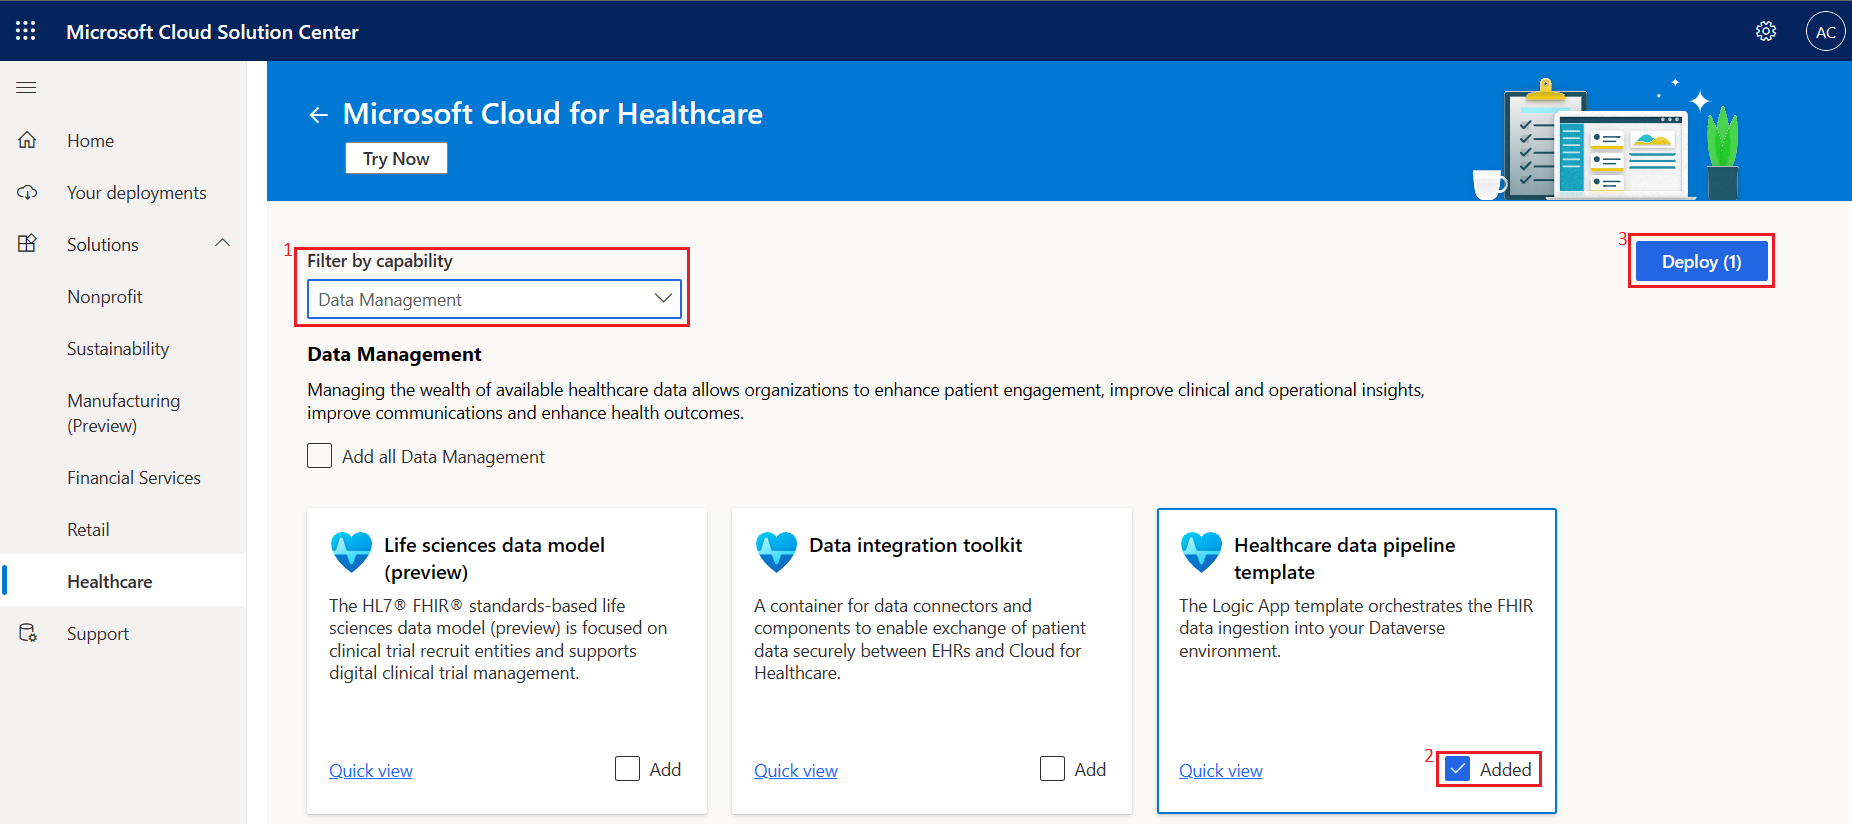
On the Microsoft Cloud for Healthcare page, select any solution card, such as Personalized care.
Select Data Management from the Filter by capability dropdown menu.
Select the Healthcare data pipeline template card.
Select Deploy.
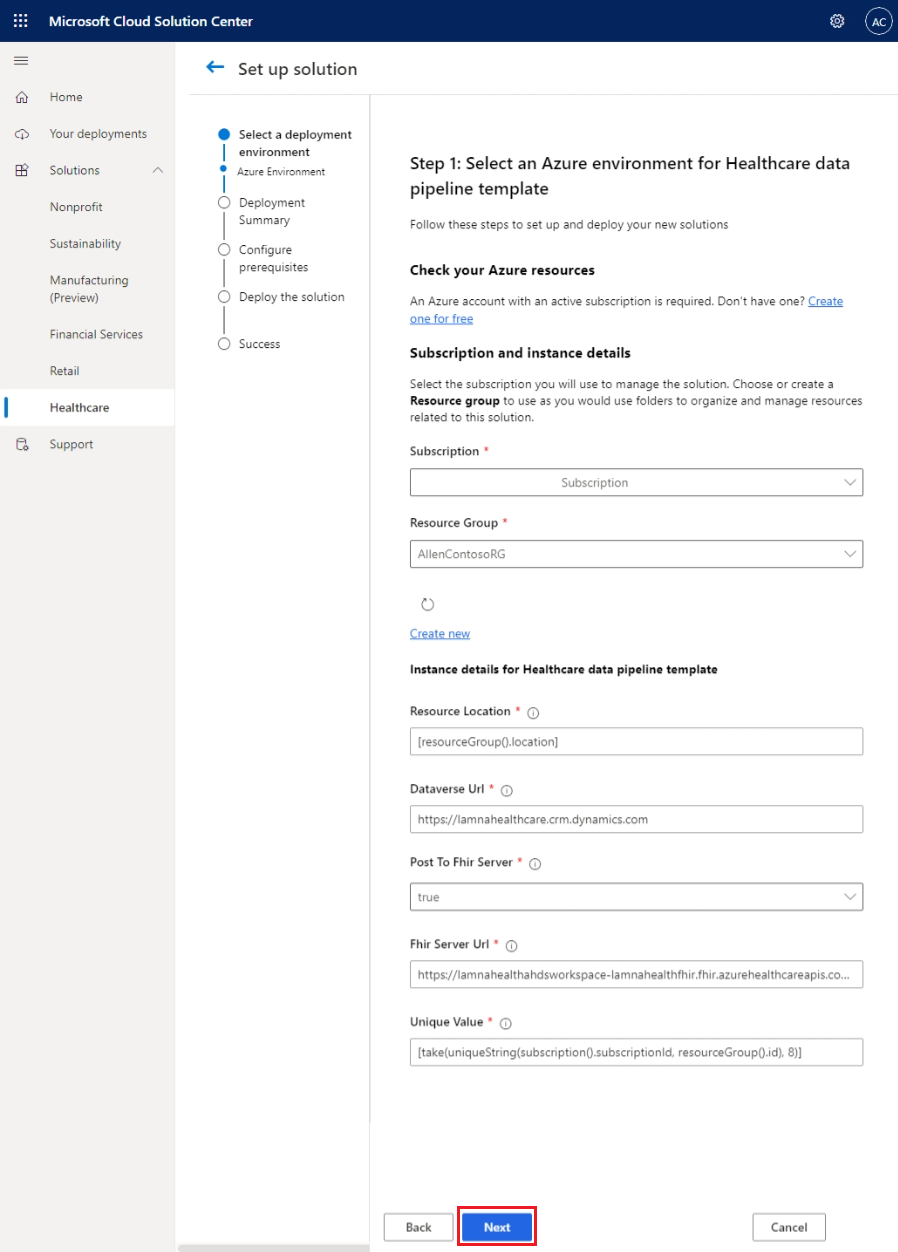
On the Select an Azure environment for Healthcare data pipeline template page, provide the following details:
Subscription - Select the Azure subscription in which you provisioned the Azure Health Data Services workspace.
Resource Group - Select the resource group name in which you provisioned the Azure Health Data Services workspace.
Resource Location - Leave the default value.
Dataverse Url - Specify the URL of the Dataverse environment in which you deployed Microsoft Cloud for Healthcare solutions. It should look like
https://lamnahealthcare.crm.dynamics.com.Post to Fhir Server - Select true from the dropdown menu.
Fhir Server Url - Specify the FHIR server URL that you copied in the previous unit. It should look like
https://lamnahealthahdsworkspace-lamnahealthfhir.fhir.azurehealthcareapis.com/.Unique Value - Leave the default value.
Select Next.
On the Deployment summary and nickname page, enter a name in the Name this new deployment for easy management text box.
Select the Terms of Service box.
Select Next.
On the Configure pre-deployment dependencies page, select Deploy if all solution dependencies have a green check mark.
On successful deployment of the Healthcare data pipeline template, go to Azure portal and then select the resource group in which Azure Health Data Service was deployed.
Verify if the following resources are deployed in the resource group:
Managed Identity
Storage account
Service Bus Namespace
Event Grid System Topic
Logic App
API Connection
Grant the FHIR Data Contributor role to the managed identity
In this task, you'll grant the FHIR Data Contributor role to the managed identity that was created through the deployment of Healthcare data pipeline template. This task allows the managed identity to post new data to the FHIR service that you created in the Azure Health Data Services workspace.
Sign in to your Microsoft 365 tenant as a user with the contributor role on the Resource Group to which the Azure Health Data Service and FHIR service is deployed, open a new browser tab and then go to the Azure portal.
Note
You must contact your system administrator to get the required permissions to deploy the Healthcare data pipeline template.
Select the resource group in which Azure Health Data Service and FHIR service were deployed.
Select the FHIR service.
On the FHIR service page, select Access Control (IAM) on the left navigation pane.
On the right pane, select + Add > Add role assignment.
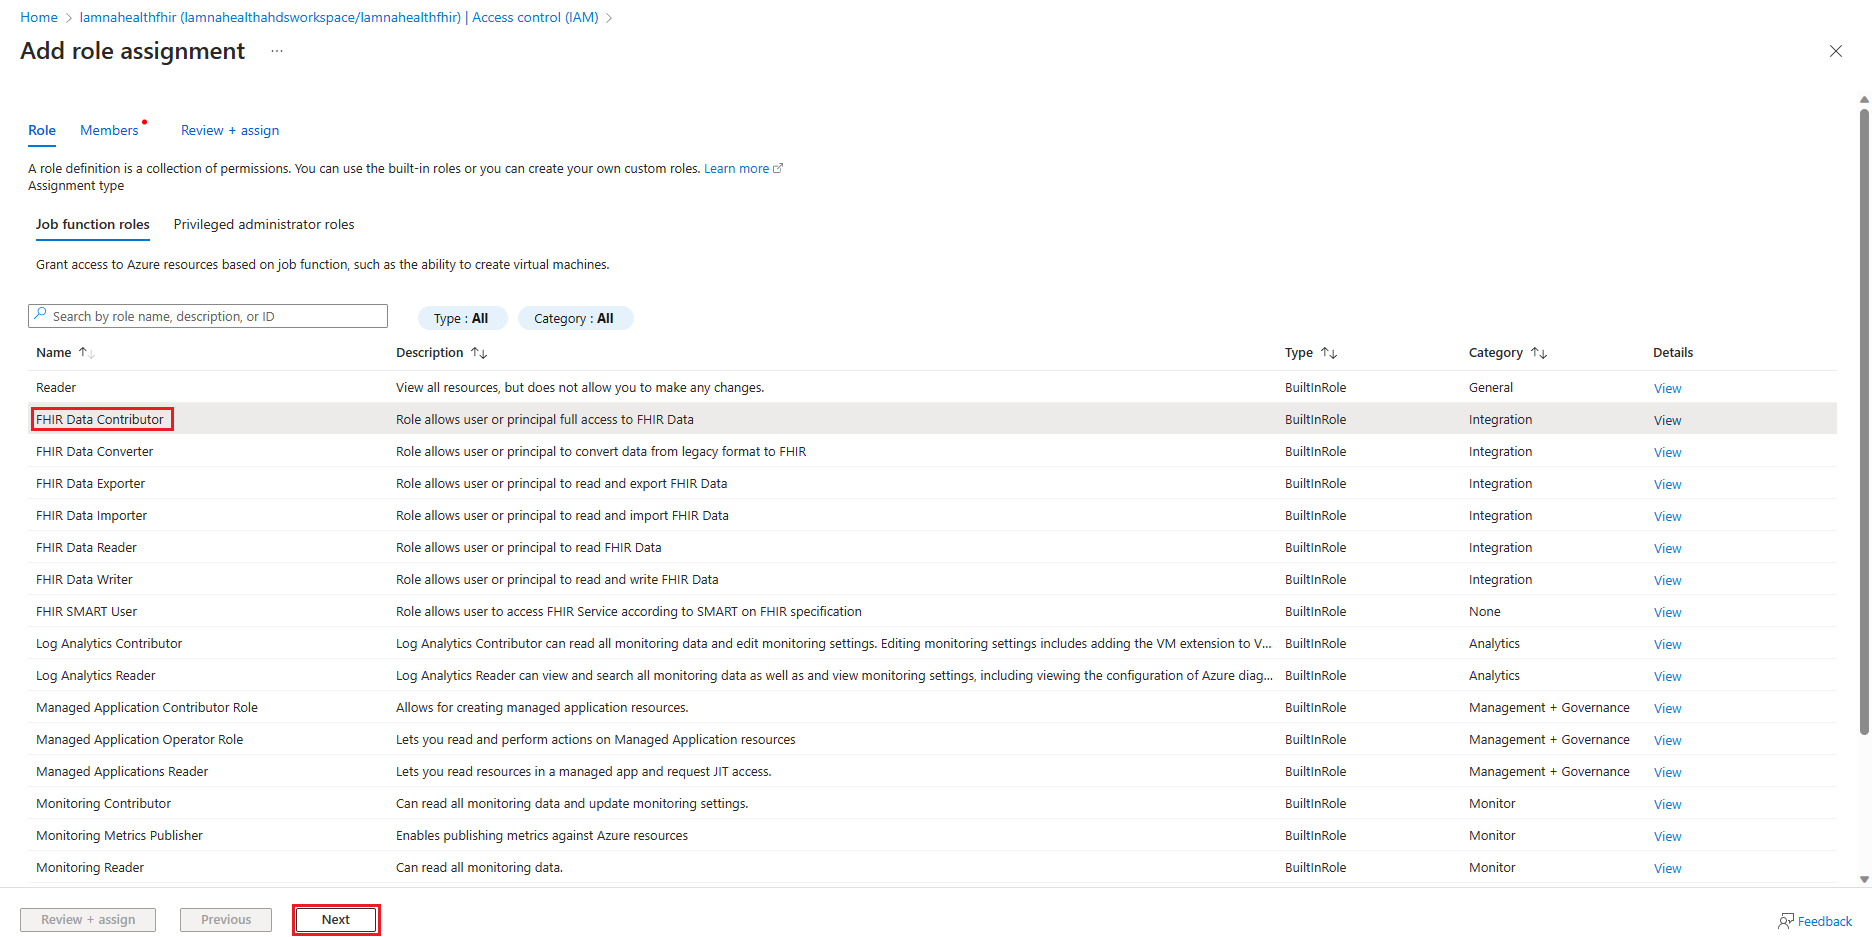
On the Add role assignment page, select the FHIR Data Contributor role and then select Next.
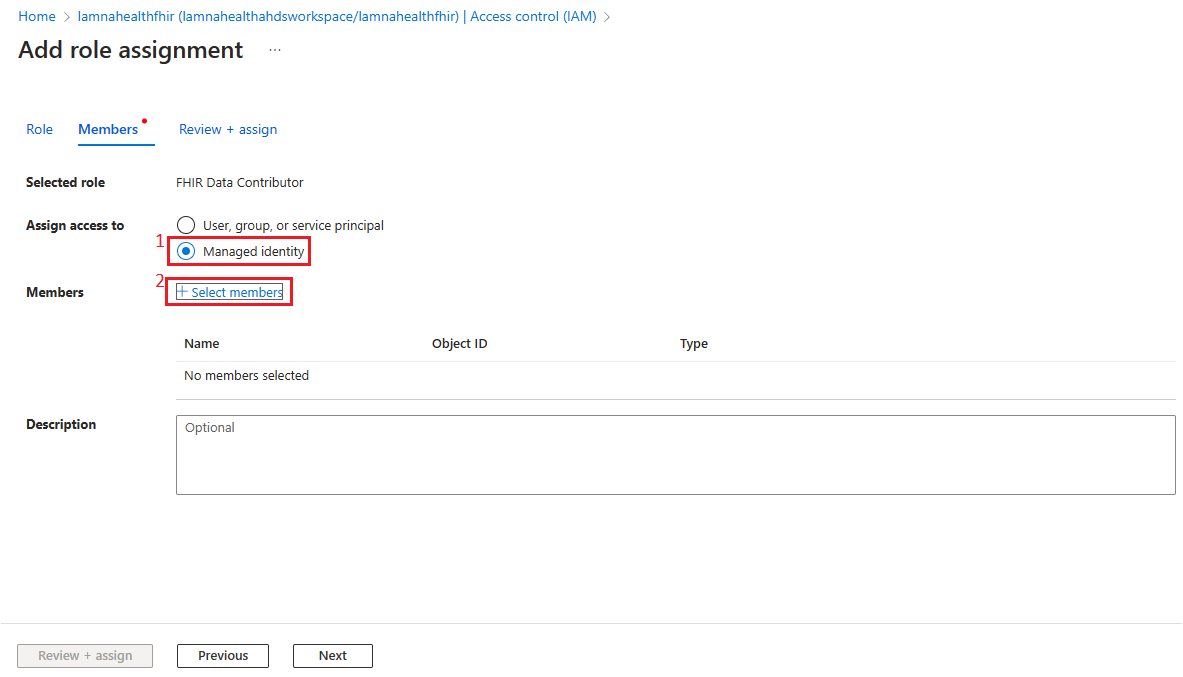
In the Assign access to object, select Managed identity.
Select + Select members.
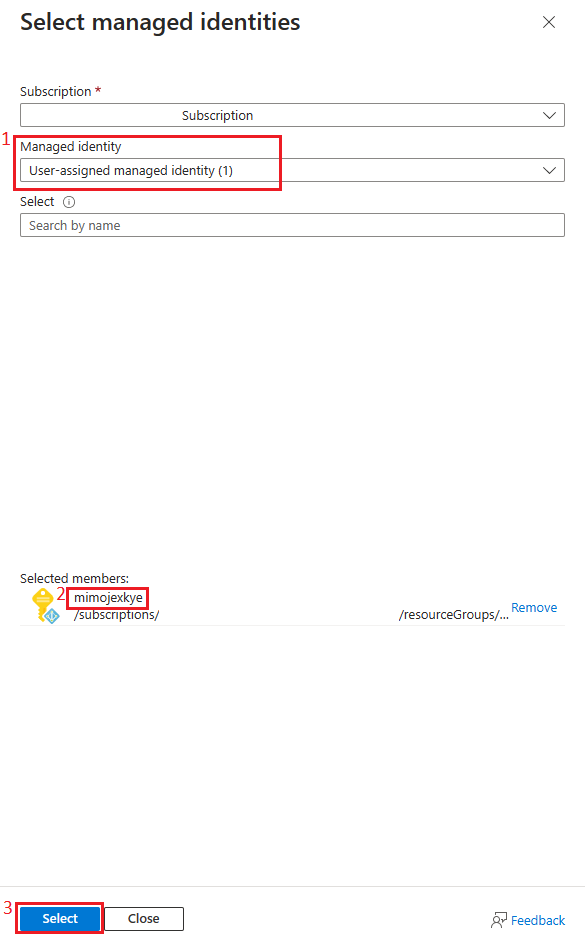
On the Select managed identities panel, select User-assigned managed identity from the Managed identity dropdown menu.
Select the managed identity that was created through Healthcare data pipeline template deployment.
Select Review + assign.
Grant the Sync Admin for FHIR App Reg User role to the managed identity
In this task, you register the managed identity as an application user in the Dataverse environment and then grant the Sync Admin for FHIR App Reg User Dataverse role to it so that it can access Dataverse Healthcare APIs.
While signed in to your Microsoft 365 tenant as the user with a contributor role, open a new browser tab and then go to the Azure portal.
Note
The user must be assigned the contributor role on the Resource Group to which the template will be deployed.
Select the resource group in which Managed Identity service is deployed.
Select the Managed Identity.
Copy the Client ID of the Managed Identity from its Overview page and then save it in a notepad.
Open a new browser tab and then go to the Microsoft Power Platform admin center.
Select the Dataverse environment in which you deployed the Microsoft Cloud for Healthcare solutions.
In the Access section, select S2S apps and then select + New app user.
On the Create a new app user pane, select the Business unit associated with your Dataverse environment and then select + Add an app.
On the Add an app from Azure Active Directory pane, paste the client ID of the managed identity, which you copied in the previous step, in the search box.
Select the name of the managed identity from the search results.
Select Add.
Select the edit icon next to Security roles.
On the Edit security roles pane, select the Sync admin for FHIR App Reg User role and then select Save.
Select Create.
Now, you successfully set up and deployed the Healthcare data pipeline template. Additionally, you granted the FHIR Data Contributor Azure role and the Sync admin FHIR App Reg User Dataverse role to the managed identity.

