Exercise - Post sample data to Azure Health Data Services FHIR service with Insomnia
For the exercises in this module, the provided sample FHIR bundles help you validate your FHIRlink connection with the canvas app and Power Automate flows. Each bundle contains the following FHIR resources:
Patient
Practitioner
Location
Organization
Encounter
Condition
Appointment
MedicationRequest
You can import each file independently with all included references in the same bundle. For example, each Appointment references the Patient and Practitioner resources that are included in that file.
You can edit these files and add your own FHIR resources. However, later exercises in this module use the Patient and Appointment FHIR resources that are included in the sample files as examples.
In this exercise, you use Insomnia to configure the following items:
A new set of Environment settings
A new Request to retrieve an authorization token
A request to post the FHIR bundle samples to your FHIR service
Prerequisites
To complete this exercise, make sure that you meet the following prerequisites:
FHIR service deployed in Azure. For more information, see Deploy a FHIR service.
A registered client application to access the FHIR service. For more information, see Register a service client application in Microsoft Entra ID.
Note
In the Authentication setting: confidential vs. public section, Custom redirect URIs values, use
https://insomnia.rest/instead of the value that's listed for Postman.FHIR Data Contributor permissions granted to the client application and your user account.
Insomnia is installed locally. For more information, see Install Insomnia.
Sample bundles are downloaded from FHIRlink sample bundles
Configure new Insomnia environment settings
In this task, you set up Insomnia to connect to Azure Health Data Services FHIR service. This configuration uses the Client Credential grant flow to obtain an access token from Microsoft Entra ID to authenticate Insomnia.
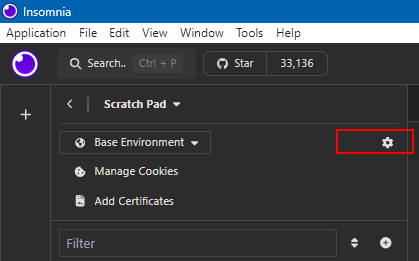
Open Insomnia and select Use the local Scratch Pad.
Select the settings gear icon next to Base Environment.
Select the plus (+) icon for the dropdown menu and then select Private environment.
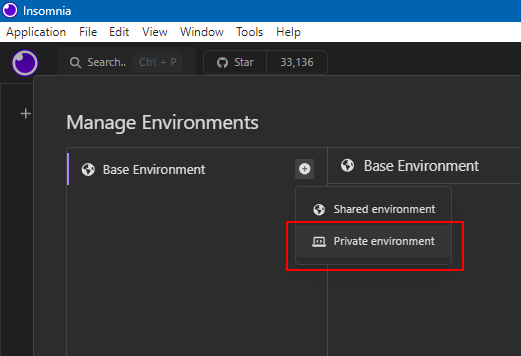
Enter Azure Health Data Services as the name for the new environment.
Add the following variables JSON in the Azure Health Data Services environment.
{ "client_id": "<your client id>", "client_secret": "<your client secret>", "fhir_url": "<your FHIR service url>", "tenantid": "<your Azure Tenant ID>", "tokenurl": "https://login.microsoftonline.com/{{tenantid}}/oauth2/token" }Select Save.
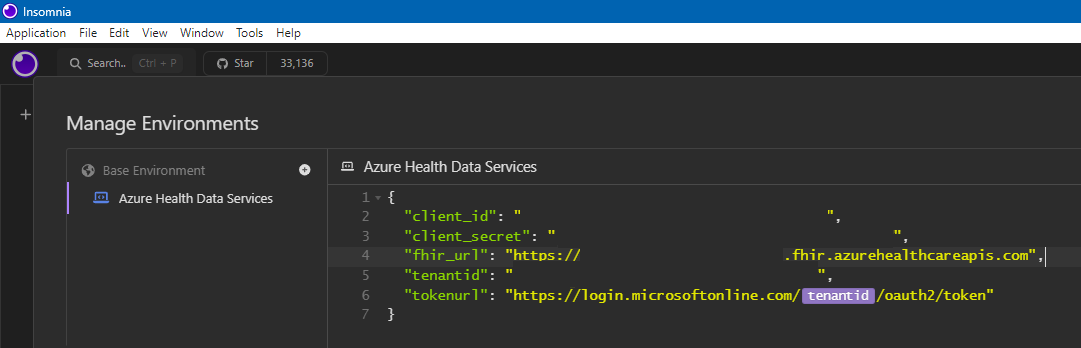


Now, you can use the new named variables in your requests and other configuration areas. For example, you can use the tenantid variable to define the tokenurl variable.
Configure a new Insomnia request to retrieve the authorization token
In this task, you create a new HTTP request to request a new access token for the Azure Health Data Services FHIR service by using the values in the environment variables.
In the Requests section after the environments, select the plus (+) icon and then select HTTP request.
Enter the name of the request as GetAccessToken.
In the upper-right corner of the request details, in the URL, enter the environment variable for the token URL as
{{ _.tokenurl}}and then select POST as the method.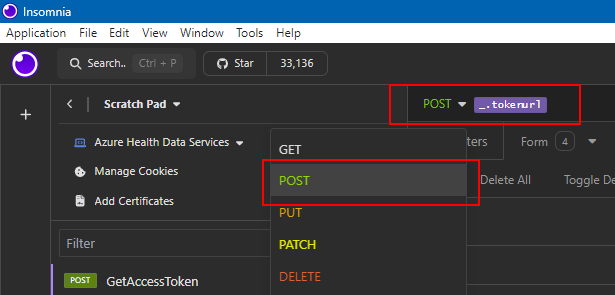
Select the Body tab and then select Form URL Encoded.
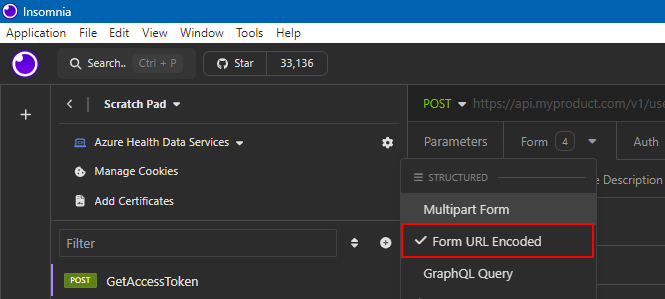
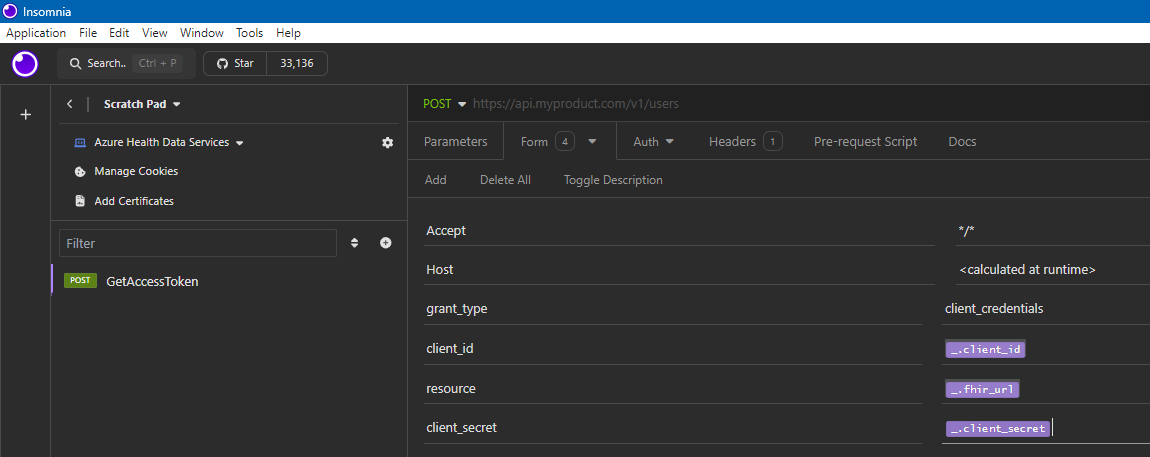
In the Form area, add the following four new form name/value pairs.
Name Value grant_type client_credentialsclient_id {{ _.client_id }}resource {{ _.fhir_url }}client_secret {{ _.client_secret }}The use of braces and the underscore (_.) prefix with a period indicates that you're referencing an environment variable. These environment variables are highlighted in the Insomnia editor.
On the Headers tab, verify that the headers are automatically set to
application/x-www-form-urlencoded. The system automatically configures this setting when you select the Form URL Encoded option for the Body.
In the upper right of the request details, in the URL area, select Send.
Validate that you receive a 200 OK response and an access_token value that's available in the response JSON.


Configure a new Insomnia request to post a FHIR bundle
In this next task, you create a new HTTP request that posts a FHIR bundle to the FHIR server. You configure the new request to use an Insomnia function to chain together the requests that invoke the GetAccessToken and retrieve the access_token value from the response JSON.
The new request retrieves a new access_token value automatically whenever you select Send. You can reuse this request when posting FHIR bundles, and you use it to post each sample bundle included in the module.
Add another HTTP request to your environment.
In the Requests section, after Environments, select the plus (+) icon and then select HTTP request.
Enter a name for the request as PostFHIRBundle.
In the upper right of the request details, in the URL, enter the environment variable for token URL as
{{ _.fhir_url}}and then select POST as the method.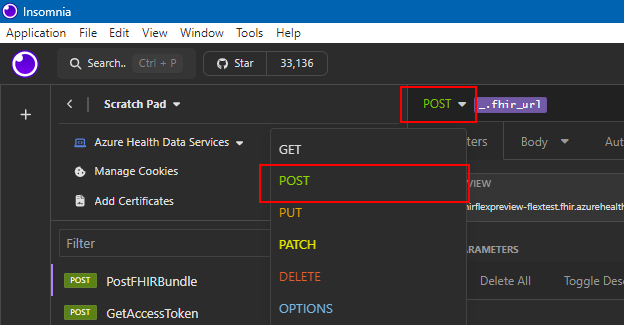
On the Headers tab, add the following header name/value pairs.
Name Value Authorization Bearer(include a trailing space)Content-Type application/json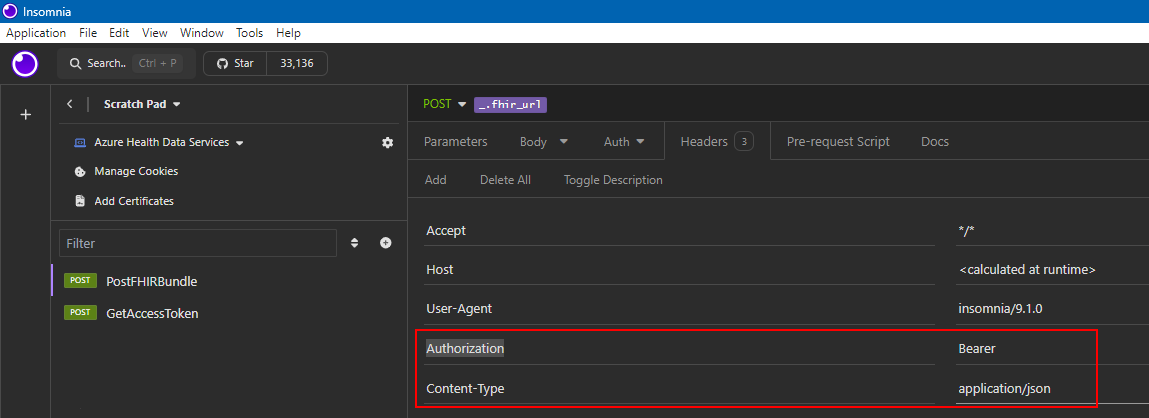
In the Authorization value, after the trailing space behind Bearer , press the CTRL + Space keyboard shortcut. In the context menu, select Response and then Body attribute.
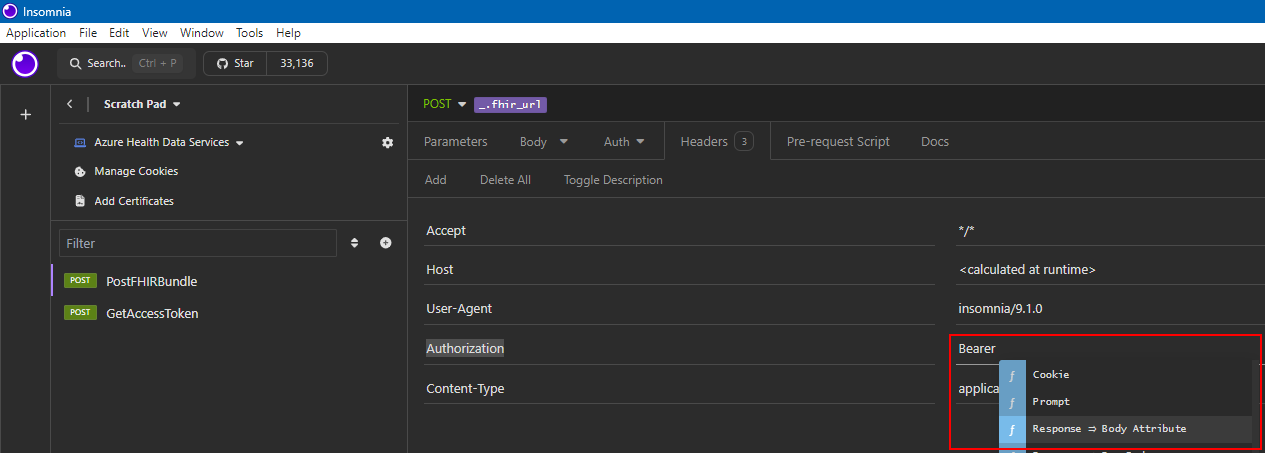
Select the highlighted text to open the Insomnia function editor. In the editor, enter the following values:
Name Value Function to Perform Response- reference values from other request's responsesAttribute Body Attribute- value of response bodyRequest POST GetAccessTokenFilter (JSONPath or XPath) $.access_tokenTrigger Behavior When Expired- resend when existing response expiresMax age (seconds) 60Select Done.
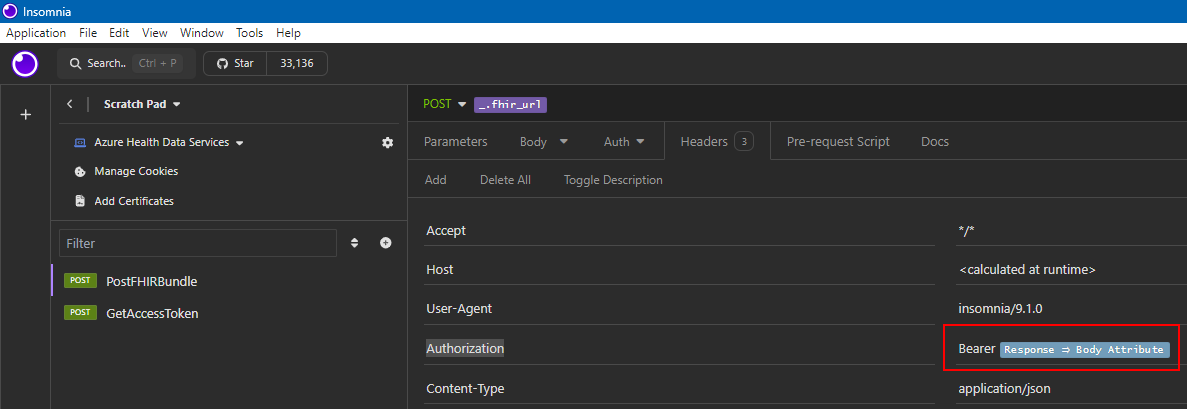
Now, whenever the PostFHIRBundle request is called, it first retrieves the authorization token by using the GetAccessToken request and then passes the token in the Authorization header.
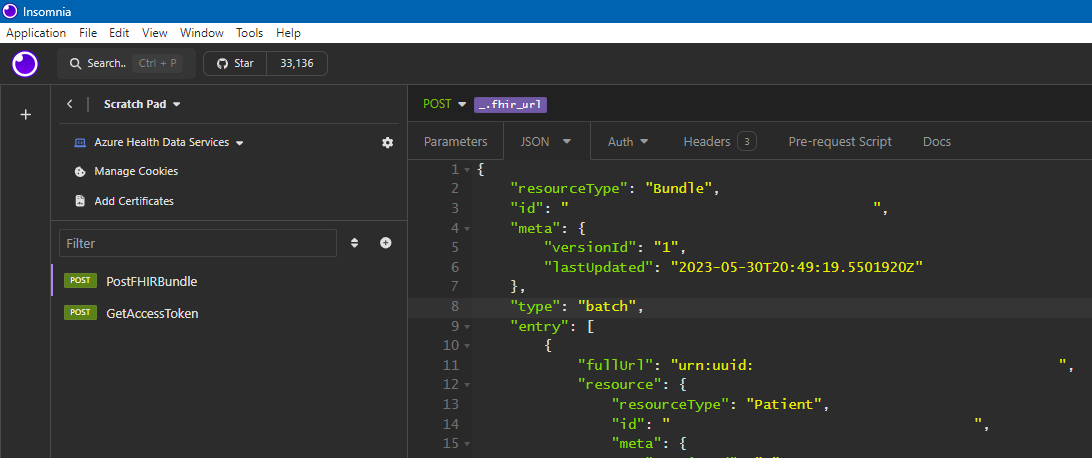
On the Body tab, select JSON.

In the editor, paste the contents of the sample bundle file, or drag and drop it to the editor area to load. For example, drag and drop the Patient-FHIRlink1.json file into the editor.
In the URL area, in the upper corner of the request details, select Send.
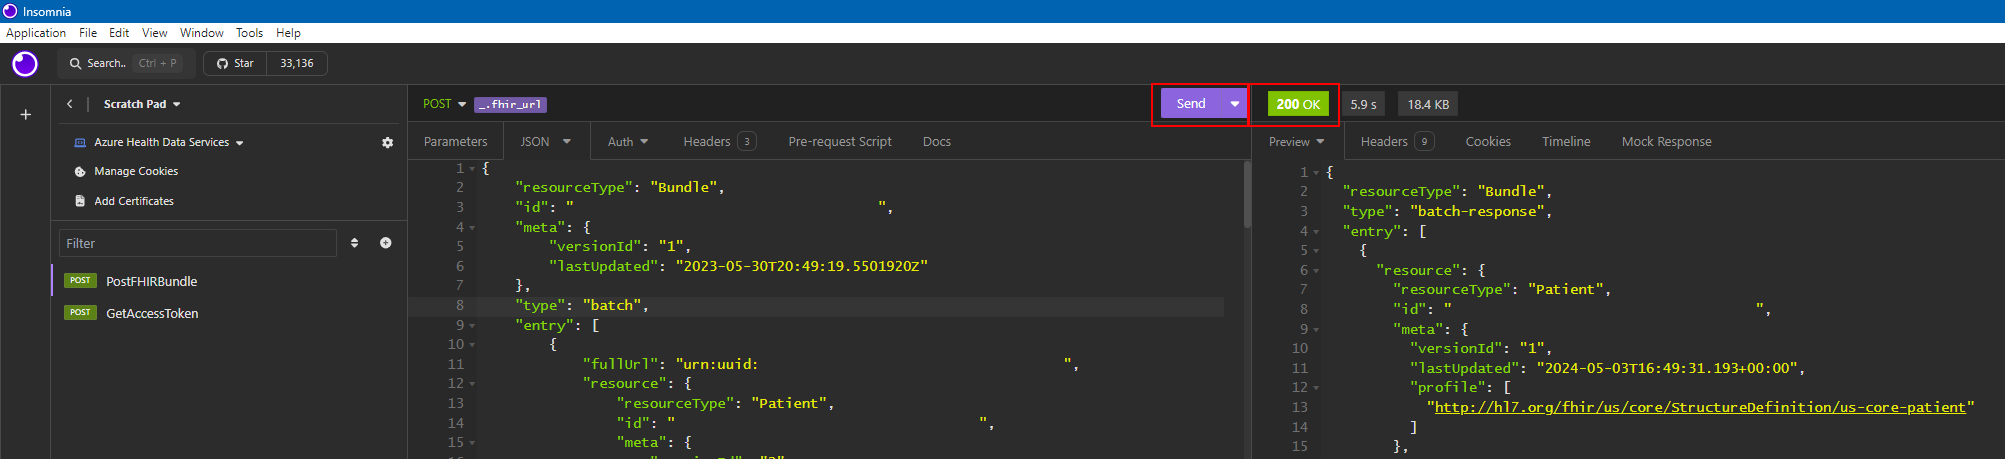
Validate that you receive a 200 OK response and that the response value JSON includes a bundle of type batch-response.
Repeat the three previous steps for each sample FHIR bundle included in the module:
Patient-FHIRlink2.json
Patient-FHIRlink3.json
Patient-FHIRlink4.json
Patient-FHIRlink5.json


