Column-level security to control access
When record-level control isn't adequate for your business scenario, Dataverse provides a column-level security feature to allow more granular control of security at the column level. You can turn on column-level security on all custom columns and most system columns. Each column’s metadata defines if that's an available option for the system column.
You can turn on column-level security on a column-by-column basis. Then, you can manage access by creating a Column Security Profile. The profile contains all columns that have column-level security turned on and the access granted by that specific profile. You can control each column in the profile for Create, Update, and Read access. Then, you would associate Column Security Profiles with a user or teams to grant users with those privileges to the records that they already have access to. Column-level security has nothing to do with record-level security. A user must already have access to the record for the Column Security Profile to grant them access to the columns. Make sure that you use column-level security as needed and not excessively because it can add overhead that's detrimental if over used.
To provide you with more information, this unit includes an example of implementing column security.
Configure column security example
Before you begin going through the following example, you should learn how to implement column-level security. A system administrator needs to perform the following tasks:
Turn on column security on one or more columns for a given table.
Associate one more existing security profile, or create one or more new security profiles, to grant the appropriate access to specific users or teams.
A security profile determines:
Permissions to the secure columns
Users and teams
You can configure a security profile to grant a user or team members with the following permissions at the column level:
Read - Read-only access to the column's data.
Create - Users or teams in this profile can add data to this column when creating a record.
Update - Users or teams in this profile can update the column's data after it's been created.
To determine the user privileges for a specific data column, you can configure a combination of these three permissions.
Important
Unless a security-enabled field has one or more security profiles assigned, only users with the system administrator security role have access to the field.
Background for the ensuing example: Your company's policy is that only account managers and system administrators should be able to view a customer's credit limit. To restrict access, you can implement column-level security by completing the following steps.
Turn on column security
To turn on column security, follow these steps:
Sign in to Power Apps as an administrator.
Select an environment.
On the left pane, select Dataverse.
Select Tables and then select the All view.
Select the Account table.
In the Schema pane, select Columns. Find and select the Credit Limit column (you can use the search entry field in the upper right of the Columns view or scroll down the list).
On the right pane, select Advanced options.
Select Enable column security.
Select Save. After the saving process completes, column security is available.
Configure the security profile
To configure the security profile, follow these steps:
Sign in to Power Apps as an administrator.
In the upper right, select the gear (Settings) icon and then select Admin center to open a separate Power Platform admin center browser instance.
Select Environments from the left navigation menu, and then select the environment where you want to set up the security profile.
From the header ribbon, select Settings.
Select the dropdown menu next to Users + permissions and then select Column security profiles. Alternatively, you can search for this setting in the search field under the Settings screen header.
From the upper ribbon, select + New Profile. A pane appears to the right of your screen called Create new column security profile. Enter a name, such as Account Manager. You can also add a description if you want.
Select Save. The pane closes to reveal your new profile listed under Column Security Profiles.
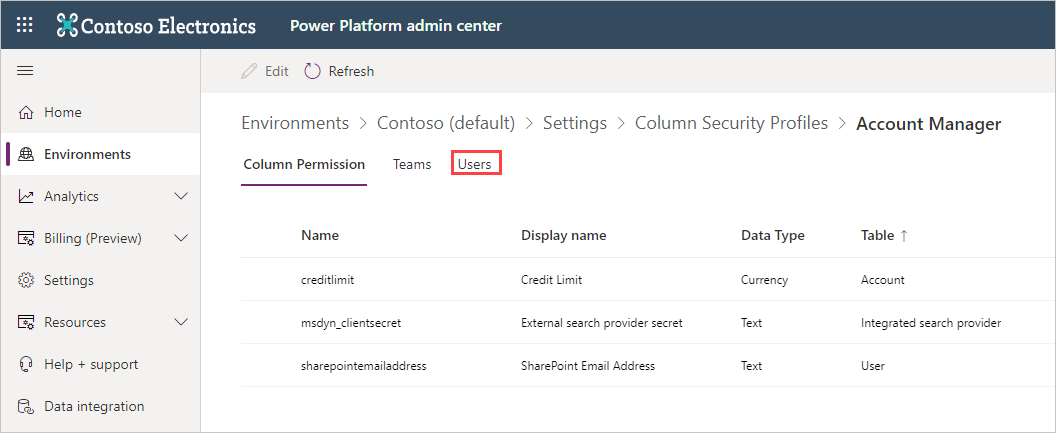
Select your Account Manager profile. Next, add some users to this profile. Three tabs show under the screen header: Column Permission (where you are by default), Teams, and Users. Select the Users tab.
Select + Click here to Add Users. An Add Users pane opens to the right of the screen. Enter the user names or email addresses for the users whom you want to add. Then, select the name from the dropdown menu that appears to add them to the list. If you add a name by mistake, you can select the X icon to the right of the user to remove them from the list.
When you're satisfied with the list of users, select Add in the lower part of the Add Users pane. If you need to add other users, use the + Add Users button in the upper part of the screen.
Select the Column Permission tab.
Select the Credit Limit column. In the upper part of the screen, select Edit.
From the Edit column security pane, under Read, select Allowed.
Select Save. The pane closes and your Column Permission tab displays the new settings for Account Managers for the Credit Limit column.
Essentially, any users who aren't in the Account Manager profile for this column won't have access to the Credit Limit column in the Account table or views. The field value displays a lock icon with asterisks (********), indicating that the field is secured.
