Create an account, database, and collection using Azure Cosmos DB for MongoDB
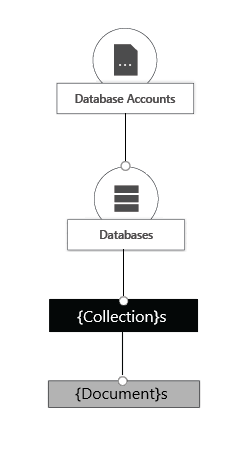
Azure Cosmos DB is a fully managed platform-as-a-service (PaaS). To use this service, we need to first create an Azure Cosmos DB account under our subscription. Once our account is created, we can then add database, collections, and documents within it.
We take a look at a couple of ways to create the different Azure Cosmos DB for MongoDB model elements.
Create an account, database, and container for the Azure Cosmos DB for MongoDB using the Azure portal
One way of creating our Azure Cosmos DB account and its elements, is using the Azure portal. In this example, we use the Azure portal to create an Azure Cosmos DB account using the Azure Cosmos DB for MongoDB. We then add a database and a collection. For the moment, don't worry about filling out more advanced settings that we cover in more detail in later modules. For this example, lets just review the Basics tab. Let's create our account and its elements.
Create an account for the Azure Cosmos DB for MongoDB
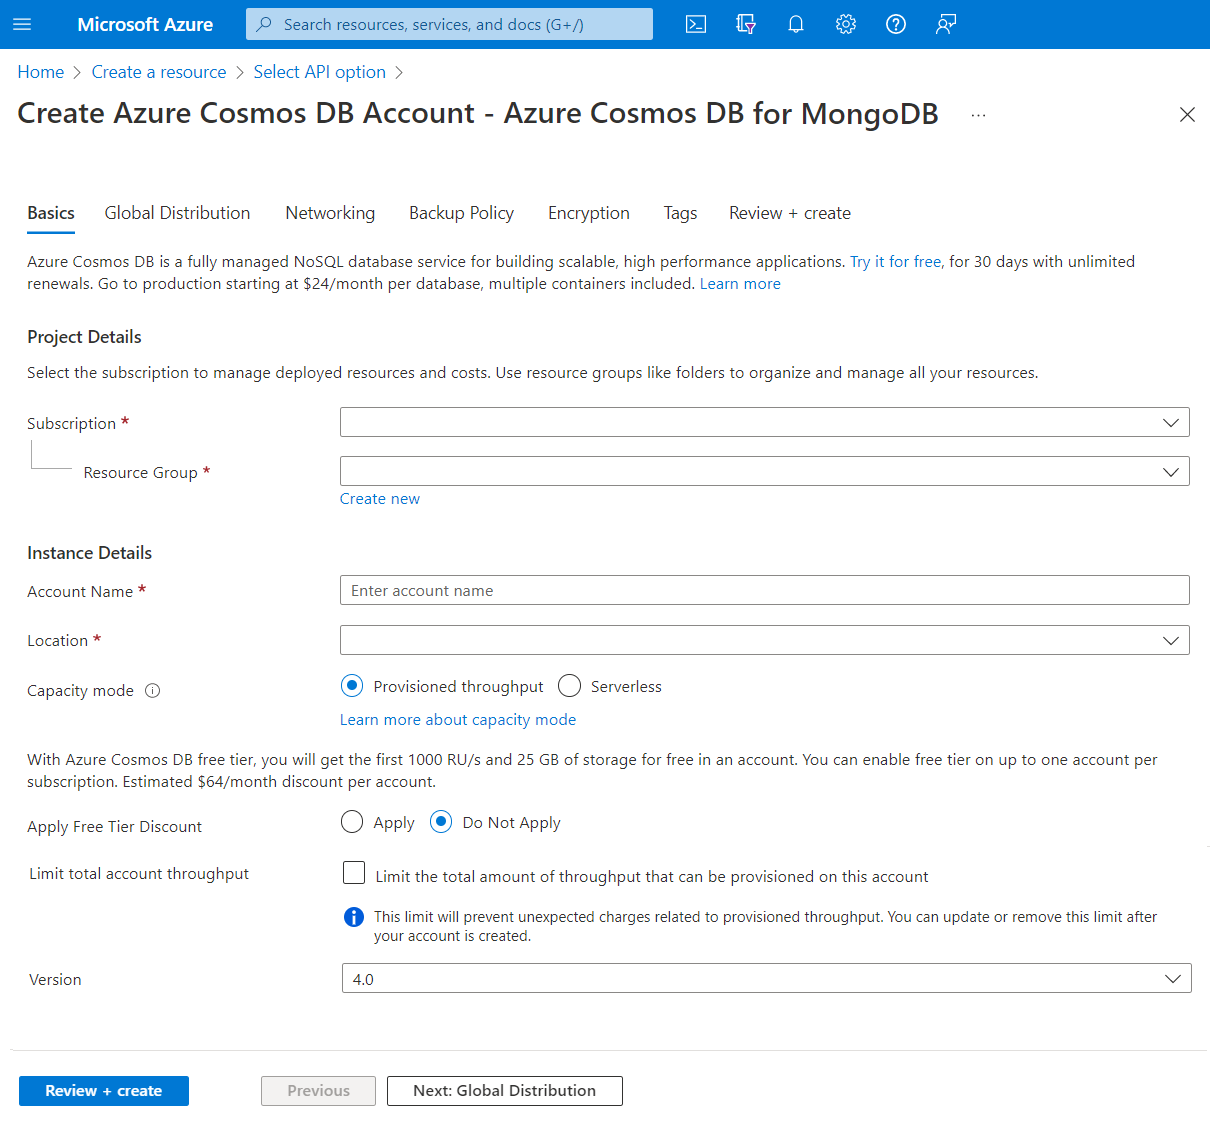
In the Azure portal, Select + Create a Resource, select Azure Cosmos DB, and Create.
Select Azure Cosmos DB for MongoDB.
Input the following parameters.
- Subscription - Your current Azure subscription.
- Resource Group - A new or existing Azure Resource Group to create the Azure Cosmos DB account on.
- Account Name - A unique name for your Azure Cosmos DB account. This name must be unique across the Azure. Your account URI has mongo.cosmos.azure.com appended to your account name.
- Location - The geographical location that hosts your Azure Cosmos DB account. You should typically select a location close to your users or applications.
- Capacity mode - As we discussed in a previous unit, you can select for your account to use Provisioned throughput or Serverless. Select Provisioned throughput for this example.
- Apply Free Tier Discount - Select Don't Apply for this example.
- Limit total account throughput - Leave unchecked for this example.
- Version - Select 4.0.
Note
To take better advantage of the supported features, we recommend that you use versions 3.6+ whenever possible.
Select Review + Create, and on a successful validation, select Create.
Note
It can take several minutes to create your Azure Cosmos DB account.
Create a database and container for the Azure Cosmos DB for MongoDB
Creating a database and container in the Azure portal is straight forward, let's first create a database.
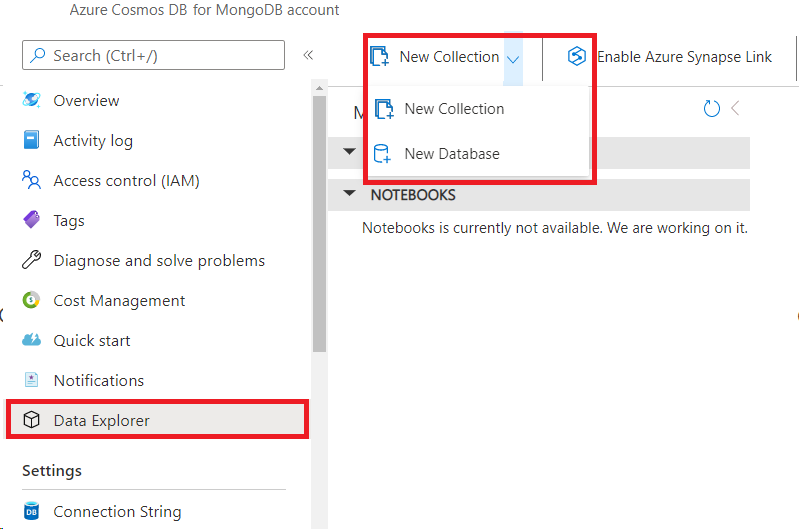
On the Azure Cosmos DB for MongoDB account left-hand menu, select Data Explorer.
Select the pulldown to the right of the New Collection icon and select New Database.
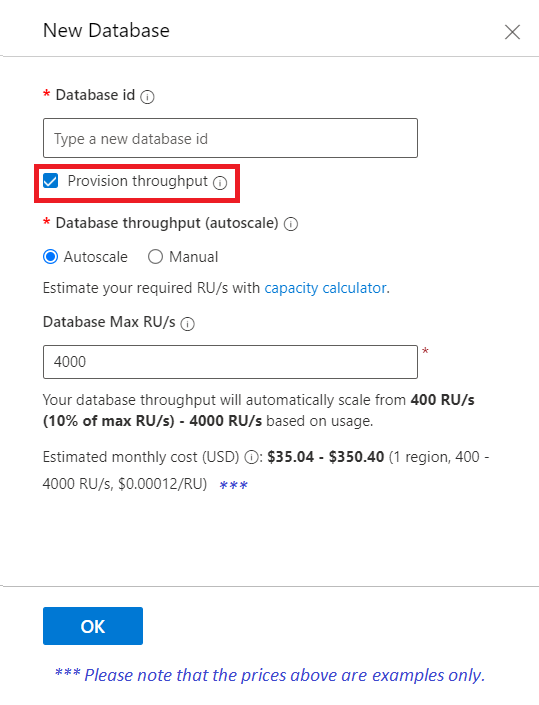
Give your database a new name under the Database id textbox.
While we could define the Provision throughput in the New Database dialog, in most cases you would select your provisioned throughput at the container level. Let's uncheck the Provision throughput checkbox and select Ok for this example.
We should now notice our new database under the MONGO API section. It's time to create our new collection.
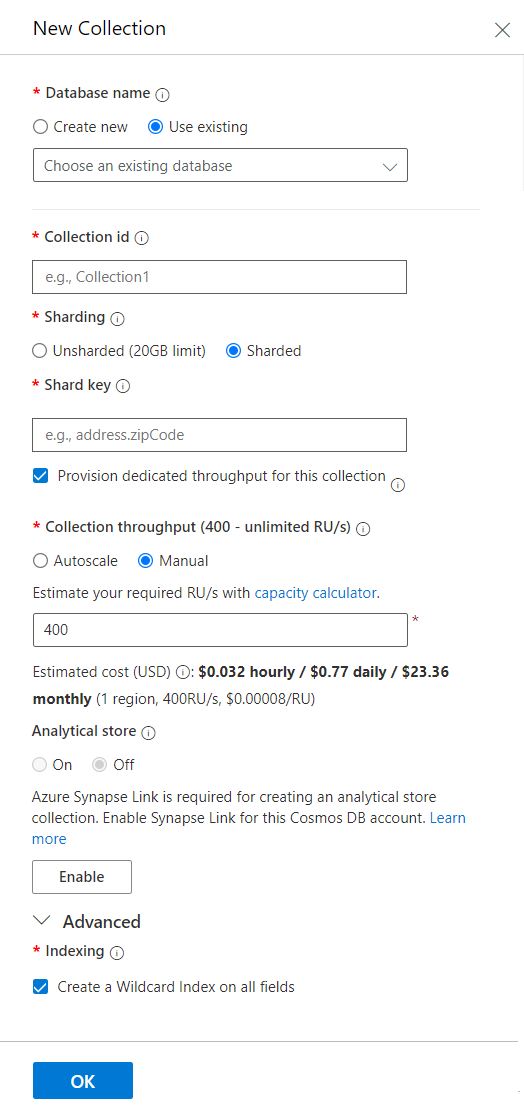
Select the New Collection icon.
Input the following parameters under the New Collection dialog.
- Database name - You notice that you have two options here, Create new, or Use existing. This option allows you to create a new database at the time you're creating the new collection. Since we already created a new database in our previous steps, select Use existing and pick the database name from the pulldown options.
- Collection id - This parameter is the name you give your collection.
- Sharding - We usually would want to select Sharded. This option allows Azure Cosmos DB to create containers that are sharded across multiple tenants based on the Shard key. With large containers, Azure Cosmos DB spreads your tenants across multiple physical nodes to achieve a high degree of scale. We discuss sharding in more detail under the Design module. Select Sharded.
- Shard key - Selecting Sharded requires you to add a Shard key. This key is the partition key that defines your partitioning strategy. For example in and IoT (Internet of Things) collection it could be /deviceid or maybe /region depending on the partitioning strategy you choose. We discuss partitioning strategy in more detail under the Design module.
- Provision dedicated throughput for this collection checkbox - Usually you want to provision the throughput of your collection either as Autoscale or Manual. This setting allows you to have better control of the cost of your individual collection. We discuss throughput in more detail in the Design module. For now, check the checkbox and select Autoscale.
- Collection throughput or Collection Max RU/s - Depending if you selected Manual or Autoscale you need to input the Collection throughput or Collection Max RU/s respectively, or in other words the throughput mode. The main difference is that in Manual mode charges you the amount the RU/s chosen regardless if you use them or not. Autoscale only charges what you use up to the Max RU/s you selected. In either case, your collection starts throttling once its throughput reaches the selected value. Leave the predefined value for this example.
- Analytical Store - The Azure Cosmos DB analytical store is beyond the scope of these lessons. Review the What is Azure Cosmos DB analytical store article for more information on that topic.
- Advanced/Indexing - We discuss indexes in more detail under the Design module. Leave the checkbox checked.
We should now have a database and one collection to connect to. In the next unit, we'll go into more detail on connecting to an Azure Cosmos DB for MongoDB account. Before that, let's review another way of creating our Azure Cosmos DB for MongoDB databases and collections.
Create or connect to a database and collection for the Azure Cosmos DB for MongoDB
You should be able to create or connect to your Azure Cosmos DB for MongoDB account using the Java, Python, Node.js, .NET, or other programming language with a MongoDB driver. Let's introduce some functions you would use to create these elements using some of the different languages. At the beginning of this module, we stated that the developers can keep on using MongoDB drivers, SDKs, and tools they're familiar with to connect to Azure Cosmos DB and create apps. We use those drivers and their properties and methods to program our access and operations against our Azure Cosmos DB for MongoDB account.
Create or connect to a database for the Azure Cosmos DB for MongoDB
You can use your favorite development tool to create your Azure Cosmos DB for MongoDB application. We use the MongoDB driver for each respective programming language to create our databases and collections. Let's review the code to connect to the Azure Cosmos DB for MongoDB accounts and to connect to the products database.
Node.js
import { DefaultAzureCredential, ClientSecretCredential } from "@azure/identity";
const { MongoClient, ObjectId } = require('mongodb');
import axios from "axios";

async function main() {
  // Environment variables
  const endpoint = process.env.AZURE_COSMOS_RESOURCEENDPOINT;
  const listConnectionStringUrl = process.env.AZURE_COSMOS_LISTCONNECTIONSTRINGURL;
  const scope = process.env.AZURE_COSMOS_SCOPE;

  // Uncomment the corresponding lines for the authentication type you want to use.
  // For system-assigned managed identity.
  // const credential = new DefaultAzureCredential();

  // For user-assigned managed identity.
  // const clientId = process.env.AZURE_COSMOS_CLIENTID;
  // const credential = new DefaultAzureCredential({
  //     managedIdentityClientId: clientId
  // });

  // For service principal.
  // const tenantId = process.env.AZURE_COSMOS_TENANTID;
  // const clientId = process.env.AZURE_COSMOS_CLIENTID;
  // const clientSecret = process.env.AZURE_COSMOS_CLIENTSECRET;
  // const credential = new ClientSecretCredential(tenantId, clientId, clientSecret);

  // Acquire the access token
  const accessToken = await credential.getToken(scope);

  // Get the connection string
  const config = {
    method: 'post',
    url: listConnectionStringUrl,
    headers: {
        'Authorization': 'Bearer ${accessToken.token}'
    }
  };
  const response = await axios(config);
  const keysDict = response.data;
  const connectionString = keysDict['connectionStrings'][0]['connectionString'];

  // Connect to Azure Cosmos DB for MongoDB
  const client = new MongoClient(connectionString);

  try {
    // Open the connection
    await client.connect();

    // Connect to the database "products"
    const ProductDatabase = client.db('products');

    // Add code to connect to a collection and add an entry here
  } catch (err) {
    console.error("An error occurred:", err);
  } finally {
    // Close the connection
    await client.close();
  }
}

main().catch((err) => console.error("Unhandled error:", err));
Java
package com.fabrikam;

import com.mongodb.MongoClient;
import com.mongodb.MongoClientURI;
import com.mongodb.client.MongoCollection;
import com.mongodb.client.MongoDatabase;
import com.mongodb.client.model.Filters;
import javax.net.ssl.*;
import java.net.InetSocketAddress;
import com.azure.identity.*;
import com.azure.core.credential.*;
import java.net.http.*;
import java.net.URI;

public class App {
  public static void main(String[] args) {
    // Environment variables
    String endpoint = System.getenv("AZURE_COSMOS_RESOURCEENDPOINT");
    String listConnectionStringUrl = System.getenv("AZURE_COSMOS_LISTCONNECTIONSTRINGURL");
    String scope = System.getenv("AZURE_COSMOS_SCOPE");

    // Uncomment the corresponding lines for the authentication type you want to use.
    // For system-assigned managed identity.
    // DefaultAzureCredential defaultCredential = new DefaultAzureCredentialBuilder().build();

    // For user-assigned managed identity.
    // DefaultAzureCredential defaultCredential = new DefaultAzureCredentialBuilder()
    //     .managedIdentityClientId(System.getenv("AZURE_COSMOS_CLIENTID"))
    //     .build();

    // For service principal.
    // ClientSecretCredential defaultCredential = new ClientSecretCredentialBuilder()
    //     .clientId(System.getenv("AZURE_COSMOS_CLIENTID"))
    //     .clientSecret(System.getenv("AZURE_COSMOS_CLIENTSECRET"))
    //     .tenantId(System.getenv("AZURE_COSMOS_TENANTID"))
    //     .build();

    MongoClient mongoClient = null;

    try {
      // Acquire the access token
      AccessToken accessToken = defaultCredential
          .getToken(new TokenRequestContext().addScopes(scope))
          .block();
      String token = accessToken.getToken();

      // Retrieve the connection string
      HttpClient client = HttpClient.newBuilder().build();
      HttpRequest request = HttpRequest.newBuilder()
          .uri(new URI(listConnectionStringUrl))
          .header("Authorization", "Bearer " + token)
          .POST(HttpRequest.BodyPublishers.noBody())
          .build();
      HttpResponse<String> response = client.send(request, HttpResponse.BodyHandlers.ofString());

      JSONParser parser = new JSONParser();
      JSONObject responseBody = parser.parse(response.body());
      List<Map<String, String>> connectionStrings = responseBody.get("connectionStrings");
      String connectionString = connectionStrings.get(0).get("connectionString");

      // Connect to Azure Cosmos DB for MongoDB
      MongoClientURI uri = new MongoClientURI(connectionString);
      mongoClient = new MongoClient(uri);

      // Connect to the database
      MongoDatabase ProductDatabase = mongoClient.getDatabase("products");

      // Add code to connect to a collection and add an entry here

    } catch (Exception e) {
      e.printStackTrace();
    } finally {
      if (mongoClient != null) {
        mongoClient.close();
      }
    }
  }
}
Python
import os
import pymongo
import requests
from azure.identity import ManagedIdentityCredential, ClientSecretCredential

# Environment variables
endpoint = os.getenv('AZURE_COSMOS_RESOURCEENDPOINT')
listConnectionStringUrl = os.getenv('AZURE_COSMOS_LISTCONNECTIONSTRINGURL')
scope = os.getenv('AZURE_COSMOS_SCOPE')

# Uncomment the following lines corresponding to the authentication type you want to use.
# For system-assigned managed identity
# cred = ManagedIdentityCredential()

# For user-assigned managed identity
# managed_identity_client_id = os.getenv('AZURE_COSMOS_CLIENTID')
# cred = ManagedIdentityCredential(client_id=managed_identity_client_id)

# For service principal
# tenant_id = os.getenv('AZURE_COSMOS_TENANTID')
# client_id = os.getenv('AZURE_COSMOS_CLIENTID')
# client_secret = os.getenv('AZURE_COSMOS_CLIENTSECRET')
# cred = ClientSecretCredential(tenant_id=tenant_id, client_id=client_id, client_secret=client_secret)

# Get the connection string
session = requests.Session()
token = cred.get_token(scope)
response = session.post(listConnectionStringUrl, headers={"Authorization": "Bearer {}".format(token.token)})
keys_dict = response.json()
conn_str = keys_dict["connectionStrings"][0]["connectionString"]

# Connect to Azure Cosmos DB for MongoDB
client = pymongo.MongoClient(conn_str)

# To connect to the database, use the connection variable ("client" in this case), and the database name
ProductDatabase = client["products"]

# Add code to connect to a collection and add an entry here
C#
using MongoDB.Driver;
using Azure.Identity;
using Azure.Core;
using System;
using System.Net.Http;
using System.Text.Json;
using System.Collections.Generic;
using System.Threading.Tasks;

public class Products
{
  public int ProductId { get; set; }
  public string name { get; set; }
}

class test
{
  public static async Task Main(string[] args)
  {
      // Environment variables
      var endpoint = Environment.GetEnvironmentVariable("AZURE_COSMOS_RESOURCEENDPOINT");
      var listConnectionStringUrl = Environment.GetEnvironmentVariable("AZURE_COSMOS_LISTCONNECTIONSTRINGURL");
      var scope = Environment.GetEnvironmentVariable("AZURE_COSMOS_SCOPE");

      // Uncomment the corresponding lines for the authentication type you want to use.
      // For system-assigned identity.
      // var tokenProvider = new DefaultAzureCredential();

      // For user-assigned identity.
      // var tokenProvider = new DefaultAzureCredential(
      //     new DefaultAzureCredentialOptions
      //     {
      //         ManagedIdentityClientId = Environment.GetEnvironmentVariable("AZURE_COSMOS_CLIENTID")
      //     });

      // For service principal.
      // var tenantId = Environment.GetEnvironmentVariable("AZURE_COSMOS_TENANTID");
      // var clientId = Environment.GetEnvironmentVariable("AZURE_COSMOS_CLIENTID");
      // var clientSecret = Environment.GetEnvironmentVariable("AZURE_COSMOS_CLIENTSECRET");
      // var tokenProvider = new ClientSecretCredential(tenantId, clientId, clientSecret);

      // Acquire the access token.
      AccessToken accessToken = await tokenProvider.GetTokenAsync(
          new TokenRequestContext(scopes: new[] { scope }));

      // Get the connection string.
      using var httpClient = new HttpClient();
      httpClient.DefaultRequestHeaders.Add("Authorization", $"Bearer {accessToken.Token}");
      var response = await httpClient.PostAsync(listConnectionStringUrl, null);
      response.EnsureSuccessStatusCode();
      var responseBody = await response.Content.ReadAsStringAsync();

      // Parse the connection string.
      var connectionStrings = JsonSerializer.Deserialize<Dictionary<string, List<Dictionary<string, string>>>>(responseBody);
      string connectionString = connectionStrings["connectionStrings"][0]["connectionString"];

      // Initialize the MongoClient with the connection string.
      var mongoClient = new MongoClient(connectionString);

      // Connect to the "products" database.
      var ProductDatabase = mongoClient.GetDatabase("products");

      // Add code to connect to a collection and add an entry here.
  }
}
It's that simple, once we connect using the driver, we either create a new database, or pointed to an existing one with the GetDatabase or similar methods depending on the language. Our application can now use the ProductDatabase variable to reference to the desired database. Creating or connecting to a collection is as simple as it was to create a new database.
Create a collection for the Azure Cosmos DB for MongoDB
To create or access an existing collection, we use a get collection method or reference depending on the programming language. Let's add some code to the previous example to create/connect to a collection and add one entry on that collection.
Node.js
          // Add code to connect to a collection and add and find an entry here
          var collection = ProductDatabase.collection('documents');
          var insertResult = await collection.insertOne({ ProductId: 1, name: "bread" });

          // return data where ProductId = 1
          const findProduct = await collection.find({ProductId: 1});
          await findProduct.forEach(console.log);
Java
          // Add code to connect to a collection and add and find an entry here
          MongoCollection collection = ProductDatabase.getCollection("products");

          collection.insertOne(new Document()
                      .append("ProductId", 1)
                      .append("name", "bread"));

          // return data where ProductId = 1
          Document findProduct = (Document) collection.find(eq("ProductId", 1)).first();
          System.out.println(findProduct.toJson());
Python
# Add code to connect to a collection and add an entry here
collection = ProductDatabase["products"]
collection.insert_one({ "ProductId": 1, "name": "bread" })
C#
    // Add code to connect to a collection and add an entry here
    var ProductCollection = ProductDatabase.GetCollection<Products>("products");

    Products Product = new Products {ProductId=1,name="bread"};
    ProductCollection.InsertOne (Product);
In the next unit, we'll see how exactly did we created our connection string.
Use MongoDB extension commands to manage data stored in Azure Cosmos DB’s API for MongoDB
As we discussed earlier, Azure Cosmos DB for MongoDB gives us the ability to use the same drivers and code we used to access and create our objects in a MongoDB server for our Azure Cosmos DB account. However, using that code to create our databases and collections use the default Azure Cosmos DB creation parameters. To take advantage of Azure Cosmos DB features, we need to be able to control our database and collection creation parameters like throughput, autoscaling, assigning shard keys, and defining indexes. Azure Cosmos DB for MongoDB gives us this ability by using extended commands to define those parameters. These commands allow us to code more precise instructions on how to create or modify our databases and collections specifically for Azure Cosmos DB.
Azure Cosmos DB for MongoDB provides extension commands for the following request types:
- Create database
- Update database
- Get database
- Create collection
- Update collection
- Get collection
The MongoDB drivers provide a function to run a command against a database we use this function to send our extended commands to Azure Cosmos DB. Let's take a look at the code to create an IoT Device collection with a throughput of 2000 RUs (Request Units) and a shard key of DeviceId.
Node.js
    // create the Devices collection with a throughput of 2000 RUs and with DeviceId as the sharding key
    var result = IOTDatabase.command({customAction: "CreateCollection", collection: "Devices", offerThroughput: 2000, shardKey: "DeviceId"});
Java
      // create the Devices collection with a throughput of 2000 RUs and with DeviceId as the sharding key
      Document DevCollectionDef = new Document();
      DevCollectionDef.append("customAction", "CreateCollection");
      DevCollectionDef.append("collection", "Devices");
      DevCollectionDef.append("offerThroughput", 2000);
      DevCollectionDef.append("shardKey", "DeviceId");

      Document result = IOTDatabase.runCommand(DevCollectionDef);
Python
      # create the Devices collection with a throughput of 2000 RUs and with DeviceId as the sharding key
      IOTDatabase.command({'customAction': "CreateCollection", 'collection': "Devices", 'offerThroughput': 2000, 'shardKey': "DeviceId"})
C#
      // create the Devices collection with a throughput of 1000 RUs and with EmployeeId as the sharding key
      var result = IOTDatabase.RunCommand<BsonDocument>(@"{customAction: ""CreateCollection"", collection: ""Devices"", offerThroughput: 2000, shardKey: ""DeviceId""}");
In a similar fashion, we can modify a collection or create or modify a database. Review the Use MongoDB extension commands to manage data stored in Azure Cosmos DB’s API for MongoDB article for more information.
