Get data from online services
To support their daily operations, organizations frequently use a range of software applications, such as SharePoint, OneDrive, Dynamics 365, Google Analytics and so on. These applications produce their own data. Power BI can combine the data from multiple applications to produce more meaningful insights and reports.
Scenario
Tailwind Traders uses SharePoint to collaborate and store sales data. It's the start of the new financial year and the sales managers want to enter new goals for the sales team. The form that the leadership uses exists in SharePoint. You're required to establish a connection to this data within Power BI Desktop, so that the sales goals can be used alongside other sales data to determine the health of the sales pipeline.
The following sections examine how to use the Power BI Desktop Get Data feature to connect to data sources that are produced by external applications. To illustrate this process, we've provided an example that shows how to connect to a SharePoint site and import data from an online list.
Connect to data in an application
When connecting to data in an application, you would begin in the same way as you would when connecting to the other data sources: by selecting the Get data feature in Power BI Desktop. Then, select the option that you need from the Online Services category. In this example, you select SharePoint Online List.
After you've selected Connect, you'll be asked for your SharePoint URL. This URL is the one that you use to sign into your SharePoint site through a web browser. You can copy the URL from your SharePoint site and paste it into the connection window in Power BI. You don't need to enter your full URL file path; you only need to load your site URL because, when you're connected, you can select the specific list that you want to load. Depending on the URL that you copied, you might need to delete the last part of your URL, as illustrated in the following image.
After you've entered your URL, select OK. Power BI needs to authorize the connection to SharePoint, so sign in with your Microsoft account and then select Connect.
Choose the application data to import
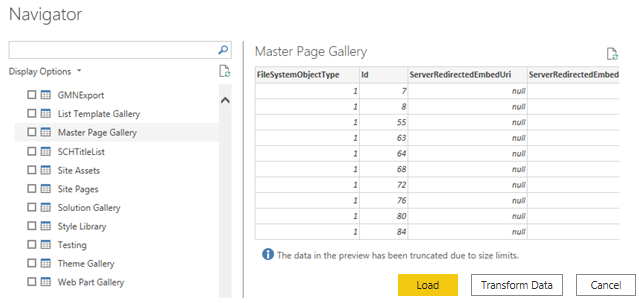
After Power BI has made the connection with SharePoint, the Navigator window appears, as it does when you connect to other data sources. The window displays the tables and entities within your SharePoint site. Select the list that you want to load into Power BI Desktop. Similar to when you import from other data sources, you have the option to automatically load your data into a Power BI model or launch the Power Query Editor to transform your data before loading it.
For this example, you select the Load option.


