Transfer conversations to agents by using Omnichannel for Customer Service
Situations might occur where an agent needs to hand off a conversation to a live agent. This situation often happens when a user has asked for information that the agent doesn't know, or after the agent has captured the necessary information that is required to ensure that the conversation can be routed correctly to a live agent. When an agent hands off a conversation to live agent, it shares the full history of the conversation (the context) and any variables with the agent. Microsoft Copilot Studio agents can be configured to hand off conversations to agents for organizations that use customer engagement applications to conduct a generic handoff, as described in configure generic handoff. This feature allows your customer engagement application to route incoming escalations to the appropriate live agent queue, and it also allows the live agents to review exactly what occurred in the prior conversation so that they can resume at that point. This process prevents agents from potentially asking for information that was previously captured by the agent.
Transfer conversations to agents
Two primary components that are involved when an agent transfers to an agent are:
Telling the agent when to transfer the conversation to an agent.
Telling the agent where to transfer the conversation.
Tell the agent when to transfer the conversation to an agent
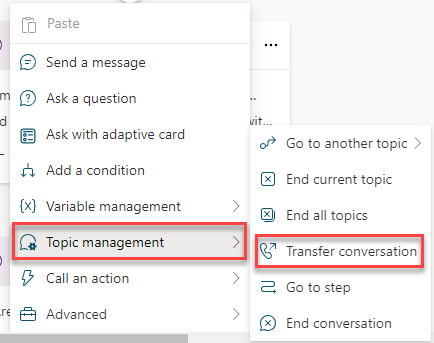
The way that Microsoft Copilot Studio tells the agent that it's time to transfer a conversation to an agent is always the same. Microsoft Copilot Studio includes the Topic management conversation node, which includes options for switching between different topics, and how to potentially end a conversation. It provides multiple actions that can be initiated:
Go to another topic – Allows you to specify another topic that the user should be redirected to.
End current topic – The current topic is ended to ensure that it's considered completed.
End all topics – Any previously initiated topics in the conversation is closed.
Transfer conversation - Escalates the conversation to a live agent.
Go to step – Allows you to select any node within the current topic to redirect users to.
End conversation – Ends the conversation
Agent authors can initiate a transfer to an agent from within a specific topic. For example, if a customer indicates that their entire point-of-sale system is down, the agent can automatically call the Transfer conversation node and transfer it to an agent. Another way to accomplish this task is through the Escalate topic. All agents include a conversation topic called Escalate, which includes a message that is presented to the customer. You can modify the Escalate topic to include a Topic Management node that would transfer to an agent. The Escalate topic is automatically triggered when someone types content such as, "speak to agent." You can also trigger the Escalate topic from within another topic by selecting Go to another topic and then selecting it.
Configure where to hand off the conversation
To facilitate the transfer of a conversation to an agent, you need to configure the agent to send the conversation to a customer engagement hub such as Dynamics 365 Customer Service instance.
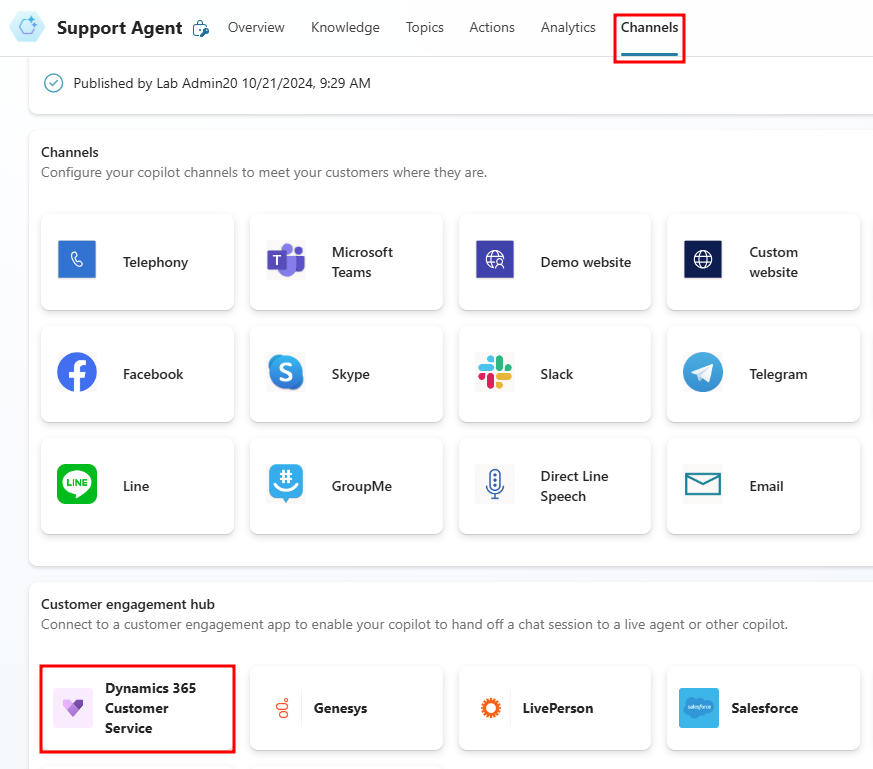
Your agent can be configured to send conversations to the following customer engagement hubs:
Dynamics 365 Customer Service
Genesys
LivePerson
Salesforce
ServiceNow
ZenDesk
Custom engagement hub
Only published agents can be used to ensure that the end-to-end capabilities work as expected. Make sure that you have published your agent prior to validating the integrated experience.
When you create the connection between Microsoft Copilot Studio and Dynamics 365 Customer Service, a Microsoft Entra ID application registration is used to call the agent. Creating the application registration is done on the Azure portal. You can register your apps by going to Microsoft Entra ID and creating a new registration under App registrations.
Three primary areas that can be defined when you create the application registration are:
Name - User-facing name of the application. This name can be changed later, if necessary.
Supported account types - This area defines who can access the application.
Redirect URL (optional) - This area contains the URL for where the app is located.
After you have defined the parameters, select the Register button.
For more information, see Use the portal to create an Microsoft Entra ID application and service principal that can access resources.
Configure transfer to agent
Each agent can only be configured to send conversations to one Dynamics 365 Customer Service instance. You can define the Dynamics 365 instance in the individual agent. If conversations from multiple agents are sent to your Dynamics 365 instance, each agent needs to be configured individually.
To configure the handoff, select Channels and go to Customer engagement hub. This screen allows you to define how the agent facilitates handoff to different applications. Select the Dynamics 365 Customer Service tile to begin the configuration process.
You need to select the Dynamics 365 Customer Service environment that you want to use with the agent. Make sure that you select an environment where your Dynamics 365 Customer Service instance is provisioned. The list shows all available environments, even if Dynamics 365 Customer Service isn't provisioned.
The primary component that you need to provide is the application ID for the app that you previously created for the Microsoft Entra ID registration. Dynamics 365 Customer Service models agents as application users in the application. Modeling agents as application users ensures that the agent can have conversations sent to it like a human agent would. It's important that the application ID is unique to your organization (your Microsoft Dataverse organization or environment). Each agent that interacts with the same Dynamics 365 Customer Service environment needs to use a different application ID. You might need to create multiple application registrations to support multiple agents.
In your Azure portal, go to Microsoft Entra ID and select App registrations. All registered applications are displayed. Select the application that you want to use with the agent. The application ID is on the Applications overview page. Copy the ID and paste it into the Microsoft Copilot Studio Application ID field.
Microsoft Copilot Studio uses a Microsoft Teams channel to communicate with Dynamics 365 Customer Service. As you go through the setup wizard, if a Teams channel hasn't been enabled, one is enabled automatically.
When the connection has been established, you can select the Go to Omnichannel link to continue configuring the agent connection in Omnichannel for Customer Service.
Note
When your agent is in the same environment as your deployed customer service it automatically detects the instance and makes the connection.
Use IVR with Omnichannel for Customer Service
Native voice integration in Microsoft Copilot Studio will dramatically improve the experience of building voice-enabled bots for customers using the voice channel in Omnichannel for Customer Service. Including voice responses and analysis in your bot can increase the ways your customers interact with your business. Voice integration can provide faster, more efficient resolutions to common questions, improving your deflection rate and customer satisfaction scores.
To enable voice optimization in your Copilot Studio agent, navigate to your agent's Settings page and select the Voice tab from the navigation menu on the left-hand side. After enabling the Optimize for voice toggle, a number of customizable options are revealed and include the following:
Increase accuracy with agent data: Adds voice-specific data pulled from your agent's data and pushed to your speech recognition model.
DTMF: Dual-tone multi-frequency, this setting determines how your agent receives input from a dial pad and allows you to specify the Interdigit timeout and Termination timeout lengths.
Silence detection: Modifies agent behavior when it doesn't detect any input from the end user.
Speech collection: Sets limits on how long your agent tries to detect and collect user input.
Latency messaging: Defines when and how users hear a latency message when background operations are experiencing excessive latency. Individual latency messages can be configured directly in agent topics and plugins.
Speech sensitivity: Modifies the filter level in response to background noise.
After enabling voice optimization, you have the ability to modify the following list of node-level settings:
Speech & DTMF: Allows the node's properties to be modified by user speech and dual-tone multi-frequency (keypad) input.
SSML: Configures the text-to-speech style in message nodes and can include playing audio pre-recorded audio files in place of text-to-speech.
Assign DTMF keys to options: Allows you to assign user responses to DTMF keys.
Enhance IVR with generative answers optimized for voice
By integrating your voice-enabled agent through Dynamics 365 Customer Service, you can drastically improve self-service capabilities and significantly reduce the load on your agents by enabling generative answers optimized for voice interactions.
For example, you can give users the opportunity to decide if they want to make use of a generative answer by creating a topic with the DTMF global command received trigger. By allocating a specific DTMF command, and informing users further up the conversation tree of the command's use, you can give users the opportunity to ask questions about the agent's general knowledge or commonly answered questions provided as knowledge sources. This process lessens the load on your live agent, leaving them with more time to focus on problems only they can solve.
Create a new topic and decide on a DTMF command that doesn't interfere with previously allocated commands. This command will be global, and whenever a user selects this command, they'll be navigated back to this topic.
Add a question node with a message prompting the user for their question. Identify the User's entire response and Save the user response as a variable. Give this variable an appropriate name like genUserQuestion.
Finally, add a Generative answers node after the question node and set the Input value to your genUserQuestion variable. Generative answer nodes can be further customized by determining its knowledge sources and if you want the agent to use its own general knowledge. With Copilot Studio's voice optimization settings, the agent can also provide a Latency Message to fill time and inform the user that the agent is generating the answer.
Under Advanced, you can either have the agent respond directly with its answer by enabling Send a message, or save it as a variable and perform further actions depending on the response's content.
Remove Dynamics 365 Customer Service connection
You can select Disconnect agent to disable the application user that represents the agent in your omnichannel instance. This disconnects the agent from the specified omnichannel environment. To add your agent back, you need to connect it again.
For more information, see Integrate a Microsoft Copilot Studio agent and configure generic handoff.


