How to deploy and connect to Azure Database for MySQL
A general understanding of Azure Database for MySQL - Flexible Server capabilities can help you identify the optimal deployment settings for your web-based application's development, testing, and production environments. Key decisions, such as selecting the target Azure region, zone-redundant high availability, and backup redundancy, should be made during the design stage. Other decisions, like allocating compute and storage resources, are driven by usage patterns that change over time.
The previous units of this module should aid in your design and planning phase. Now, let's focus on how to deploy and connect to your Azure Database for MySQL flexible server when you're ready to implement it as part of your own solution.
Understanding the dependencies between various configuration settings is key to making the right choices during deployment. Specifically, it's important to note:
- Disabling storage autogrow isn't supported for servers with high availability enabled.
- High availability isn't supported in the Burstable tier, although you can deploy the server into a specific availability zone.
How to deploy an Azure Database for MySQL flexible server
You can use several different methods to provision an Azure Database for MySQL flexible server. While you can use fully automated deployments, the most straightforward deployment method is to create an instance via the Azure portal, a graphical user interface (GUI). When you create an instance via the portal, you can configure a range of server settings, which can be divided into five groups: Basics, Compute and Storage, Networking, Security, and Tags. Each group and its corresponding settings options are presented on the page:
The Basics page includes settings that you can use to configure:
Project details: The name of the target subscription and resource group.
Server details:
- Name of the server
- Target Azure region
- MySQL version and compute tier
- Availability zone number
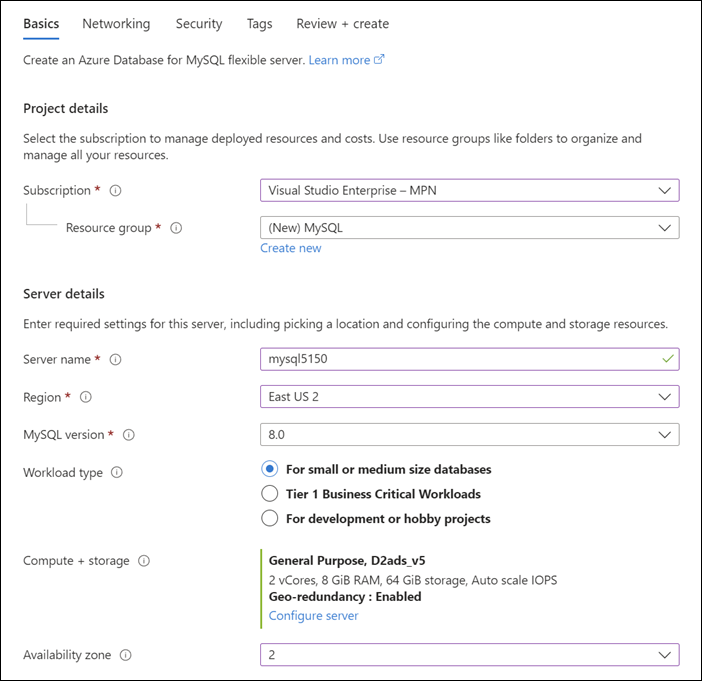
Authentication method. Select either MySQL authentication, Microsoft Entra ID authentication, or a mix of the two methods.
Note
Depending on your selected compute size and regionThe availability zone selection might not be available during this step.
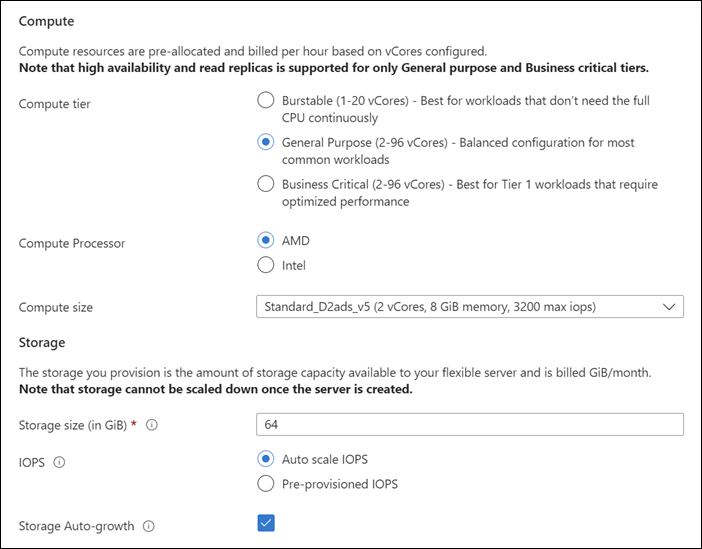
The Compute + storage page, which you access from the Basics page via the Configure server link, includes settings that you can use to configure:
Compute. The compute tier and compute size options.
Storage. The storage size (in GiB), the number of IOPS (or auto scale), and the Storage Autogrowth option.
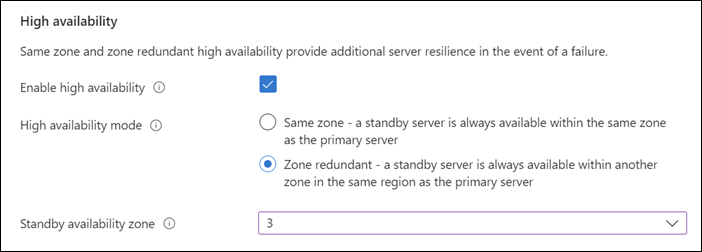
High availability. The high availability mode (same zone or zone redundant).
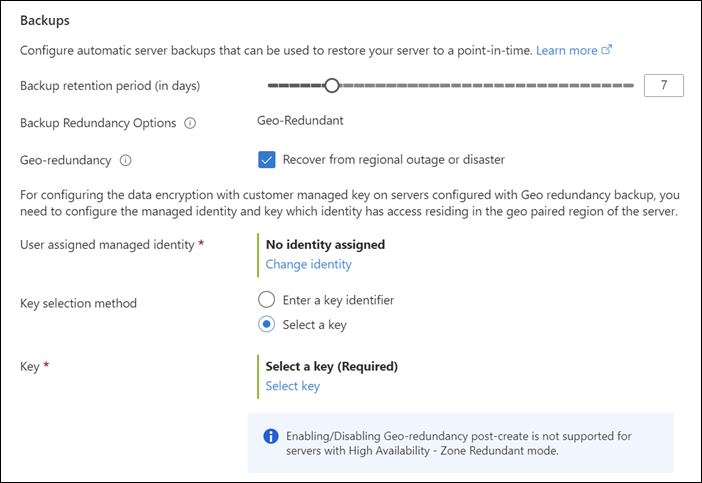
Backups. The backup retention period and the backup geo-redundancy option.
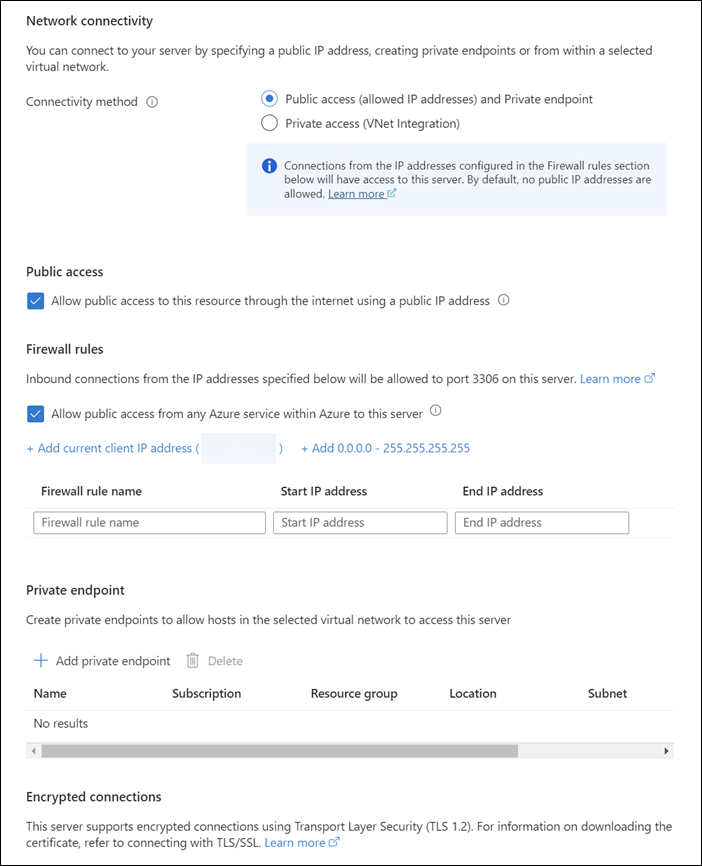
The Networking page allows you to specify the connectivity method. Depending on your choice, you can also allow public access from any Azure service, configure firewall rules, set up virtual network integration, or create private endpoints.
The Security page includes options to configure data encryption to encrypt your databases, backups, and logs at rest without any changes to your application, in addition to the storage encryption configured by default.
The Tags page adds key-value pairs that define metadata for the deployed resource.
How to connect to an Azure Database for MySQL flexible server
Before connecting to your flexible server, consider the network configuration you implemented during deployment. For example, if your flexible server is configured with public access and you decide to connect from the Azure Cloud Shell or other client applications that don't have direct network access to the database, then enable the Allow public access from any Azure service within Azure to this server option of the server firewall. When connecting from an on-premises application server or an internet-connected device, add the public IP address of the connecting device or service to the list of firewall exceptions.
For secure connections from Azure VMs or containerized workloads running in Azure, consider enabling private endpoints. Private endpoints allow you to connect securely to your flexible server over a private network, eliminating exposure to the public internet. Additionally, ensure that the network you're connecting from allows outbound traffic to Azure over TCP port 3306, which is required by an Azure Database for MySQL flexible server.
Because encryption is enabled by default for new deployments, you'll need to download the public certificate installed on the server and use it when establishing a connection over TLS 1.2.
After you address the networking and certificate requirements, you should be able to connect to the Azure Database for MySQL flexible server and query it in several different ways, including using:
Azure CLI (az mysql) or Azure Cloud Shell
- Use the following command format in Azure CLI to connect:
az mysql flexible-server connect --name <server-name> --user <username>
- Use the following command format in Azure CLI to connect:
mysql.exe command line utility
- Use the following command format in the MySQL command-line tool to connect:
mysql -h <server-name>.mysql.database.azure.com -u <username> -p
- Use the following command format in the MySQL command-line tool to connect:
MySQL Workbench graphical tool
- Use the following connection details in the MySQL Workbench graphical tool:
- Hostname:
<server-name>.mysql.database.azure.com - Port: 3306
- Username:
<username> - Password:
<your-password>
- Hostname:
- Use the following connection details in the MySQL Workbench graphical tool:
Azure Data Studio with the MySQL extension
- Launch Azure Data Studio and make sure the MySQL extension is installed.
- Select the New Connection icon or navigate to File > New Query.
- In the connection dialog box, for Connection type, select MySQL.
- Specify the Connection details:
- Server name:
<server-name>.mysql.database.azure.com - Username:
<username> - Password:
<your-password>- Alternatively, you can log in using Microsoft Entra ID authentication. - Port: 3306
- Database name (Optional): Specify a specific database name to connect to, or leave blank to list all databases
- Server name:
- SSL Mode:
- Select Require or Verify CA.
- Download the SSL certificate if using Verify CA mode.
- Select Test Connection to ensure that all details are correct.
- Optionally, you can save the connection details for future use by selecting Save Password.
- Select Connect to establish the connection to your Azure Database for MySQL flexible server.
Many programming languages, such as PHP, Java, Python, C#, C++, JavaScript, Rust, Go, and Ruby.
Here's a basic example of connecting to an Azure Database for MySQL flexible server using PHP's MySQL Improved extension (mysqli) class:
<?php
$host = '<server-name>.mysql.database.azure.com';
$username = '<username>';
$password = '<your-password>';
$db_name = '<database-name>';

//Establish the connection
$conn = mysqli_init();
mysqli_real_connect($conn, $host, $username, $password, $db_name, 3306);
if (mysqli_connect_errno($conn)) {
    die('Failed to connect to MySQL: '.mysqli_connect_error());
}

//Run a query
printf("Reading data from table: \n");
$res = mysqli_query($conn, 'SELECT * FROM Products');
while ($row = mysqli_fetch_assoc($res)) {
    var_dump($row);
}

//Close the connection
mysqli_close($conn);
?>
Note
For more information about connecting to an Azure Database for MySQL flexible server programmatically, see Microsoft Learn.