Exercise - Deploy an Azure Database for MySQL flexible server
Now that you've reviewed the deployment and connectivity options associated with Azure Database for MySQL – Flexible Server, it's time to test the process of provisioning a server and validating its availability by connecting to it. In this unit, you step through a sample deployment and connect to the flexible server using the mysql.exe utility from the Azure Cloud Shell.
Deploy an Azure Database for MySQL flexible server
To deploy an Azure Database for MySQL flexible server from the Azure portal, perform the following steps:
Navigate to the Azure portal for the sandbox.
At the top of the window, in the Search resources, services, and docs text box at the top of the page, enter MySQL, and then select Azure Database for MySQL flexible servers.

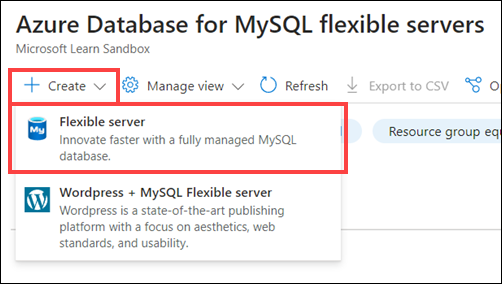
On the Azure Database for MySQL flexible servers page, select + Create, and then select Flexible server.

On the Flexible server page, on the Basics tab, enter the information in the following table.
Setting Value Description Subscription Concierge Subscription The name of your subscription. In this case, we're using the Concierge Subscription. Resource group [sandbox resource group name] Use the LEARN created resource group available. Server name <server_name> A valid and globally unique name that identifies your flexible server. The server's fully qualified name consists of the <server_name> you choose, followed by the suffix mysql.database.azure.com. The server name can contain only lowercase letters, numbers, and the hyphen (-) character. It must contain between 3 and 63 characters. Region The name of an Azure region The name of the Azure region that hosts your server. Select any region that supports Azure Database for MySQL - Flexible Server deployment that is nearest the location of the computer you use to run this exercise. MySQL version 8.0 The MySQL major version your app uses. Workload type For development or hobby projects The intended workload type determines the virtual machine (VM) SKU to host the server. Availability zone No preference This setting allows you to specify an availability zone where the servers are deployed. Your choice is typically based on the zone hosting the application tier. Enable high availability Not selected This setting determines whether you want a replica server automatically provisioned in another availability zone (for zonal deployments). This option requires the choice of either General Purpose or Business Critical VM SKUs compute tier. Authentication method MySQL authentication only Authenticate with the admin username and password only. Admin username mysqladmin A valid username you configure as the admin account for the MySQL server instance. In this case, we're using mysqladmin. Don't use azure_superuser, admin, administrator, root, guest, or public. Password <Pword>A valid password assigned to the admin account. In this case, we're using <Pword>. It must contain between 8 and 128 characters and include characters from three categories: English uppercase letters, English lowercase letters, numbers (0 through 9), and nonalphanumeric characters (such as ! $, #, %).On the Basics tab, under Compute + Storage, select Configure server.
On the Compute + Storage page, configure the following settings: a. Compute 1. Select the Burstable compute tier. 2. From the Compute size dropdown list, select Standard_B1s (1 vCore, 1 GiB memory, 400 max iops). b. Storage 1. Leave the Storage size (in GB) set to 20. 2. Select Pre-provisioned IOPS and leave the value set to 360. 3. Leave Storage Auto-growth checked. c. High Availability 1. Leave Enable High Availability as not selected. d. Backups 1. Ensure that the Backup retention period (in days) is set to 7. 2. Leave the Recover from regional outage or disaster as not selected.
Select Save, and then, on the Basics tab of the Flexible server page, select Next: Networking >.
On the Networking tab, configure the following settings:
a. Set the Connectivity method to Public access (allowed IP address).
b. Select the Allow public access to this resource through the internet using a public IP address checkbox.
c. Select the Allow public access from any Azure service within Azure to this server checkbox.
d. Select the + Add current client IP address link.
Select Review + create.
Review the settings you configured on the Review + create page, and then select Create.
Note
Wait for the provisioning process to complete, which might take about 10 minutes.
After the deployment, select Go to resource to navigate to the page for the newly deployed Azure Database for MySQL flexible server.
On the page for your flexible server, in the navigation menu, under Settings, select Databases, and then select Add.
In the Create database pane, in the Name text box, enter testdb, accept the default character set and collation values, and then select Save.
Note
You will use the resources you deployed in this exercise for the next exercise.