Exercise - Connect to an Azure Database for MySQL flexible server
Now that you've provisioned an Azure Database for MySQL flexible server, you want to connect to it to validate its availability. In this unit, you step through connecting to the server by using the mysql.exe utility from the Azure Cloud Shell.
Connect to an Azure Database for MySQL flexible server
From the Azure Cloud Shell, to connect to and query the newly deployed Azure Database for MySQL flexible server, perform the following steps:
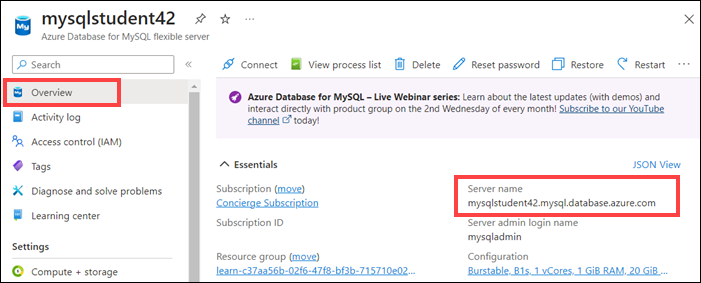
On the page for your Azure Database for MySQL flexible server, select Overview.
On the Overview pane, note the value of Server name. You need this fully qualified server name to establish a connection.

To verify that your network configuration allows connectivity from Azure Cloud Shell, under Settings, select Networking.
On the Networking pane, verify that the Allow public access from any Azure service within Azure to this server checkbox is selected.
In the Cloud Shell pane, run the following command to download the public certificate used by the server:
wget --no-check-certificate https://dl.cacerts.digicert.com/DigiCertGlobalRootCA.crt.pemNext, run the following command to connect to the server, replacing the <server_name> placeholder with the name of your server and the <user_name> placeholder with the name of the admin account you specified (such as
mysqladmin) when provisioning the server in the previous exercise:mysql -h <server_name>.mysql.database.azure.com -u <user_name> -p --ssl-mode=VERIFY_IDENTITY --ssl-ca=DigiCertGlobalRootCA.crt.pemWhen prompted, enter the password you assigned (such as
Passw0rd123) to the admin account you specified when provisioning the server in the previous task.You should receive the MySQL [(none)] prompt. This prompt verifies that the connection was successful.
Next, from the MySQL [(none)] prompt, run the following command to list databases hosted by the server:
SHOW DATABASES;Verify that the list includes the four precreated databases (information_schema, MySQL, performance_schema, and sys) and the testdb you created in the previous exercise.
From the MySQL [(none)] prompt, run the following command to switch to the testdb database:
USE testdb;From the MySQL [(testdb)] prompt, run the following command to create a sample table in the testdb database:
CREATE TABLE table1 (id int NOT NULL, val int,txt varchar(200));From the MySQL [(testdb)] prompt, run the following command to add a row of data into the newly created table:
INSERT INTO table1 values (1,100,'text1');From the MySQL [(testdb)] prompt, run the following command to display the newly added data:
SELECT * FROM table1;To exit the connection, at the MySQL [(testdb)] prompt, enter quit.