Exercise: Implement tab navigation
In the astronomy app, you're asked to combine tabs with the flyout to help with navigation between the different pages.
The first thing you decide to do is remove all the pages from the flyout and add them to a TabBar, so you can see how the app feels.
Adding a TabBar
In the Solution Explorer window, open the AppShell.xaml page.
In the XAML markup page, delete everything inside of the
<Shell>.Create a
<TabBar>and an empty<Tab>.<?xml version="1.0" encoding="UTF-8" ?> <Shell x:Class="Astronomy.AppShell" xmlns="http://schemas.microsoft.com/dotnet/2021/maui" xmlns:x="http://schemas.microsoft.com/winfx/2009/xaml" xmlns:local="clr-namespace:Astronomy.Pages" FlyoutIcon="moon.png"> <TabBar> <Tab> </Tab> </TabBar> </Shell>Next, add a
ShellContentto theTaband set its content to theMoonPhasePage.<TabBar> <Tab> <ShellContent ContentTemplate="{DataTemplate local:MoonPhasePage}" /> </Tab> </TabBar>Now give the tab a title to be displayed and an icon using the
TitleandIconproperties.<Tab Title="Moon Phase" Icon="moon.png">Add in another
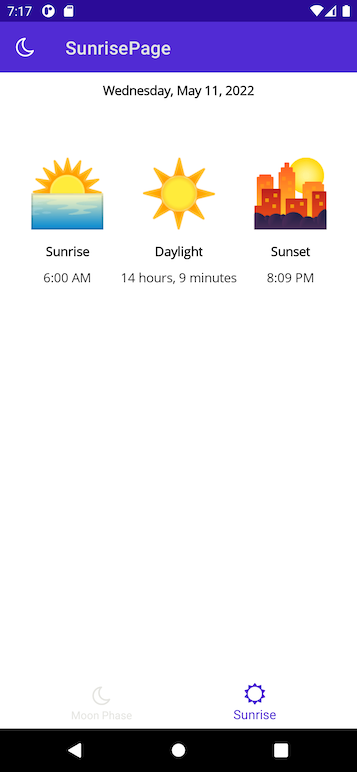
Tabfor theSunrisePage. Set itsTitleto sunrise and itsIconto sun.png. The finished XAML looks like this:<?xml version="1.0" encoding="UTF-8" ?> <Shell x:Class="Astronomy.AppShell" xmlns="http://schemas.microsoft.com/dotnet/2021/maui" xmlns:x="http://schemas.microsoft.com/winfx/2009/xaml" xmlns:local="clr-namespace:Astronomy.Pages" FlyoutIcon="moon.png"> <TabBar> <Tab Title="Moon Phase" Icon="moon.png"> <ShellContent ContentTemplate="{DataTemplate local:MoonPhasePage}" /> </Tab> <Tab Title="Sunrise" Icon="sun.png"> <ShellContent ContentTemplate="{DataTemplate local:SunrisePage}"/> </Tab> </TabBar> </Shell>Run the app to see how it looks.

Combine tab pages with a flyout
You decide it makes sense to have the moon phase and sunrise pages in the same tab page. It also makes sense to keep the about page separate. So you decide to add the flyout back in. The first flyout item displays the tab page, and the second the about page.
Delete the
TabBarand all of the child items contained in it.In its place, add in a
<FlyoutItem>. Set itsTitleproperty to Astronomy and its icon to moon.png.<FlyoutItem Title="Astronomy" Icon="moon.png"> </FlyoutItem>Within the
<FlyoutItem>, add a<ShellContent>that points to theMoonPhasePage. Set itsTitleproperty to Moon Phase andIconproperty to moon.png.<FlyoutItem Title="Astronomy" Icon="moon.png"> <ShellContent Title="Moon Phase" Icon="moon.png" ContentTemplate="{DataTemplate local:MoonPhasePage}"/> </FlyoutItem>Within the same
<FlyoutItem>, add another<ShellContent>to point to theSunrisePage. Set itsTitleproperty to Sunrise andIconproperty to sun.png.<FlyoutItem Title="Astronomy" Icon="moon.png"> <ShellContent Title="Moon Phase" Icon="moon.png" ContentTemplate="{DataTemplate local:MoonPhasePage}"/> <ShellContent Title="Sunrise" Icon="sun.png" ContentTemplate="{DataTemplate local:SunrisePage}"/> </FlyoutItem>Now, tapping on this flyout item displays a tab page with two tabs.
To create a new flyout item that points to the
AboutPage, add a new<FlyoutItem>. Set itsTitleproperty to About andIconproperty to question.png.Within that
<FlyoutItem>, add a<ShellContent>that points to theAboutPage.<FlyoutItem Title="About" Icon="question.png"> <ShellContent ContentTemplate="{DataTemplate local:AboutPage}"/> </FlyoutItem>Run the app again. You should see two items in the flyout. The first one opens up a tab page that contains the
MoonPhasePageandSunrisePage. The second displays theAboutPageby itself.
Need help?
The final XAML code for AppShell.xaml should look like this example:
<?xml version="1.0" encoding="UTF-8" ?>
<Shell
x:Class="Astronomy.AppShell"
xmlns="http://schemas.microsoft.com/dotnet/2021/maui"
xmlns:x="http://schemas.microsoft.com/winfx/2009/xaml"
xmlns:local="clr-namespace:Astronomy.Pages"
FlyoutIcon="moon.png">
<!-- You can add this back in for the header -->
<!--<Shell.FlyoutHeader>
<Grid HeightRequest="100" BackgroundColor="DarkSlateBlue">
<Image Source="moon.png"/>
</Grid>
</Shell.FlyoutHeader>-->
<FlyoutItem Title="Astronomy" Icon="moon.png">
    <ShellContent Title="Moon Phase" Icon="moon.png"
        ContentTemplate="{DataTemplate local:MoonPhasePage}"/>

    <ShellContent Title="Sunrise" Icon="sun.png"
        ContentTemplate="{DataTemplate local:SunrisePage}"/>
</FlyoutItem>
<FlyoutItem Title="About" Icon="question.png">
    <ShellContent
        ContentTemplate="{DataTemplate local:AboutPage}"/>
</FlyoutItem>
</Shell>