Create and use Bicep modules
Modules are independent Bicep files. They typically contain sets of resources that are deployed together. Modules can be consumed from any other Bicep template.
By using modules, you can reuse your Bicep code, and you can make your Bicep files more readable and understandable because they're each focused on a specific job. Your main templates then compose multiple modules together.
The benefits of modules
In your toy company, you've been provisioning cloud resources by using many individual Bicep files. Over time, these templates grow significantly. Eventually, you end up having monolithic code that's difficult to read and navigate, and even harder to maintain.
This approach also forces you to duplicate parts of your code when you want to reuse it in other templates. When you change something, you need to search through and update multiple files.
Bicep modules help you address these challenges by splitting your code into smaller, more manageable files that multiple templates can reference. Modules give you some key benefits.
Reusability
After you've created a module, you can reuse it in multiple Bicep files, even if the files are for different projects or workloads. For example, when you build out one solution, you might create separate modules for the app components, the database, and the network-related resources. Then, when you start to work on another project with similar network requirements, you can reuse the relevant module.
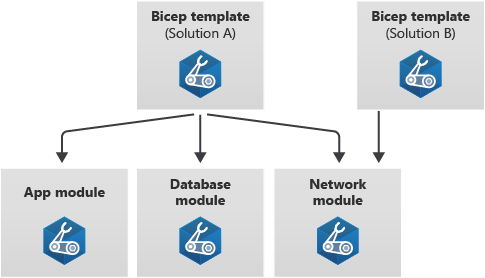
You can even share modules within your team, within your organization, or with the Azure community. You'll learn more about sharing Bicep modules in a future Microsoft Learn module.
Encapsulation
Modules help you keep related resource definitions together. For example, when you define an Azure Functions app, you typically deploy the app, a hosting plan for the app, and a storage account for the app's metadata. These three components are defined separately, but they represent a logical grouping of resources, so it might make sense to define them as a module.
That way, your main template doesn't need to be aware of the details of how a function app is deployed. That's the responsibility of the module.
Composability
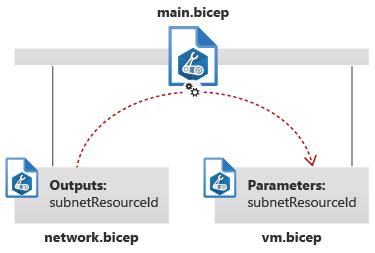
After you've created a set of modules, you can compose them together. For example, you might create a module that deploys a virtual network, and another module that deploys a virtual machine. You define parameters and outputs for each module so that you can take the important information from one and send it to the other.
Tip
It's helpful to think of Bicep modules as building blocks that you can combine in different ways to support your deployments.
Functionality
Occasionally, you might need to use modules to access certain functionality. For example, you can use modules and loops together to deploy multiple sets of resources. You can also use modules to define resources at different scopes in a single deployment.
Create a module
A module is a normal Bicep file. You'll create it just like you do any other Bicep file.
Generally, it's not a good practice to create a module for every resource that you deploy. A good Bicep module typically defines multiple related resources. However, if you have a complex resource with a lot of configuration, it might make sense to create a single module to encapsulate the complexity. This approach keeps your main templates simple and uncluttered.
Split an existing Bicep template into modules
You might build up a large Bicep template and then decide that it should be split up into modules. Sometimes, it's obvious how you should split a large Bicep file. You might have a set of resources that clearly belong together in a module. Other times, it's not as straightforward to determine the resources that should be grouped into a module.
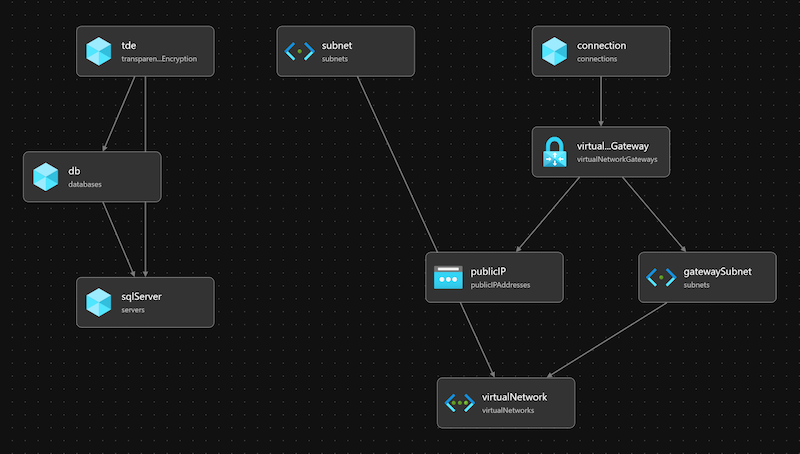
The Bicep visualizer can help you put your whole Bicep file in perspective. The visualizer is included in the Bicep extension for Visual Studio Code.
To view the visualizer, open Visual Studio Code Explorer, select and hold (or right-click) the Bicep file, then select Open Bicep Visualizer. The visualizer shows a graphical representation of the resources in your Bicep file. It includes lines between resources to show the dependencies that Bicep detects.
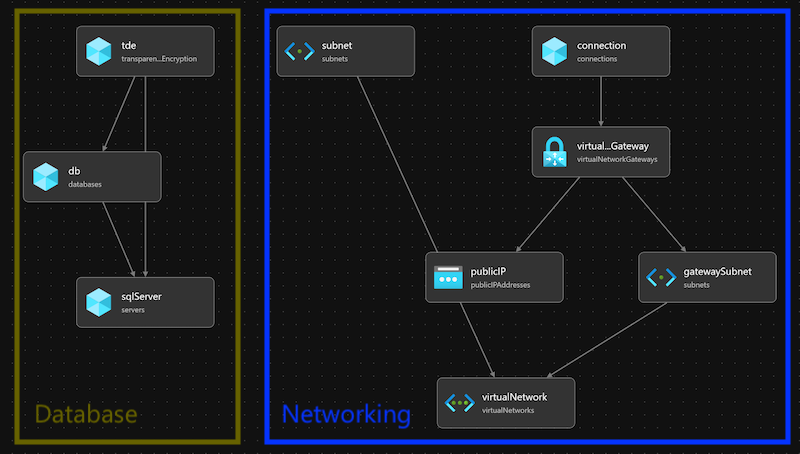
You can use the visualizer to help you to split up your files. Consider whether the visualization illustrates any clusters of resources. It might make sense to move these clusters into a module together.
For example, consider the following visualization for a Bicep file. Two distinct sets of resources are defined. It might make sense to group them into separate database and networking modules.
Nest modules
Modules can include other modules. By using this nesting technique, you can create some modules that deploy small sets of resources, then compose these into larger modules that define complex topologies of resources. A template combines these pieces into a deployable artifact.
Tip
Although it's possible to nest multiple layers of modules, that can become complex. If you get an error or something else goes wrong, it's harder to work out what you need to fix when you have many layers of nesting.
For complex deployments, sometimes it makes sense to use deployment pipelines to deploy multiple templates instead of creating a single template that does everything with nesting. You'll learn more about deployment pipelines in a future Microsoft Learn module.
Choose good file names
Be sure to use a descriptive file name for each module. The file name effectively becomes the identifier for the module. It's important that your colleagues can understand the module's purpose just by looking at the file name.
Use the module in a Bicep template
You'll use a module in a Bicep template by using the module keyword, like this:
module appModule 'modules/app.bicep' = {
  name: 'myApp'
  params: {
    location: location
    appServiceAppName: appServiceAppName
    environmentType: environmentType
  }
}
A module definition includes the following components:
- The
modulekeyword. - A symbolic name, like
appModule. This name is used within this Bicep file whenever you want to refer to the module. The symbolic name never appears in Azure. - The module path, like
modules/app.bicep. This is typically the path to a Bicep file on your local file system. In a future Microsoft Learn module, you'll learn about how you can share modules by using registries and template specs, which have their own module path formats.Tip
You can also use a JSON Azure Resource Manager template (ARM template) as a module. This ability can be helpful if you have a set of templates that you haven't yet migrated to Bicep.
- The
nameproperty, which specifies the name of the deployment. You'll learn more about deployments in the next section. - The
paramsproperty, where you can specify values for the parameters that the module expects. You'll learn more about module parameters in the next unit.
How modules work
Understanding how modules work isn't necessary for using them, but it can help you investigate problems with your deployments or help explain unexpected behavior.
Deployments
In Azure, a deployment is a special resource that represents a deployment operation. Deployments are Azure resources that have the resource type Microsoft.Resources/deployments. When you submit a Bicep deployment, you create or update a deployment resource. Similarly, when you create resources in the Azure portal, the portal creates a deployment resource on your behalf.
However, not all changes to Azure resources create or use deployments. For example, when you use the Azure portal to modify an existing resource, it generally doesn't create a deployment to make the change. When you use third-party tools like Terraform to deploy or configure your resources, they might not create deployments.
When you deploy a Bicep file by using the Azure CLI or Azure PowerShell, you can optionally specify the name of the deployment. If you don't specify a name, the Azure CLI or Azure PowerShell automatically creates a deployment name for you from the file name of the template. For example, if you deploy a file named main.bicep, the default deployment name is main.
When you use modules, Bicep creates a separate deployment for every module. The name property that you specify for the module becomes the name of the deployment. When you deploy a Bicep file that contains a module, multiple deployment resources are created: one for the parent template and one for each module.
For example, suppose you create a Bicep file named main.bicep. It defines a module named myApp. When you deploy the main.bicep file, two deployments are created. The first one is named main, and it creates another deployment named myApp that contains your application resources.

You can list and view the details of deployment resources to monitor the status of your Bicep deployments or to view history of deployments. However, when you reuse the same name for a deployment, Azure overwrites the last deployment with the same name. If you need to maintain the deployment history, ensure that you use a unique name for every deployment. You might include the date and time of the deployment in the name to help make it unique.
Generated JSON ARM templates
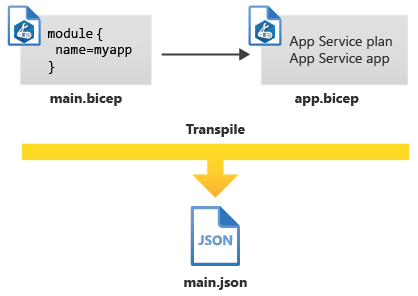
When you deploy a Bicep file, Bicep converts it to a JSON ARM template. This conversion is also called transpilation. The modules that the template uses are embedded into the JSON file. Regardless of how many modules you include in your template, only a single JSON file will be created.
In the example discussed in the previous section, Bicep generates a single JSON file even though there were originally two Bicep files.
