Migrate an on-premises MySQL server using Azure Database for MySQL Import CLI
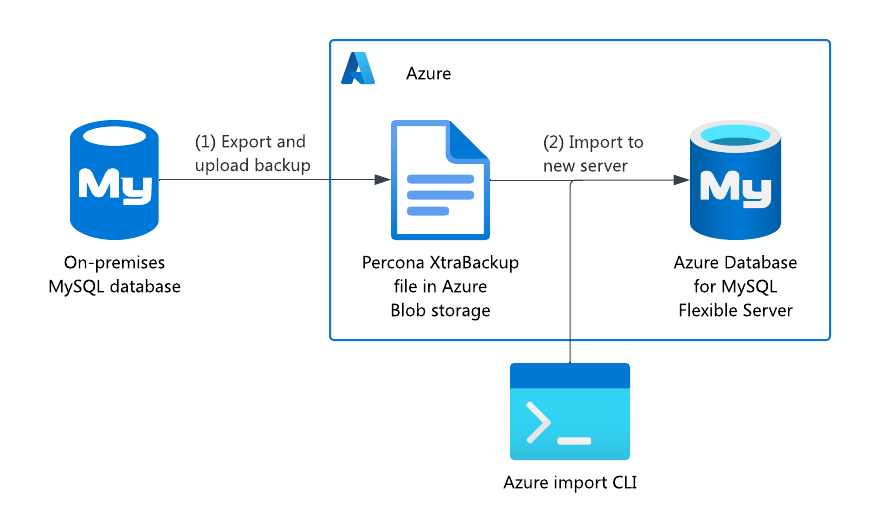
It's time to migrate the on-premises MySQL server to an Azure Database for MySQL flexible server. You've decided to perform an offline migration because network settings prevent a direct connection between the source and target servers. The following diagram summarizes the procedure:
Prerequisites
On the source server, ensure that the following settings are configured:
-
lower_case_table_names = 1
innodb_file_per_table = ON
innodb_page_size = 16348 (MySQL Default)
The system tablespace name should be
ibdata1.The system tablespace size should be greater than or equal to 12 MB. (MySQL Default)
Only the INNODB engine is supported.
-
You need an Azure Blob storage container. If you don't have an appropriate container, create one with this quickstart. You need the Azure Blob container's shared access signature (SAS) token. To optimize performance, keep the storage and target flexible server in the same region.
You need to shut down your application to prevent any changes to the database.
Procedure
Make a physical backup of your MySQL database. We use Percona's open-source XtraBackup tool.
Install the tool according to these instructions (for MySQL 8.0).
Create a full backup; for example:
xtrabackup --backup --target-dir=/data/backups/
Upload the backup file to Azure Blob storage, following these steps.
Trigger the import by running this command after filling in variables. You can modify the compute size as well by changing Standard_D2ds_v4.
-
az mysql flexible-server import create --data-source-type "azure_blob" --data-source $BLOB_DATA_URL --data-source-backup-dir "mysql_backup_percona" –-data-source-token $SAS_TOKEN --resource-group $RESOURCE_GROUP --name $FLEXIBLE_SERVER_NAME –-sku-name Standard_D2ds_v4 --tier GeneralPurpose –-version 8.0 -–location westus --auto-scale-iops Enabled Expect the import to take longer in proportion to the backup file. A 1-GiB backup file takes about half a minute to import, whereas a 1-TB file takes about 23 minutes.
-
Keep in mind the following limitations:
- Users and privileges aren't migrated. You need to manually dump users and privileges to migrate logins after the import operation is complete.
- High availability isn't available during import, so enable high availability after the migration is complete.
After migrating users and privileges, connect your applications to the flexible server, and the migration is complete.
Tip
Alternatively, if you were performing an online migration, you would have performed the export and import as explained previously, and then set up replication from the source to the target. When the target fully caught up to the source, you'd have cut over the application before shutting down the source database.
