Exercise - Create and deploy a deployment stack with Bicep
You are on sprint 1 for the new deposits application. You want to test the process of creating a deployment stack with managed resources in a development subscription. In this exercise, you create a deployment stack scoped to a resource group that references a Bicep file. The file defines an Azure app service plan and an Azure app service.
During the process, you'll:
- Create a Bicep file that defines your initial architecture
- Create a deployment stack scoped to a resource group using your Bicep file.
- Review the configuration of your deployment stack and managed resources
This exercise uses the Bicep extension for Visual Studio Code. Be sure to install this extension in Visual Studio Code.
Create the Bicep file
Our first step is to create a Bicep file that defines our resources to use with the deployment stack.
Open Visual Studio Code.
Create a new file called main.bicep.
Save the empty file so that Visual Studio Code loads the Bicep tooling.
You can either select File > Save As or select Ctrl+S in Windows (⌘+S on macOS). Be sure to remember where you saved the file. For example, you might want to create a templates folder in which to save the file.
Add the following Bicep code into the file. You deploy the template soon. It's a good idea to type the code yourself instead of copying and pasting, so you can see how the tooling helps you to write your Bicep files.
// Parameters
@description('The location for all resources.')
param location string = 'eastus'

@description('The name of the web application.')
param webApplicationName string = 'webapp-${uniqueString(resourceGroup().id)}'

// Variables
@description('The name of the app service plan.')
var appServicePlanName = 'plan-deposits'

// Resource - App Service Plan
resource appServicePlan 'Microsoft.Web/serverfarms@2023-12-01' = {
  name: appServicePlanName
  location: location
  sku: {
    name: 'F1'
    capacity: 1
  }
}

// Resource - Web App
resource webApplication 'Microsoft.Web/sites@2023-12-01' = {
  name: webApplicationName
  location: location
  properties: {
    serverFarmId: appServicePlan.id
  }
}
Notice that you're using expressions that include string interpolation and the
uniqueString()function to define default parameter values. Someone deploying this template can override the default parameter values by specifying the values at deployment time, but they can't override the variable values.Also notice that you're using a variable for the Azure App Service plan name, but you're using parameters for the other names. Storage accounts and App Service apps need globally unique names, but App Service plan names need to be unique only within their resource group. This difference means it's not a concern to use the same App Service plan name across different deployments, as long as the deployments are all going into different resource groups.
Save the changes to the file.
Create the deployment stack and deploy your resources to Azure
To deploy this template to Azure, you need to sign in to your Azure account from the Visual Studio Code terminal. Be sure you've installed the Azure CLI tools.
On the Terminal menu, select New Terminal. The terminal window usually opens in the lower half of your screen.
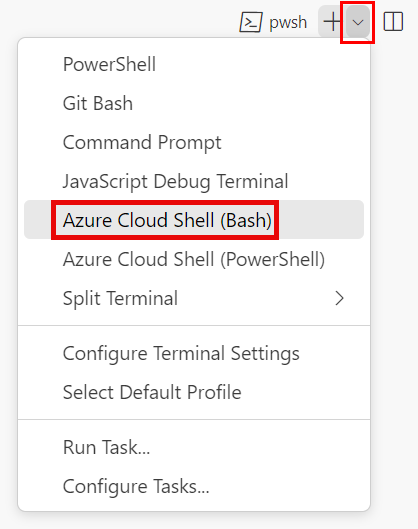
If the terminal window displays bash on the right side, it means the correct shell is already open. Alternatively, if you see a bash shell icon on the right, you can select it to launch the shell.

If a shell other than bash appears, select the shell dropdown arrow, and then select Git Bash.

In the terminal, go to the directory where you saved your template. For example, if you saved your template to the templates folder, you can use this command:
cd templates
Install Bicep
Run the following command to ensure you have the latest version of Bicep:
az bicep install && az bicep upgrade
Sign in to Azure by using Azure CLI
In the Visual Studio Code terminal, sign in to Azure by running the following command:
az loginIn the browser that opens, sign in to your Azure account.
The Visual Studio Code terminal displays a list of the subscriptions associated with this account.
In the list, find the subscription that you want to use for this exercise.
If you missed the list from the sign-in, you can use the following snippet to list your subscriptions again.
az account list --output tableSet the default subscription for all the Azure CLI commands that you run in this session.
az account set --subscription "Your Subscription Name or ID"
Create a resource group
We need to create a resource group for our deployment stack and managed resources. To create a resource group, run the following command from the terminal in Visual Studio Code.
az group create \
    --name rg-depositsApplication \
    --location eastus
To deploy this template to Azure, sign in to your Azure account from the Visual Studio Code terminal. Be sure you've installed Azure PowerShell.
On the Terminal menu, select New Terminal. The terminal window usually opens in the lower half of your screen.
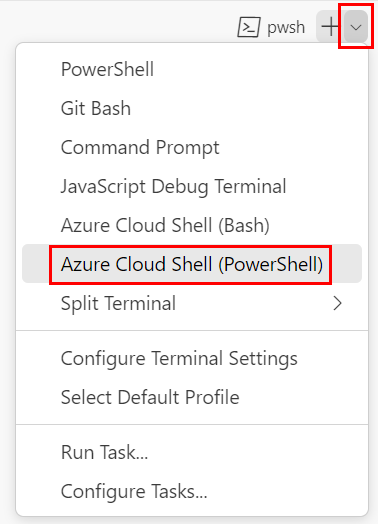
If the terminal window displays pwsh or powershell on the right side, it means the correct shell is already open. Alternatively, if you see a PowerShell shell icon on the right, you can select it to launch the shell.

If a shell other than pwsh or powershell appears, select the shell dropdown arrow, and then select PowerShell.

In the terminal, go to the directory where you saved your template. For example, if you saved your template in the templates folder, you can use this command:
Set-Location -Path templates
Install the Bicep CLI
To use Bicep from Azure PowerShell, install the Bicep CLI.
Sign in to Azure by using Azure PowerShell
In the Visual Studio Code terminal, sign in to Azure by running the following command:
Connect-AzAccountIn the browser that opens, sign in to your Azure account.
Get the ID of the subscription that you want to use for this exercise by running the following command:
Get-AzSubscriptionThe subscription ID is the second column. Copy the second column. It looks something like aaaa0a0a-bb1b-cc2c-dd3d-eeeeee4e4e4e.
Set the default subscription for all the Azure PowerShell commands that you run in this session.
Set-AzContext -SubscriptionId {Your subscription ID}
Create a resource group
We need to create a resource group for our deployment stack and managed resources. To create a resource group, run the following command from the terminal in Visual Studio Code.
New-AzResourceGroup `
    -Name rg-depositsApplication `
    -Location eastus
Create the deployment stack
Next, we need to create our deployment stack scoped to our recently created resource group. To create the deployment stack, run the following command from the terminal in Visual Studio Code.
az stack group create \
    --name stack-deposits \
    --resource-group rg-depositsApplication \
    --template-file ./main.bicep \
    --action-on-unmanage detachAll \
    --deny-settings-mode none
New-AzResourceGroupDeploymentStack `
    -Name stack-deposits `
    -ResourceGroupName rg-depositsApplication `
    -TemplateFile ./main.bicep `
    -ActionOnUnmanage DetachAll `
    -DenySettingsMode None
Verify the creation of the deployment stack and the managed resources
When you create a deployment stack and its managed resources, you can view its configuration using the command-line or the Azure portal. In this exercise, we use Azure CLI. To view the configuration of the deployment stack, run the following command from the terminal in Visual Studio Code.
az stack group show \
    --resource-group rg-depositsApplication \
    --name stack-deposits
The results include the properties of the deployment stack and the status of the managed resources. The json output should appear familiar to the following image:
{
  "actionOnUnmanage": {
    "managementGroups": "detach",
    "resourceGroups": "detach",
    "resources": "detach"
  },
  "bypassStackOutOfSyncError": null,
  "correlationId": ".",
  "debugSetting": null,
  "deletedResources": [],
  "denySettings": {
    "applyToChildScopes": false,
    "excludedActions": null,
    "excludedPrincipals": null,
    "mode": "none"
  },
  "deploymentId": "/subscriptions/././rg-depositsApplication/./Microsoft.Resources/deployments/stack-deposits",
  "deploymentScope": null,
  "description": null,
  "detachedResources": [],
  "duration": "PT2M53.2734284S",
  "error": null,
  "failedResources": [],
  "id": "/subscriptions/././rg-depositsApplication/./Microsoft.Resources/deploymentStacks/stack-deposits",
  "location": null,
  "name": "stack-deposits",
  "outputs": null,
  "parametersLink": null,
  "provisioningState": "succeeded",
  "resourceGroup": "rg-depositsApplication",
  "resources": [
    {
      "denyStatus": "none",
      "id": "/subscriptions/././rg-depositsApplication/././serverfarms/plan-deposits",
      "resourceGroup": "rg-depositsApplication",
      "status": "managed"
    },
    {
      "denyStatus": "none",
      "id": "/subscriptions/./resourceGroups/rg-depositsApplication/././sites/webapp-eque2jlrboltq",
      "resourceGroup": "rg-depositsApplication",
      "status": "managed"
    }
  ],
  "systemData": {
    "createdAt": "2024-01-01T00:00:01.000000+00:00",
    "createdBy": "depositsapplication@contoso.com",
    "createdByType": "User",
    "lastModifiedAt": "2024-01-01T00:00:01.000000+00:00",
    "lastModifiedBy": "depositsapplication@contoso.com",
    "lastModifiedByType": "User"
  },
  "tags": {},
  "template": null,
  "templateLink": null,
  "type": "Microsoft.Resources/deploymentStacks"
}
Take notice of the resources section of the output. For each resource, it shows its status as "managed," its resource group, its resource id, and its deny settings.
When you create a deployment stack and its managed resources, you can view its configuration using the command-line or the Azure portal. In this exercise, we use Azure PowerShell. To view the configuration of the deployment stack, run the following command from the terminal in Visual Studio Code.
Get-AzResourceGroupDeploymentStack `
    -ResourceGroupName rg-depositsApplication `
    -Name stack-deposits
The results include the properties of the deployment stack and the status of the managed resources. The PowerShell output should appear familiar to the following image:
Id                            : /subscriptions/././rg-depositsApplication/././deploymentStacks/stack-deposits
Name                          : stack-deposits
ProvisioningState             : succeeded
resourcesCleanupAction        : detach
resourceGroupsCleanupAction   : detach
managementGroupsCleanupAction : detach
CorrelationId                 : .
DenySettingsMode              : none
CreationTime(UTC)             : 1/01/2024 0:00:01 AM
DeploymentId                  : /subscriptions/././rg-depositsApplication/././deployments/stack-deposits
Resources                     : /subscriptions/././rg-depositsApplication/././serverfarms/plan-deposits
                                /subscriptions/././rg-depositsApplication/././sites/webapp-eque2jlrboltq
Take notice of the resources section of the output. It defines the resources managed by the deployment stack. You see the full resource ID of each resource.