Exercise - Secure your network
In this exercise, you'll review and manage your firewall rules by using the Azure portal. You'll also configure the most secure connection while you're using the public endpoint.
Open the Azure portal using the following button if you haven't already done so.
Secure the network
When you deployed your database in Azure SQL Database, the script you ran enabled Allow Azure services and resources access to this server, which allows any resource from any region or subscription access to your resource. It's important to uncheck the setting to ensure the most secure configuration of the public endpoint. When the setting Allow Azure services and resources access to this server is unchecked, it blocks all connections and networks other than the ones you've added.
In this exercise, you'll learn how to view and edit firewall rules. Setting up firewall rules can be complicated, because you'll need to specify a range of IP addresses for all your connections, which can sometimes use dynamic IP addresses. Alternative methods for securing your network are provided in a demonstration video at the end of this exercise.
Manage firewall rules in the Azure portal
In the Azure portal resource menu, select SQL databases, then select your Azure SQL Database (AdventureWorks).
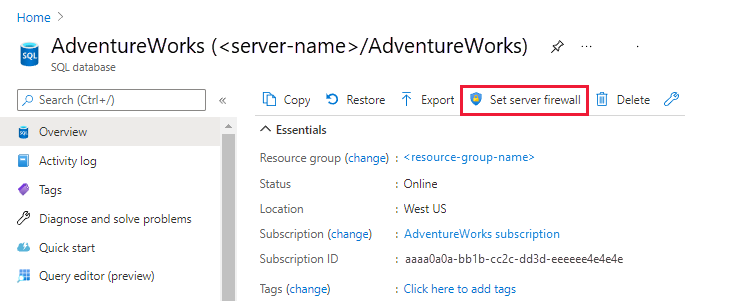
In the command bar of your SQL database, select Set server firewall.

For Allow Azure services and resources to access this server, uncheck the box next to the setting.
The system should have added your computer's Client IP address during deployment, but if none of the rules match your Client IP, add your IP address under Rule name to enable you to log in from SQL Server Management Studio (SSMS).
Select Save to save your changes. In the SQL database menu, select Overview to return to the overview page.
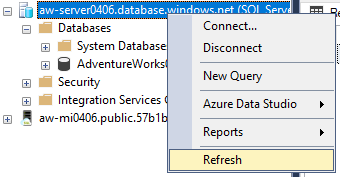
To confirm that you still have access from your local machine, go to SSMS. Right-click your database in Object Explorer and select Refresh to refresh your connection to the Azure SQL Database logical server. If no error occurs, you've successfully configured secure access to your Azure SQL Database logical server for your IP address.

Optionally, you can see how SSMS is connecting to your Azure SQL Database instance by running this code from New Query in SSMS:
SELECT client_net_address FROM sys.dm_exec_connections WHERE session_id=@@SPID;The result should be the public IP address of your local machine. You can verify your IP address by running the following command on a local instance of PowerShell (not the Azure Cloud Shell):
(Invoke-WebRequest -UseBasicParsing -Uri "https://ipinfo.io/ip").ContentYou used a similar command to find the IP address at the beginning of the module. This query should return the same IP address.
Manage firewall rules with Azure Cloud Shell
You can also use the Azure CLI command az sql server firewall-rule to create, delete, and view server-level firewall rules. You can use the Azure CLI through the command-line interface of your Azure virtual machine (VM) or through a PowerShell notebook. For this exercise, you'll experiment with Cloud Shell. You can open a Cloud Shell terminal through the Azure portal, but for now, use the sandbox built-in terminal at the right, which is essentially the same thing.
Run the following command to configure your environment:
$database_name = "AdventureWorks"
$server = Get-AzureRmSqlServer -ResourceGroupName <rgn>[sandbox resource group name]</rgn>
$logical_server = $server.ServerName
Enter the following command to list your server's firewall settings:
az sql server firewall-rule list -g <rgn>[sandbox resource group name]</rgn> -s $logical_serverThe output should be a JSON object for each rule on the Firewall rules setting of the Networking menu of your Azure SQL logical server in the Azure portal.
Setting up server-level firewall rules by using either the Azure portal or Cloud Shell grants your client IP address access to all the databases in your logical server. You can configure database-level firewall rules, which apply to individual databases by using the T-SQL command EXECUTE sp_set_database_firewall_rule in SSMS. T-SQL is the only method available for configuring firewall rules for a specific database. For more information, see the references on the Summary page of this module.
Go further
You've now learned how to update firewall rules for specific IP addresses or ranges of IP addresses on the server and at the database level. In a production environment, you might also need access from various virtual networks or resources, such as Azure apps or Azure VMs. Azure VMs have dynamic IP addresses, which means that the addresses change. You can set up static IP addresses, which can be difficult to maintain using firewall rules. Alternatively, you can use virtual network rules to manage access from specific subnets that contain your VMs or other services. You could also configure a private endpoint, the most secure way to connect to an Azure SQL Database logical server.
You can also set the Minimum TLS version allowed from client connections to the logical server using the Networking menu and going to the Connectivity tab of the Azure SQL logical server.
In this video, you'll learn how to create, configure, and compare the various methods of connecting to a database in Azure SQL Database:
- Allow access to Azure resources
- Firewall rules
- Virtual network rules
- Private endpoint