Security capabilities and tasks
SQL Server and Azure SQL services have been known for the importance they put on security, specifically as being enterprise-class. In this unit, you'll learn about the various security capabilities related to network security and access management. In the units that follow, you'll get hands-on experience with some of these capabilities.

Network security
The first layer of security involves the network. The networking capabilities and tasks differ between Azure SQL Database and Azure SQL Managed Instance. For information on Azure SQL Managed Instance networking capabilities, see Connectivity architecture for Azure SQL Managed Instance.
Azure SQL Database network security
When you're securing your network for Azure SQL Database, you have four main choices:
- Allow access to Azure services
- Use firewall rules
- Use virtual network rules
- Use Azure Private Link
In addition to these main choices, you have the opportunity to block all public access (only with Azure Private Link) and the option to force a minimum Transport Layer Security (TLS) version. The least secure method, but the easiest to configure, is to allow access to Azure services. The most secure method is to use Private Link. The following sections will cover the capabilities for each option, as well as how to configure and maintain each option.
Allow access to Azure services
During the Azure SQL Database deployment, you have the option to set Allow Azure services and resources access to this server to Yes. If you choose this option, you're allowing any resource from any region or subscription the possibility to access your resource. This option makes it easy to get up and running and get Azure SQL Database connected to other services, such as Azure Virtual Machines, Azure App Service, or even Azure Cloud Shell, because you're allowing anything that comes through Azure to have the potential to connect.
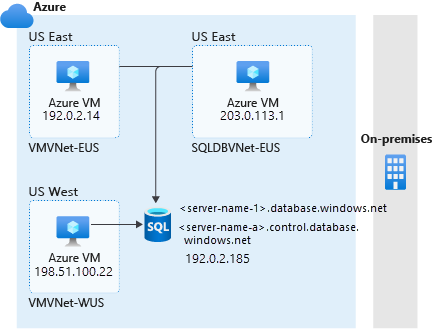
Allowing access to Azure services does not, however, allow anything outside of Azure (for example, your on-premises environment) to have access.
The most secure configuration is to set Allow Azure services and resources access to this server to No, which blocks all connections and networks apart from ones you've explicitly added with the various options that follow in the next sections.
Firewall rules
Your next option is to apply firewall rules. Your results might be similar to those of Allow Azure services and resources access to this server except that, for each service (in the following image, a virtual machine (VM)), you'll need to add a unique firewall rule to allow it to connect. Firewall rules also enable your on-premises environment to connect to the Azure SQL Database resource, because you can add the rules for machines and applications in your on-premises environment.
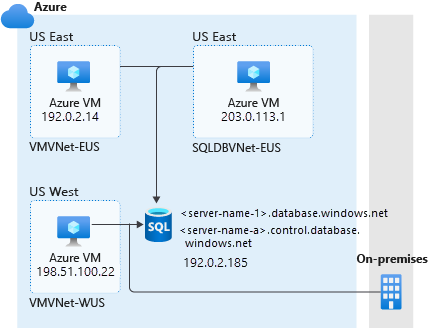
To get connectivity in Azure, you can also allow access to Azure services and then add firewall rules for on-premises connectivity only. As previously mentioned, Allow Azure services and resources access to this server isn't as secure, because it allows all Azure traffic. We recommend that you use firewall rules exclusively.
Let's look at the preceding example with the firewall rules configured. From a tool that supports Transact-SQL (T-SQL) like SQL Server Management Studio (SSMS), you could run the following query from your Azure VM in the virtual network SQLDBVNET-EUS:
SELECT client_net_address FROM sys.dm_exec_connections WHERE session_id=@@SPID;
The result would be 203.0.113.1. This is the public IP address of the Azure VM. Even though we're using firewall rules, all the connections being made are public.
Virtual network rules
If you want to use only firewall rules, it can be complicated to set up. Using only firewall rules means that you have to specify a range of IP addresses for all your connections, which can sometimes have dynamic IP addresses. A much easier alternative is to use virtual network rules to establish and manage access from specific networks that contain VMs or other services that need to access the data.
If you configure access from a virtual network with a virtual network rule, any resources in that virtual network can access the Azure SQL Database logical server. This can simplify the challenge of configuring access to all static and dynamic IP addresses that need to access the data. By using virtual network rules, you can specify one or more virtual networks, encompassing all the resources within them. You can also start to apply virtual network technologies to connect networks across regions in both Azure and on-premises.
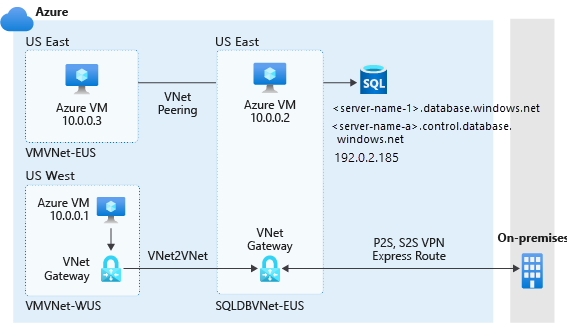
In this example, as in the previous section, you could run the same query from your Azure VM in the virtual network SQLDBVNET-EUS:
SELECT client_net_address FROM sys.dm_exec_connections WHERE session_id=@@SPID;
The result would now be 10.0.0.2, the private IP address of the Azure VM. This result gets you one step closer to making private connections to your Azure SQL Database logical server, because resources are now connecting through the virtual network.
Another common strategy for analyzing your connection is to examine the Domain Name System (DNS) hierarchy. In the same Azure VM, in a command prompt, you could run the following command:
nslookup aw-server.database.windows.net
By using this command, you can get details that are related to the DNS infrastructure. Your results would be similar to the following:
Server: Unknown
Address: 168.63.129.16

Non-authoritative answer:
Name:   cr2.eastus1-a.control.database.windows.net
Address:    203.0.113.1
Aliases:    aw-server.database.windows.net
            dataslice2.eastus.database.windows.net
Under the non-authoritative answer, there are some important things to look at:
- Name: The endpoint starting with
cr2is part of the public DNS hierarchy. Without getting too much into the hierarchy, let's say thatcr2is control ring 2 and that there are multiple data "slices" below it. - Address: The IP address returned here should match the public IP address of your Azure VM. Although a tool such as SSMS's final hop might be through your VM's private IP address, your VM's public IP address is still being used to connect in some capacity.
- Aliases: Aliases are various points within the DNS hierarchy; in this case, the specific data "slice" and endpoint you connect to.
Note
In the preceding output block, Address: 168.63.129.16 is a virtual public IP address that's used to facilitate a communication channel to Azure platform resources. It applies to all regions and all national clouds, and it won't change.
Although the connection through SSMS comes through the Azure VM's private IP address, you're still ultimately connecting through a public endpoint.
Private Link for an Azure SQL Database
You've seen how to configure the most secure network by using your database in Azure SQL Database with the public endpoint. This method of securing a database in SQL Database has been used for years. However, in 2019, Azure began moving toward a concept of a private link, which is more like the way that Azure SQL Managed Instance is deployed. With Azure Private Link, you can connect to your database in SQL Database and several other platform-as-a-service (PaaS) offerings by using a private endpoint. This means that it has a private IP address within a specific virtual network.
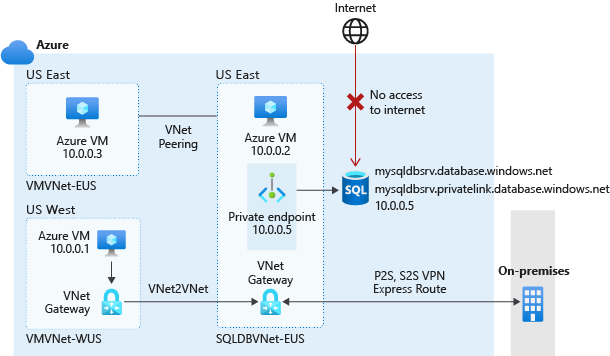
In the preceding example, you'll notice that the general networking infrastructure didn't change and you can still apply the virtual network connectivity strategies from the virtual network rules. However, you won't have to create virtual network rules. Resources that need to connect to the database server must have access to the virtual network where the endpoint resides. In the example, the endpoint is SQLDBVNet-EUS. Only connections that go through the private endpoint have access, and all other connections (for example, from the internet) are denied.
As you continue with this example, on the Azure VM in virtual network SQLDBVNet-EUS, you could once again run the following T-SQL command:
SELECT client_net_address FROM sys.dm_exec_connections WHERE session_id=@@SPID;
The result would now be 10.0.0.2, which is the Azure VM's private IP address in this example. By adding access from your virtual network, connections to Azure SQL Database from your VM will appear to come through your VM's private IP address. This is the same result you saw with virtual network rules.
However, you might want to use the command prompt to look at the DNS hierarchy by using the following command:
nslookup aw-server.database.windows.net
If you use the preceding command, your results will be slightly different with the private endpoint configured:
Server: Unknown
Address: 168.63.129.16

Non-authoritative answer:
Name:   aw-server.privatelink.database.windows.net
Address:    10.0.0.5
Aliases:    aw-server.database.windows.net
Under the non-authoritative answer, there are some important things to look at:
- Name: Note that you're no longer pointing to the public DNS hierarchy, only to the Private Link DNS. This means that less information is revealed about your database server.
- Addresses: For virtual network rules, the address that's returned is your VM's public IP address, but it should now be one or more private IP addresses within the Private Link hierarchy (one is the private endpoint of your Azure SQL Database).
- Aliases: As in the Name field, nothing is related to the DNS hierarchy, except that you can still connect to the server name (for example,
aw-server.database.windows.net).
One thing you might be wondering if you're connecting to the private endpoint is why are you still using the same server name? In the backend, when you use only the Private Link method of connecting to Azure SQL Database (that is, no firewall or virtual network rules), the information is processed as follows:
aw-server.database.windows.net- Resolved by service to
aw-server.privatelink.database.net- Resolved by service to
10.0.0.5(the IP address of your private endpoint)
- Resolved by service to
- Resolved by service to
Additionally, the service will block you from directly connecting by using anything other than aw-server.database.windows.net.
Access management
After you've worked out the networking access, the next layer to consider is access management.
Role-based access control
All Azure types of operations for Azure SQL Database are controlled through role-based access control (RBAC). RBAC is currently decoupled from Azure SQL security, but you can think of it as security rights outside of your database in SQL Database, with a scope that includes subscription, resource group, and resource. The rights apply to operations in the Azure portal, the Azure CLI, and Azure PowerShell. RBAC allows for separation of duties between deployment, management, and usage.
Built-in roles are available to reduce the need for higher-level RBAC roles, such as Owner or Contributor. Effectively, you can use these roles to have certain individuals deploy Azure SQL resources (or manage security policies) but grant other users actual access to use or manage the database. For example, a SQL Server Contributor could deploy a server and assign a user to be the admin of the server and databases. The built-in roles for Azure SQL Database include:
- SQL DB Contributor: Can create and manage databases but can't access the database (for example, can't connect and read data)
- SQL Security Manager: Can manage security policies for databases and instances (such as auditing) but can't access them
- SQL Server Contributor: Can manage servers and databases but can't access them.
Authentication
During an Azure SQL Database logical server deployment, you can specify the following Authentication method:
- Use only Microsoft Entra authentication
- Use both SQL and Microsoft Entra authentication
- Use SQL authentication
The server admin needs to be set during deployment. For databases in Azure SQL Database, the server admin is a server-level principal for the Azure SQL Database logical server.
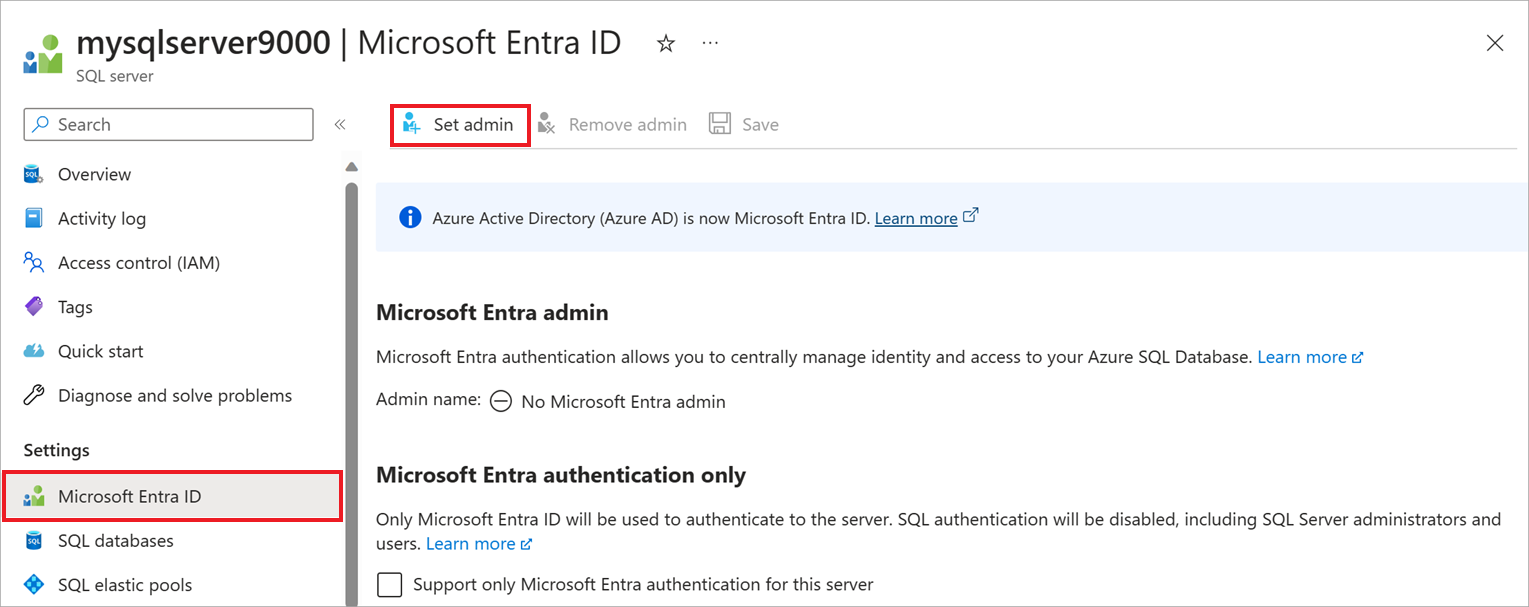
If you're migrating a workload that needs Windows authentication or your organization uses Microsoft Entra ID, you can use Microsoft Entra ID. You can assign a Microsoft Entra server admin by using the portal or command-line tools.
Microsoft Entra-only authentication is the default option when configuring a new server. Server logins have been introduced to allow Microsoft Entra server principals, which are logins in the virtual master database of a SQL Database. You can create Microsoft Entra logins from Microsoft Entra users, groups, and service principals. When using Microsoft Entra-only authentication, you can create SQL authentication logins, and existing logins will remain. However, only Microsoft Entra authentication logins and users can connect to the logical server. To learn more about Microsoft Entra-only authentication, see Microsoft Entra-only authentication with Azure SQL.
Depending on how your organization has configured the Microsoft Entra instance, you can connect to it by using any of the following three methods (for example, in SSMS):
Microsoft Entra ID - Integrated: A non-interactive method that you can use if you're signed in to Windows with your Microsoft Entra credentials from a federated domain.
Microsoft Entra ID - Password: A non-interactive method that allows you to connect with a Microsoft Entra principal name by using the Microsoft Entra ID-managed domain. From the documentation:
This can apply to native or federated Microsoft Entra users. A native user is one explicitly created in Microsoft Entra ID and being authenticated using user name and password, while a federated user is a Windows user whose domain is federated with Microsoft Entra ID. The latter method (using user name & password) can be used when a user wants to use their windows credential, but their local machine is not joined with the domain (for example, using a remote access). In this case, a Windows user can indicate their domain account and password and can authenticate to SQL Database or Azure Synapse Analytics (formerly SQL DW) by using federated credentials.
Microsoft Entra ID - Universal with multifactor authentication (MFA): An interactive method that safeguards access to data while meeting an organization's demand for a single sign-in process with Microsoft Entra multifactor authentication.
For Azure SQL Database, there are a few nuances. You can have logins that exist in the virtual master database, database users, and even contained database users for Microsoft Entra accounts (recommended). Although the server admin for Azure SQL Database essentially has sysadmin rights, you can create more limited admins by using server or database level roles. Two database level roles are available for SQL Database that only exist in the virtual master database:
- loginmanager: A database-level role that allows members to create logins for the database server
- dbmanager: A database-level role that allows members to create and delete databases for the database server
Here's a list of server-level roles in Azure SQL Database:
- ##MS_DatabaseConnector##
- ##MS_DatabaseManager##
- ##MS_DefinitionReader##
- ##MS_LoginManager##
- ##MS_SecurityDefinitionReader##
- ##MS_ServerStateReader##
- ##MS_ServerStateManager##
Finally, when you set up and configure authentication and authorization, you have four guidelines to follow:
- Deploy with a server admin
- Create other admins as necessary
- Admins can create users
- Grant access just like you would in SQL Server
Other capabilities
After you get hands on with some of the network and authentication capabilities, later in the module you'll examine other capabilities (and their related tasks) for data protection, monitoring, logging, and auditing.