Exercise - Create and deploy a template spec
Note
The first time you activate a sandbox and accept the terms, your Microsoft account is associated with a new Azure directory named Microsoft Learn Sandbox. You're also added to a special subscription named Concierge Subscription.
At your toy company, your team has been working with Azure for a while now, and you created lots of templates that you use on a daily basis. You decide to take one template and create a template spec. You're starting with the template that you use to create Azure Cosmos DB accounts.
Your team decided that continuous backup needs to be configured on all of your Azure Cosmos DB accounts. So you want to include backups in the default configuration of Azure Cosmos DB accounts that are provisioned through the template spec.
In this exercise, you publish the Azure Cosmos DB template as a template spec.
During the process, you'll:
- Create a template that you'll use as the template spec.
- Update the template to ensure that the parameters are easy to understand and work with.
- Publish the template spec.
- Verify the template spec by using the Azure portal.
- Deploy the template spec to test it.
- Verify the deployment.
This exercise uses the Bicep extension for Visual Studio Code. Be sure to install this extension in Visual Studio Code.
Create the template
You start with one of the templates that your team created. The template deploys an Azure Cosmos DB account and configures it to enable continuous backup.
Open Visual Studio Code.
Create a new file called main.bicep.
Save the empty file so that Visual Studio Code loads the Bicep tooling.
You can either select File > Save As or select Ctrl+S in Windows (⌘+S on macOS). Be sure to remember where you saved the file. For example, you might want to create a scripts folder to save it in.
Copy the following code into main.bicep:
param location string = resourceGroup().location
param cosmosDBAccountName string = 'toy-${uniqueString(resourceGroup().id)}'

resource cosmosDBAccount 'Microsoft.DocumentDB/databaseAccounts@2021-04-15' = {
  name: cosmosDBAccountName
  kind: 'GlobalDocumentDB'
  location: location
  properties: {
    consistencyPolicy: {
      defaultConsistencyLevel: 'Session'
    }
    locations: [
      {
        locationName: location
        failoverPriority: 0
        isZoneRedundant: false
      }
    ]
    databaseAccountOfferType: 'Standard'
    enableAutomaticFailover: false
    enableMultipleWriteLocations: false
    backupPolicy: {
      type: 'Continuous'
    }
  }
}
Notice that you set
backupPolicytoContinuous. This value configures Azure Cosmos DB to take backups of your data on a continuous basis instead of periodically.Save the file.
Open Visual Studio Code.
Create a new file called azuredeploy.json.
Save the empty file so that Visual Studio Code loads the Azure Resource Manager template (ARM template) tooling.
You can either select File > Save As or select Ctrl+S in Windows (⌘+S on macOS). Be sure to remember where you saved the file. For example, you might want to create a scripts folder to save it in.
Copy the following code into azuredeploy.json:
{
  "$schema": "https://schema.management.azure.com/schemas/2019-04-01/deploymentTemplate.json#",
  "contentVersion": "1.0.0.0",
  "parameters": {
    "location": {
      "type": "string",
      "defaultValue": "[resourceGroup().location]"
    },
    "cosmosDBAccountName": {
      "type": "string",
      "defaultValue": "[concat('toy-', uniqueString(resourceGroup().id))]"
    }
  },
  "resources": [
    {
      "type": "Microsoft.DocumentDB/databaseAccounts",
      "apiVersion": "2021-04-15",
      "name": "[parameters('cosmosDBAccountName')]",
      "kind": "GlobalDocumentDB",
      "location": "[parameters('location')]",
      "properties": {
        "consistencyPolicy": {
          "defaultConsistencyLevel": "Session"
        },
        "locations": [
          {
            "locationName": "[parameters('location')]",
            "failoverPriority": 0,
            "isZoneRedundant": false
          }
        ],
        "databaseAccountOfferType": "Standard",
        "enableAutomaticFailover": false,
        "enableMultipleWriteLocations": false,
        "backupPolicy": {
          "type": "Continuous"
        }
      }
    }
  ]
}
Notice that you set the
backupPolicytoContinuous. This value configures Azure Cosmos DB to take backups of your data on a continuous basis instead of periodically.Save the file.
Make the parameters easier to understand
When you work with template specs, it's important to consider how others use your template. This review is especially important for parameters, because they're the main way that other people interact with your code. The parameters in your team's template don't include descriptions or other hints about how they should be used, so you add this information here.
Update the
locationparameter definition by adding a description:@description('The Azure region into which the Cosmos DB resources should be deployed.') param location string = resourceGroup().locationUpdate the
cosmosDBAccountNameparameter definition to add a description, and to specify the minimum and maximum length of the name:@description('The name of the Cosmos DB account. This name must be globally unique, and it must only include lowercase letters, numbers, and hyphens.') @minLength(3) @maxLength(44) param cosmosDBAccountName string = 'toy-${uniqueString(resourceGroup().id)}'Save the file.
Update the
locationparameter definition by adding a description:"location": { "type": "string", "defaultValue": "[resourceGroup().location]", "metadata": { "description": "The Azure region into which the Cosmos DB resources should be deployed." } },Update the
cosmosDBAccountNameparameter definition to add a description, and to specify the minimum and maximum length of the name:"cosmosDBAccountName": { "type": "string", "defaultValue": "[concat('toy-', uniqueString(resourceGroup().id))]", "maxLength": 44, "minLength": 3, "metadata": { "description": "The name of the Cosmos DB account. This name must be globally unique, and it must only include lowercase letters, numbers, and hyphens." } }Save the file.
Sign in to Azure
To deploy this template to Azure, you need to sign in to your Azure account from the Visual Studio Code terminal. Be sure you've installed the Azure CLI, and remember to sign in with the same account that you used to activate the sandbox.
On the Terminal menu, select New Terminal. The terminal window usually opens in the lower half of your screen.
If the terminal window displays bash on the right side, it means the correct shell is already open. Alternatively, if you see a bash shell icon on the right, you can select it to launch the shell.

If a shell other than bash appears, select the shell dropdown arrow, and then select Git Bash.
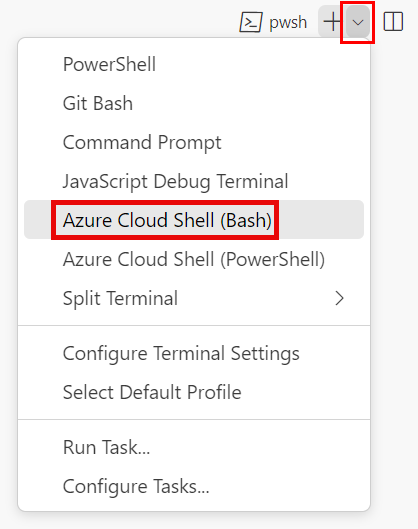
In the terminal, go to the directory where you saved your template. For example, if you saved your template to the templates folder, you can use this command:
cd templates
Install Bicep
Run the following command to ensure you have the latest version of Bicep:
az bicep install && az bicep upgrade
Sign in to Azure
In the Visual Studio Code terminal, sign in to Azure by running the following command:
az loginIn the browser that opens, sign in to your Azure account. The Visual Studio Code terminal displays a list of the subscriptions associated with this account. Select the subscription called Concierge Subscription.
If you've used more than one sandbox recently, the terminal might display more than one instance of Concierge Subscription. In this case, use the next two steps to set one as the default subscription.
Get the Concierge Subscription IDs.
  az account list \
   --refresh \
   --query "[?contains(name, 'Concierge Subscription')].id" \
   --output table
Set the default subscription by using the subscription ID. Replace {your subscription ID} with the latest Concierge Subscription ID.
az account set --subscription {your subscription ID}
Set the default resource group
When you use the Azure CLI, you can set the default resource group and omit the parameter from the rest of the Azure CLI commands in this exercise. Set the default to the resource group that's created for you in the sandbox environment.
az configure --defaults group="<rgn>[sandbox resource group name]</rgn>"
To deploy this template to Azure, sign in to your Azure account from the Visual Studio Code terminal. Be sure you've installed Azure PowerShell, and sign in to the same account that activated the sandbox.
On the Terminal menu, select New Terminal. The terminal window usually opens in the lower half of your screen.
If the terminal window displays pwsh or powershell on the right side, it means the correct shell is already open. Alternatively, if you see a PowerShell shell icon on the right, you can select it to launch the shell.

If a shell other than pwsh or powershell appears, select the shell dropdown arrow, and then select PowerShell.
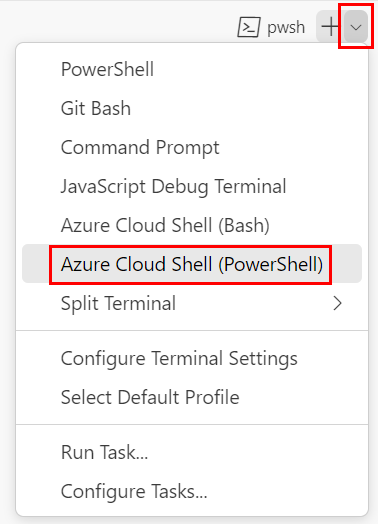
In the terminal, go to the directory where you saved your template. For example, if you saved your template in the templates folder, you can use this command:
Set-Location -Path templates
Install the Bicep CLI
To use Bicep from Azure PowerShell, install the Bicep CLI.
Sign in to Azure by using Azure PowerShell
In the Visual Studio Code terminal, run the following command:
Connect-AzAccountA browser opens so that you can sign in to your Azure account. The browser might be opened in the background.
After you've signed in to Azure, the terminal displays a list of the subscriptions associated with this account. If you've activated the sandbox, a subscription named Concierge Subscription is displayed. Select it for the rest of the exercise.
If you've used more than one sandbox recently, the terminal might display more than one instance of Concierge Subscription. In this case, use the next two steps to set one as the default subscription.
Get the subscription ID. Running the following command lists your subscriptions and their IDs. Look for
Concierge Subscription, and then copy the ID from the second column. It looks something likeaaaa0a0a-bb1b-cc2c-dd3d-eeeeee4e4e4e.Get-AzSubscriptionChange your active subscription to Concierge Subscription. Be sure to replace {Your subscription ID} with the one that you copied.
$context = Get-AzSubscription -SubscriptionId {Your subscription ID}
Set-AzContext $context
Set the default resource group
You can set the default resource group and omit the parameter from the rest of the Azure PowerShell commands in this exercise. Set this default to the resource group created for you in the sandbox environment.
Set-AzDefault -ResourceGroupName <rgn>[sandbox resource group name]</rgn>
To deploy this template to Azure, you need to sign in to your Azure account from the Visual Studio Code terminal. Be sure you've installed the Azure CLI, and remember to sign in with the same account that you used to activate the sandbox.
On the Terminal menu, select New Terminal. The terminal window usually opens in the lower half of your screen.
If the terminal window displays bash on the right side, it means the correct shell is already open. Alternatively, if you see a bash shell icon on the right, you can select it to launch the shell.

If a shell other than bash appears, select the shell dropdown arrow, and then select Git Bash.

In the terminal, go to the directory where you saved your template. For example, if you saved your template to the templates folder, you can use this command:
cd templates
Sign in to Azure
In the Visual Studio Code terminal, sign in to Azure by running the following command:
az loginIn the browser that opens, sign in to your Azure account. The Visual Studio Code terminal displays a list of the subscriptions associated with this account. Select the subscription called Concierge Subscription.
If you've used more than one sandbox recently, the terminal might display more than one instance of Concierge Subscription. In this case, use the next two steps to set one as the default subscription.
Get the Concierge Subscription IDs.
  az account list \
   --refresh \
   --query "[?contains(name, 'Concierge Subscription')].id" \
   --output table
Set the default subscription by using the subscription ID. Replace {your subscription ID} with the latest Concierge Subscription ID.
az account set --subscription {your subscription ID}
Set the default resource group
When you use the Azure CLI, you can set the default resource group and omit the parameter from the rest of the Azure CLI commands in this exercise. Set the default to the resource group that's created for you in the sandbox environment.
az configure --defaults group="<rgn>[sandbox resource group name]</rgn>"
To deploy this template to Azure, sign in to your Azure account from the Visual Studio Code terminal. Be sure you've installed Azure PowerShell, and sign in to the same account that activated the sandbox.
On the Terminal menu, select New Terminal. The terminal window usually opens in the lower half of your screen.
If the terminal window displays pwsh or powershell on the right side, it means the correct shell is already open. Alternatively, if you see a PowerShell shell icon on the right, you can select it to launch the shell.

If a shell other than pwsh or powershell appears, select the shell dropdown arrow, and then select PowerShell.

In the terminal, go to the directory where you saved your template. For example, if you saved your template in the templates folder, you can use this command:
Set-Location -Path templates
Sign in to Azure by using Azure PowerShell
In the Visual Studio Code terminal, run the following command:
Connect-AzAccountA browser opens so that you can sign in to your Azure account. The browser might be opened in the background.
After you've signed in to Azure, the terminal displays a list of the subscriptions associated with this account. If you've activated the sandbox, a subscription named Concierge Subscription is displayed. Select it for the rest of the exercise.
If you've used more than one sandbox recently, the terminal might display more than one instance of Concierge Subscription. In this case, use the next two steps to set one as the default subscription.
Get the subscription ID. Running the following command lists your subscriptions and their IDs. Look for
Concierge Subscription, and then copy the ID from the second column. It looks something likeaaaa0a0a-bb1b-cc2c-dd3d-eeeeee4e4e4e.Get-AzSubscriptionChange your active subscription to Concierge Subscription. Be sure to replace {Your subscription ID} with the one that you copied.
$context = Get-AzSubscription -SubscriptionId {Your subscription ID}
Set-AzContext $context
Set the default resource group
You can set the default resource group and omit the parameter from the rest of the Azure PowerShell commands in this exercise. Set this default to the resource group created for you in the sandbox environment.
Set-AzDefault -ResourceGroupName <rgn>[sandbox resource group name]</rgn>
Publish the template as a template spec
Publish the template spec by using this Azure PowerShell cmdlet in the Visual Studio Code terminal:
New-AzTemplateSpec `
  -ResourceGroupName <rgn>[sandbox resource group name]</rgn> `
  -Name ToyCosmosDBAccount `
  -Location westus `
  -DisplayName 'Cosmos DB account' `
  -Description "This template spec creates a Cosmos DB account that meets our company's requirements." `
  -Version '1.0' `
  -TemplateFile main.bicep
New-AzTemplateSpec `
  -ResourceGroupName <rgn>[sandbox resource group name]</rgn> `
  -Name ToyCosmosDBAccount `
  -Location westus `
  -DisplayName 'Cosmos DB account' `
  -Description "This template spec creates a Cosmos DB account that meets our company's requirements." `
  -Version '1.0' `
  -TemplateFile azuredeploy.json
Publish the template spec by using this Azure CLI command in the Visual Studio Code terminal:
az ts create \
  --name ToyCosmosDBAccount \
  --location westus \
  --display-name "Cosmos DB account" \
  --description "This template spec creates a Cosmos DB account that meets our company's requirements." \
  --version 1.0 \
  --template-file main.bicep
az ts create \
  --name ToyCosmosDBAccount \
  --location westus \
  --display-name "Cosmos DB account" \
  --description "This template spec creates a Cosmos DB account that meets our company's requirements." \
  --version 1.0 \
  --template-file azuredeploy.json
Use the Azure portal to verify the template spec
Go to the Azure portal and make sure you're in the sandbox subscription:
- Select your avatar in the upper-right corner of the page.
- Select Switch directory. In the list, choose the Microsoft Learn Sandbox directory.
On the left-side panel, select Resource groups.
Select
[sandbox resource group name] . Notice that the template spec is included in the list of resources: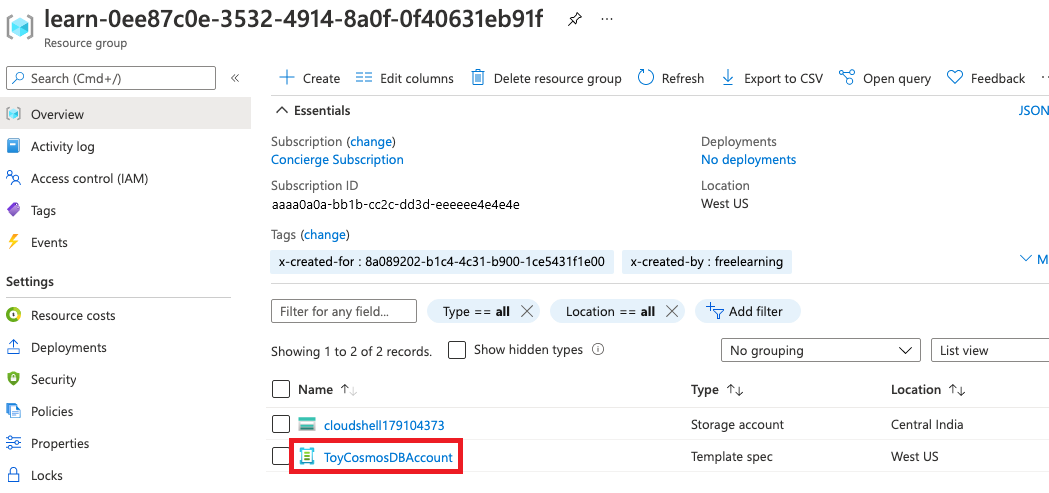
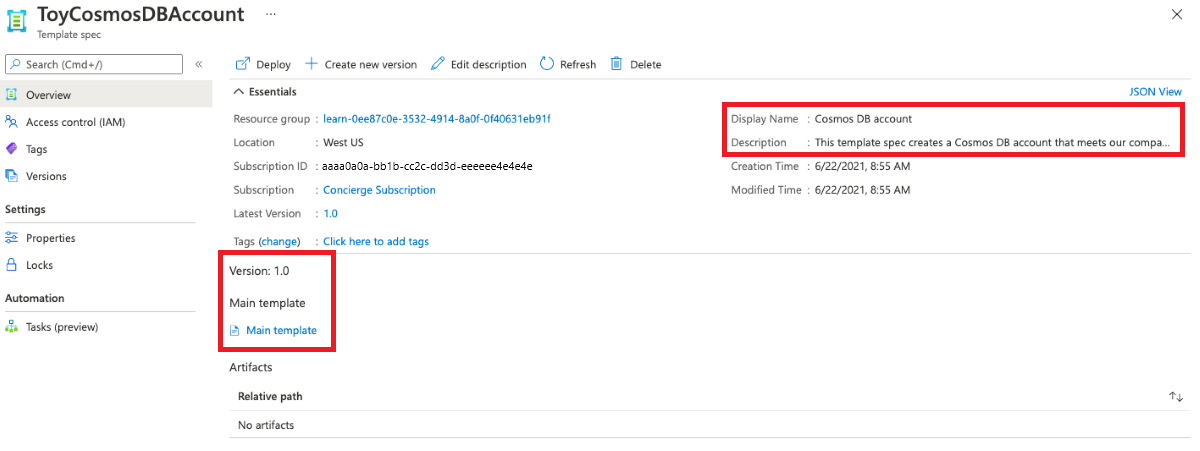
Select ToyCosmosDBAccount to open the template spec. The versions and the template file are visible.
Deploy the template spec
For simplicity, you deploy the template spec into the same sandbox resource group that the template spec itself is stored in. Normally, you keep template specs in a different resource group. However, the steps are the same both ways.
Get the template spec version's resource ID by running the following Azure PowerShell command:
$templateSpecVersionResourceId = (`
   Get-AzTemplateSpec `
      -ResourceGroupName <rgn>[sandbox resource group name]</rgn> `
      -Name ToyCosmosDBAccount `
      -Version 1.0 `
   ).Versions[0].Id
Notice that you use the
Versionsproperty. When you deploy a template spec, you need to reference the resource ID of the specific version of the template spec to use.Deploy the template spec by using this Azure PowerShell command in the Visual Studio Code terminal:
New-AzResourceGroupDeployment -TemplateSpecId $templateSpecVersionResourceId
Get the template spec version's resource ID by running the following Azure CLI command:
id=$(az ts show \
 --name ToyCosmosDBAccount \
 --resource-group "<rgn>[sandbox resource group name]</rgn>" \
 --version "1.0" \
 --query "id")
Deploy the template spec by using this Azure CLI command in the Visual Studio Code terminal:
az deployment group create --template-spec $id
The deployment can take a minute or two to finish.
Verify your deployment
In your browser, go back to the Azure portal. Go to your resource group.
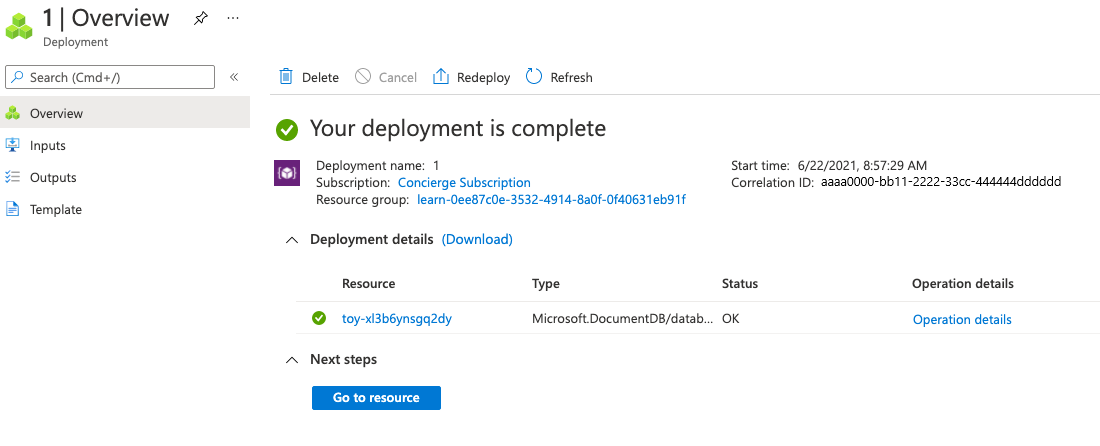
Next to Deployments, select the 1 Succeeded link to see the details of the deployment.

Select the deployment.

Your deployment's name might look different from the one in the example.
Select Deployment details to expand it. Confirm that an Azure Cosmos DB account is deployed.
