How to troubleshoot issues that you may encounter when you use the Lync 2010 mobile client for Google Android
Introduction
The Lync 2010 mobile client for Google Android requires a Lync account from your company organization. If you aren't sure whether you have a Lync account, contact your company system administrator or support team.
The Lync 2010 mobile client for Google Android smartphones isn't supported on Android tablets or on other non-phone Android devices. For more information, go to the following Microsoft Knowledge Base article:
Android smartphone devices that are supported for use with Lync 2010 for Android This article describes how to troubleshoot some common issues that you may encounter when you use the Lync 2010 mobile client for Google Android.
Note
If you're looking for help with Lync Mobile 2013 for Android phones or tablets, go to the following Microsoft websites:
- 2806012 Users can't sign in to Skype for Business Online by using Lync Mobile 2013
- Lync 2013 for Google Android Online Help
Procedure
Signing in to Lync 2010 on Google Android
Verify your password, account information, server settings, and client version
If can't sign in to Lync Mobile 2010, visit the Lync Sign-In Troubleshooter for Users to be guided through a series of steps to help resolve the most common sign-in issues.
Make sure that you can sign in to Lync from a desktop by using Lync 2010, Microsoft Lync 2013, or Microsoft Lync for Mac 2011. If you can't sign in from a regular desktop client, you probably can't sign in to a mobile client.
Make sure that you enter the correct password. If the password is incorrect, you'll have to change it.
Make sure that you enter the correct account information. Unless your administrator has told you otherwise, you probably use the same account information to sign in to Microsoft Outlook, Microsoft SharePoint, and your work computer. If you can sign in to Lync from a desktop computer, use the same information to sign in to your mobile device.
The following table describes the sign-in fields that are required for Android users, depending on where their Lync account is located and how their account information is set up.
Lync account SIP address and UPN Required fields On-premises Lync server Same Sign-in address: SIP address; User name: Blank On-premises Lync server Different Sign-in address: SIP address; User name: UPN or domain\username Microsoft 365 Same Sign-in address: SIP address; User Name: Blank Microsoft 365 Different Sign-in address: SIP address; User name: UPN Verify whether Autodetect server is On. Lync tries to determine your Lync server based on your sign-in address. If it can't detect your Lync server, you may have to turn off Autodetect server and specify the Lync server manually.
If Autodetect server is turned on but you still can't sign in, try manually entering the internal and external discovery addresses. This doesn't resolve the issue. However, if you can successfully sign in manually, this indicates that the Autodetect server option isn't set up correctly by your administrator.
For Skype for Business Online (formerly Lync Online) users in Microsoft 365:
- Internal discovery address:
https://webdir.online.lync.com/Autodiscover/autodiscoverservice.svc/Root - External discovery address:
https://webdir.online.lync.com/Autodiscover/autodiscoverservice.svc/Root
- Internal discovery address:
For Lync on-premises users, contact your support team or system administrator for help with determining your internal and external discovery address. In most cases, the internal and external discovery address should resemble the following:
- Internal discovery address:
https://lyncdiscover.lyncFE01.contoso.local/Autodiscover/autodiscoverservice.svc/Root - External discovery address:
https://lyncdiscover.contoso.com/Autodiscover/autodiscoverservice.svc/Root
Note
To access the User name, Domain, Internal discovery address, and External discovery address fields, click Server Settings on the sign-in screen.
- Internal discovery address:
Make sure that you're using the latest version of the Lync 2010 mobile client for Google Android. Download the latest version from Google Play. If you receive a message that states the client version is blocked or not supported, contact your support team or administrator because the Lync server might not be set up yet for mobile clients.
Connecting over Wi-Fi through an authenticating proxy
If the Wi-Fi connection that's used requires authentication before you connect, Lync may not connect because it can't use the credentials to connect through a proxy. To work around this issue, connect through the mobile carrier's data connection instead of through Wi-Fi.
Connecting on a network that requires certificates
If your organization requires certificates to connect to their Wi-Fi or corporate network, and you receive an error message from Lync about certificates being incorrect or missing, you may have to import certificates from your company. There are apps in the Google Play store for importing and managing certificates. Contact your support team or administrator for help.
Additional help with specific features
For guides, FAQ, and references to help you use the Lync 2010 mobile client on Google Android, go to the following Microsoft websites:
Comparison with other mobile clients
For a feature comparison of Lync 2010 mobile clients, go to the following Microsoft TechNet website:
Mobile Client Comparison Tables
Sending logs to support
When users experience an issue that affects the Lync 2010 mobile client for Google Android, they can send logs by email to the support team or administrator. To do this, follow these steps:
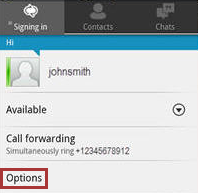
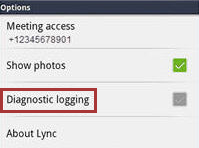
On the Google Android device, after a user is signed in, tap Options on the Signing in tab. On the Options screen, tap Diagnostic logging, sign out, and then sign in again. (The screenshot for this step is listed below).


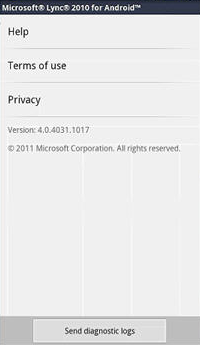
Reproduce the issue, return to the Options screen, and then tap About Lync.
Tap Send diagnostic logs, and then select a configured email account. (The screenshot for this step is listed below).

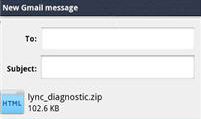
In the To box, enter the recipient's email address. For example, your personal email address or your technical support team's alias. In the Subject box, enter a subject, and then tap Send. Logs are attached as a .zip file. (The screenshot for this step is listed below).

Note
Make sure that **Logging **is set to ON before you try to reproduce the issue and send logs.
The third-party products that this article discusses are manufactured by companies that are independent of Microsoft. Microsoft makes no warranty, implied or otherwise, about the performance or reliability of these products.
Microsoft provides third-party contact information to help you find technical support. This contact information may change without notice. Microsoft does not guarantee the accuracy of this third-party contact information.
Still need help? Go to Microsoft Community.