Advanced Quick View Functionality
This tutorial builds off the following tutorial: Advanced Card View Functionality.
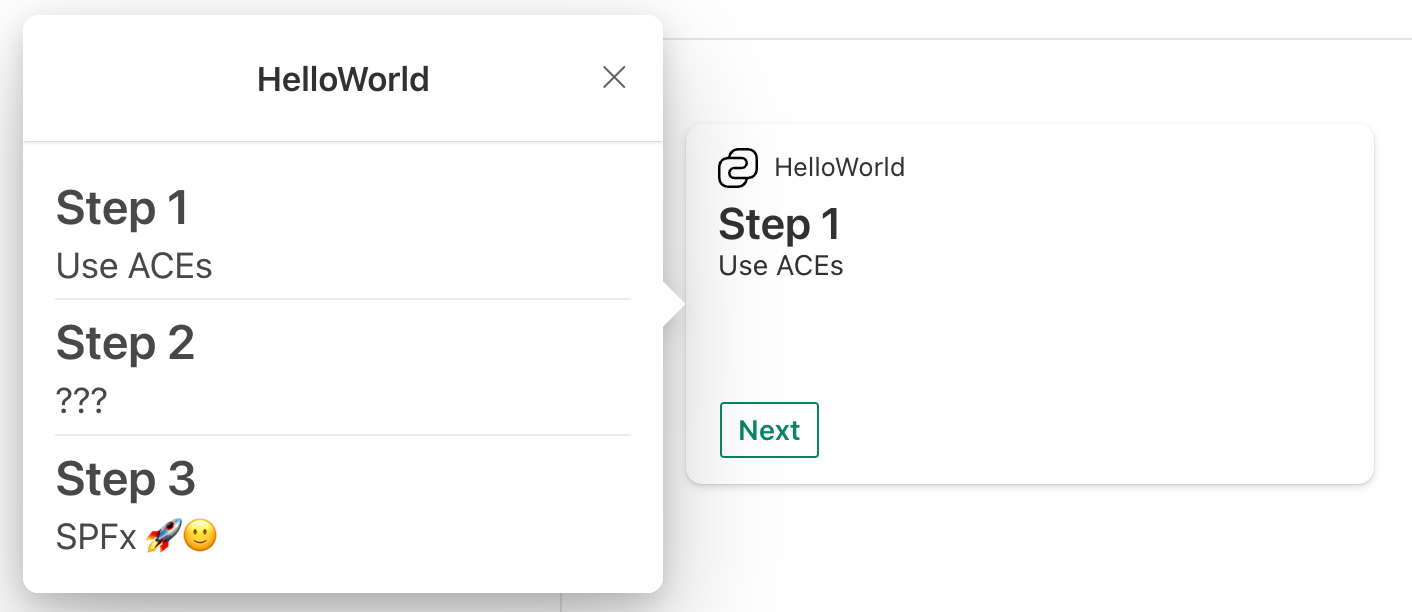
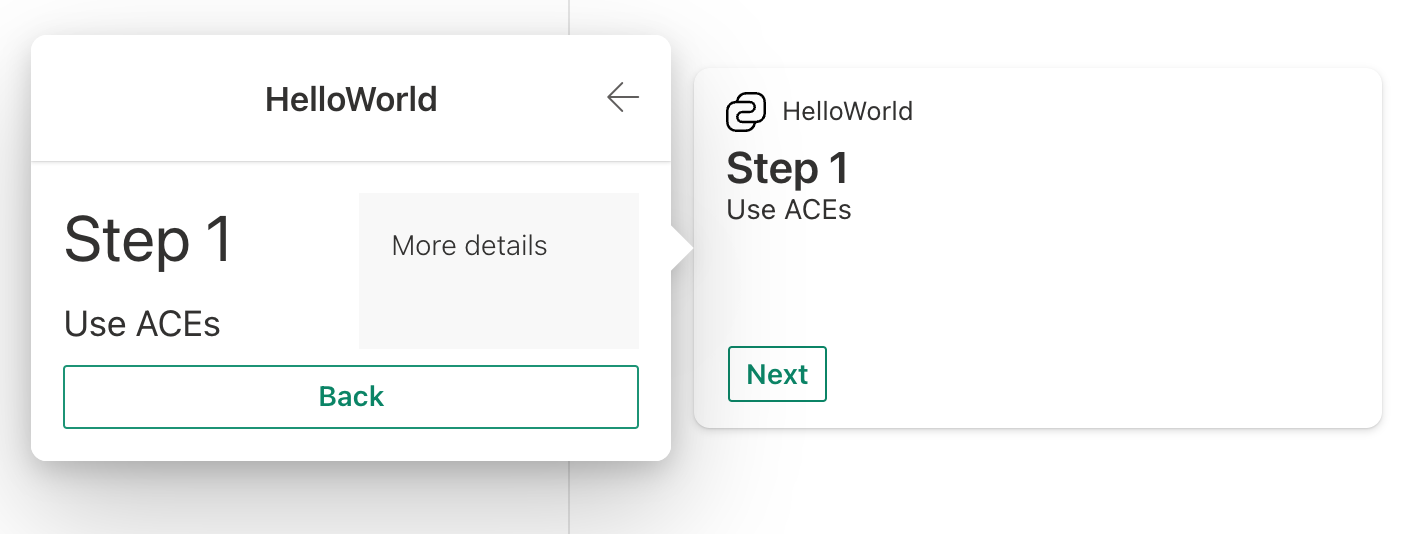
Start with the HelloWorld ACE from the previous tutorial, Advanced Card View Functionality. The HelloWorld ACE displays either the count of total steps or one individual step at a time. Using the Quick View, the ACE can show a list of all the steps. Additionally, the ACE can show more details about a particular step if it's selected.
Show all items in Quick View
Locate and open the following file in your project: ./src/adaptiveCardExtensions/helloWorld/quickView/QuickView.ts.
Update the code in the QuickView.ts file with the following changes:
import { IListItem } from '../HelloWorldAdaptiveCardExtension';

// omitted for brevity

export interface IQuickViewData {
  items: IListItem[];
}

// omitted for brevity

public get data(): IQuickViewData {
  return {
    items: this.state.items
  };
}
Next, locate and open the file src/adaptiveCardExtensions/helloWorld/quickView/template/QuickViewTemplate.json and replace its contents with the following JSON. This will update the Quick View card rendered in the ACE:
{
  "$schema": "http://adaptivecards.io/schemas/adaptive-card.json",
  "type": "AdaptiveCard",
  "version": "1.5",
  "body": [
    {
      "type": "Container",
      "$data": "${items}",
      "selectAction": {
        "type": "Action.Submit",
        "data": {
          "id": "selectAction",
          "newIndex": "${index}"
        }
      },
      "separator": true,
      "items": [
        {
          "type": "TextBlock",
          "text": "${title}",
          "color": "dark",
          "weight": "Bolder",
          "size": "large",
          "wrap": true,
          "maxLines": 1,
          "spacing": "None"
        },
        {
          "type": "TextBlock",
          "text": "${description}",
          "color": "dark",
          "wrap": true,
          "size": "medium",
          "maxLines": 1,
          "spacing": "None"
        }
      ]
    }
  ]
}
As you can see in the JSON template, we use the ${index} to pass the selected item index to the QuickView. To allow this to works, we must add and populate
indexproperty of theIListItemobject defined in the previous tutorial. Open and locate the file ./src/adaptiveCardExtensions/helloWorld/HelloWorldAdaptiveCardExtension.ts, then add the propertyindexto theIListItemdefinition:export interface IListItem { title: string; description: string; index: number; }Locate the
fetchData()method in the same class and modify the map function inside it, to:... .then((jsonResponse) => jsonResponse.value.map( (item, index) => { return { title: item.Title, description: item.Description, index: index }; }) ) ...Finally locate ./src/adaptiveCardExtensions/helloWorld/cardView/CardView.ts and update the
onCardSelection()getter to:public get onCardSelection(): IQuickViewCardAction | IExternalLinkCardAction | undefined { return { type: 'QuickView', parameters: { view: QUICK_VIEW_REGISTRY_ID } }; }
You'll also need to import QUICK_VIEW_REGISTRY_ID from ../HelloWorldAdaptiveCardExtension
Build and launch the ACE in the hosted workbench:
gulp serve
Once the local web server has loaded, navigate to the hosted workbench: https://{tenant}.sharepoint.com/_layouts/15/workbench.aspx
Open the Toolbox and select your ACE. Select the Card to open the Quick View:

Since the onAction() handler hasn't been changed to handle the item select, selecting on an item does nothing. You'll address this in the next step.
Create a new Quick View
Create a new file to hold a new Quick View card: ./src/adaptiveCardExtensions/helloWorld/quickView/DetailedQuickViewTemplate.json.
Add the following JSON to the DetailedQuickViewTemplate.json file:
{
  "$schema": "http://adaptivecards.io/schemas/adaptive-card.json",
  "type": "AdaptiveCard",
  "version": "1.5",
  "body": [
    {
      "type": "ColumnSet",
      "columns": [
        {
          "type": "Column",
          "items": [
            {
              "type": "TextBlock",
              "text": "${title}",
              "size": "ExtraLarge"
            },
            {
              "type": "TextBlock",
              "text": "${description}",
              "size": "Medium"
            }
          ]
        },
        {
          "type": "Column",
          "style": "emphasis",
          "items": [
            {
              "type": "TextBlock",
              "text": "${details}",
              "weight": "Lighter"
            }
          ]
        }
      ]
    },
    {
      "type": "ActionSet",
      "actions": [
        {
          "type": "Action.Submit",
          "title": "Back",
          "data": {
            "id": "back"
          }
        }
      ]
    }
  ]
}
Create a new file to implement a new Quick View: ./src/adaptiveCardExtensions/helloWorld/quickView/DetailedQuickView.ts
Add the following code to the DetailedQuickView.ts file:
import { BaseAdaptiveCardQuickView, ISPFxAdaptiveCard } from '@microsoft/sp-adaptive-card-extension-base';
import { IHelloWorldAdaptiveCardExtensionProps, IHelloWorldAdaptiveCardExtensionState } from '../HelloWorldAdaptiveCardExtension';

export interface IDetailedViewData {
  title: string;
  description: string;
  details: string;
}

export class DetailedView extends BaseAdaptiveCardQuickView<
  IHelloWorldAdaptiveCardExtensionProps,
  IHelloWorldAdaptiveCardExtensionState,
  IDetailedViewData
> {
  public get data(): IDetailedViewData {
    const { description, title } = this.state.items[this.state.currentIndex];
    return {
      description,
      title,
      details: 'More details'
    };
  }

  public get template(): ISPFxAdaptiveCard {
    return require('./template/DetailedQuickViewTemplate.json');
  }
}
Register the new Quick View
With the new detailed Quick View created, now you need to register it with the ACE:
Locate and open the following file in your project: ./src/adaptiveCardExtensions/helloWorld/HelloWorldAdaptiveCardExtension.ts.
Modify the code in the HelloWorldAdaptiveCardExtension.ts file with the following changes:
import { DetailedView } from './quickView/DetailedQuickView';

// omitted for brevity

export const DETAILED_QUICK_VIEW_REGISTRY_ID: string = 'HelloWorld_DETAILED_QUICK_VIEW';

// omitted for brevity

public onInit(): Promise<void> {
  // ...
  this.quickViewNavigator.register(QUICK_VIEW_REGISTRY_ID, () => new QuickView());
  this.quickViewNavigator.register(DETAILED_QUICK_VIEW_REGISTRY_ID, () => new DetailedView());
  // ...
}
ViewNavigator
The ACE's cardNavigator and quickViewNavigator are instances of a ViewNavigator.
The ViewNavigator's capabilities go beyond only registering new Views. The ViewNavigator is a state management API for the Card and Quick Views. As Views are created, they're automatically pushed onto a View stack.
ACEs can use the ViewNavigator to manipulate the stack.
ViewNavigator.push(): Pushes a new View to the top of the View stack.ViewNavigator.replace(): Replaces the top View with a new View.ViewNavigator.pop(): If there's more than one View, pops the top View from the View stack.ViewNavigator.close(): Closes the current view and removes top view from View stack.
Navigate between views
Update the Quick View to navigate between views:
Locate and open the following file in your project: ./src/adaptiveCardExtensions/helloWorld/quickView/QuickView.ts.
Update the code in the QuickView.ts file to handle when an item is selected from the Quick View:
import { DETAILED_QUICK_VIEW_REGISTRY_ID } from '../HelloWorldAdaptiveCardExtension';

..

public onAction(action: IActionArguments): void {
  if (action.type === 'Submit') {
    const { id, newIndex } = action.data;
    if (id === 'selectAction') {
      this.quickViewNavigator.push(DETAILED_QUICK_VIEW_REGISTRY_ID, true);
      this.setState({ currentIndex: newIndex});
    }
  }
}
Locate and open the following file in your project: ./src/adaptiveCardExtensions/helloWorld/quickView/DetailedQuickView.ts
Update the code in the DetailedQuickView.ts file to Handle when the Detailed Quick View's back button is selected:
public onAction(action: IActionArguments): void {
  if (action.type === 'Submit') {
    const { id } = action.data;
    if (id === 'back') {
      this.quickViewNavigator.pop();
    }
  }
}
You'll also need to import IActionArguments from @microsoft/sp-adaptive-card-extension-base.
Reload the workbench, select on the Card to open the Quick View, and select on an item in the Quick View.

Try selecting Back and selecting another item.
onRenderTypeChanged()
When an ACE transitions from one RenderType to another, the onRenderTypeChanged() method is invoked with the previous RenderType; this.renderType is updated at this point. This can be useful for any tasks to do between the transition.
For example, you might want to maintain the Card state when opening the Quick View. Let's implement this:
Locate and open the following file in your project: ./src/adaptiveCardExtensions/helloWorld/HelloWorldAdaptiveCardExtension.ts.
Update the code in the HelloWorldAdaptiveCardExtension.ts file to introduce a private member that keeps track the previous index during a RenderType change:
import { RenderType } from '@microsoft/sp-adaptive-card-extension-base';
import { DetailedView } from './quickView/DetailedQuickView';

private _cardIndex: number;

...

protected onRenderTypeChanged(oldRenderType: RenderType): void {
  if (oldRenderType === 'QuickView') {
    // Reset to the Card state when the Quick View was opened.
    this.setState({ currentIndex: this._cardIndex });
  } else {
    // The Quick View is opened, save the current index.
    this._cardIndex = this.state.currentIndex;
  }
}
Reload the workbench. Try opening and closing the Quick View after clicking on different items. Notice the Card View will remain in the state it was opened.
Conclusion
After this lab you should be familiar with:
- Create and register Quick Views
- Using the
ViewNavigatorfor navigation - Handle actions from the Quick View
- Use
onRenderTypeChanged() - Advanced Quick View manipulation