Consume the Microsoft Graph in the SharePoint Framework
Consuming REST APIs secured with Azure Active Directory (Azure AD) and Open Authorization (OAuth 2.0) from within a SharePoint Framework client-side web part or extension is a common enterprise-level business scenario.
Introduced in v1.4.1, you can use the SharePoint Framework to consume Microsoft Graph REST APIs, or any other REST API that's registered in Azure AD.
In this article, you'll learn how to create a SharePoint Framework solution that uses the Microsoft Graph API with a custom set of permissions. For a conceptual overview of this technology, see Connect to Azure AD-secured APIs in SharePoint Framework solutions.
Important
You can consume the Microsoft Graph API with versions of SharePoint Framework earlier than v1.4.1, either via the native GraphHttpClient, or by directly using Microsoft identity platfomr authentication libraries implicit OAuth flow. However, the former approach is bound to a predefined set of permissions, which presents some limitations, and the latter is complex from a development perspective.
Solution overview
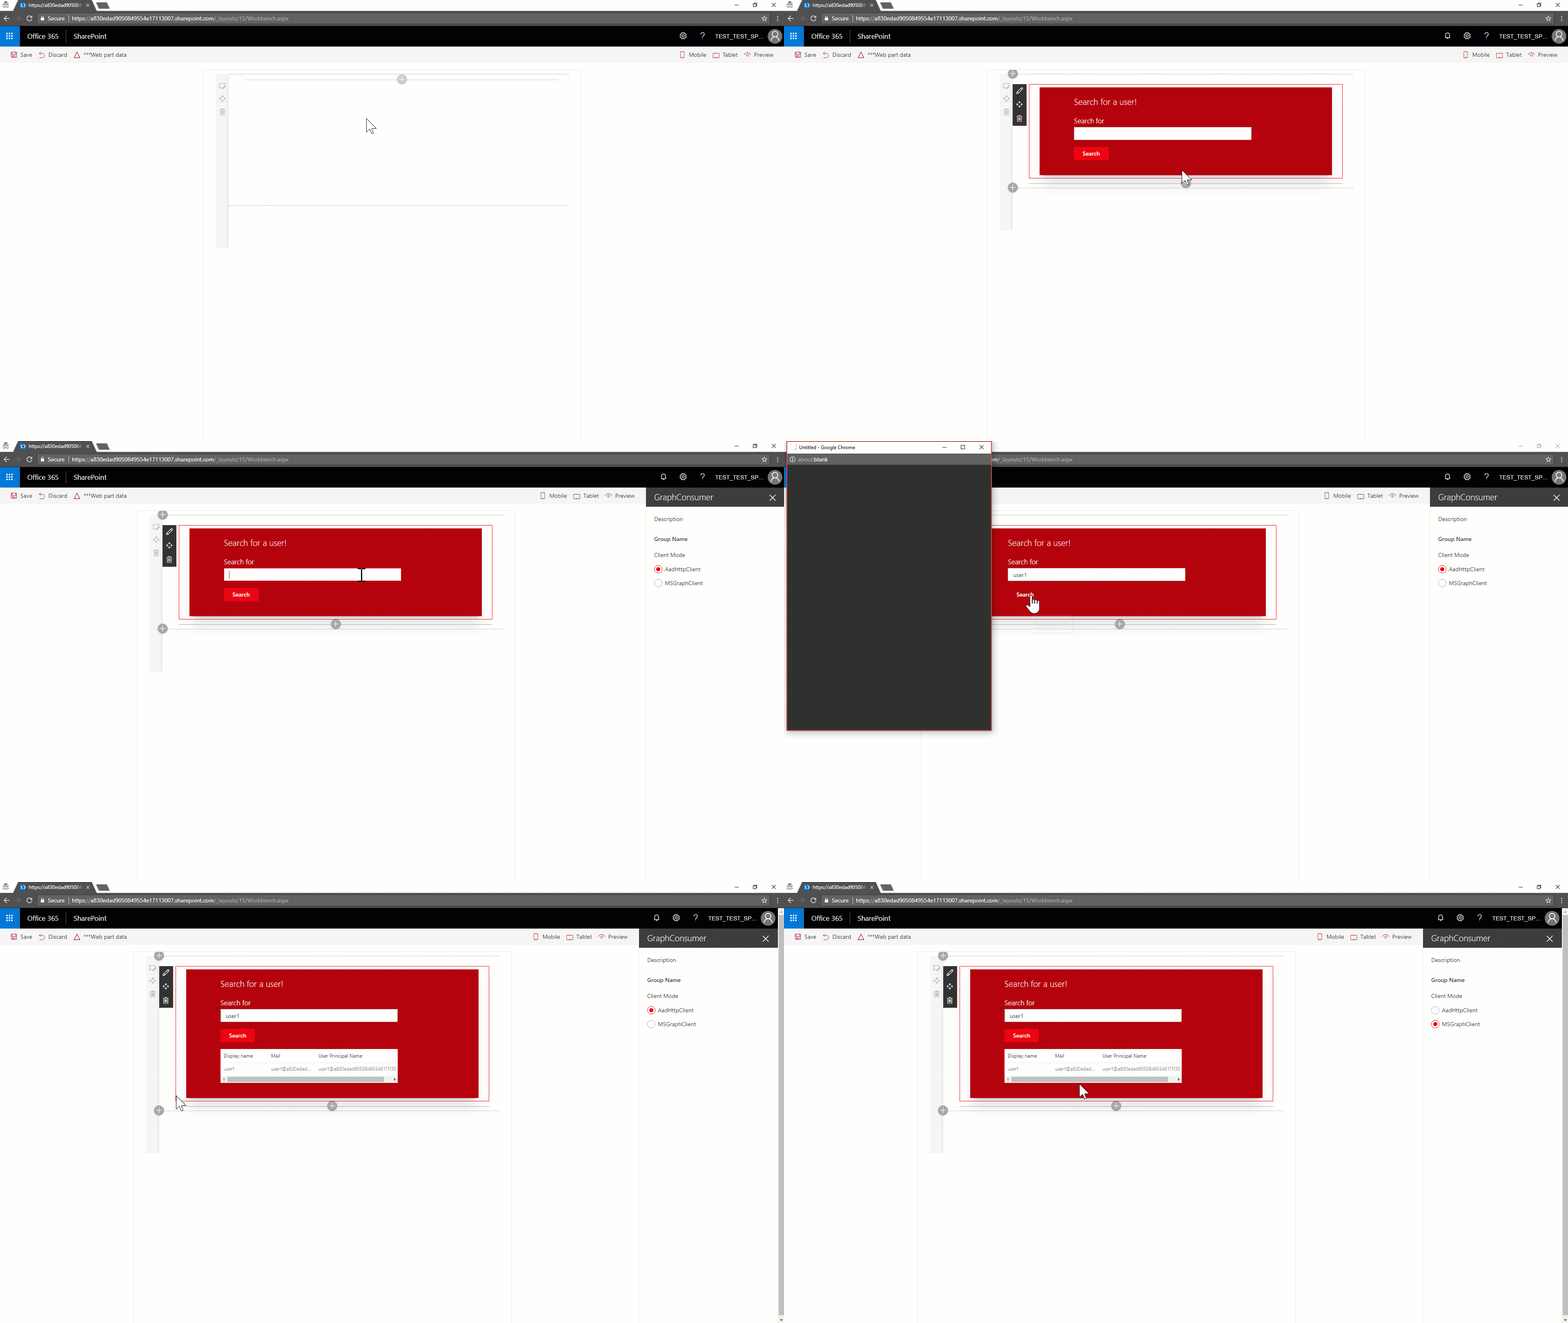
The steps in this article show you how to build a client-side web part that enables searching for users in the current tenant, as shown in the following screenshot. The search is based on Microsoft Graph and requires at least the User.ReadBasic.All permission.

The client-side web part enables searching for users based on their name, and provides all the matching users through a DetailsList Office UI Fabric component. The web part has an option in the property pane to select how to access Microsoft Graph. In versions of the SharePoint Framework starting with v1.4.1, you can access Microsoft Graph by using either the native graph client (MSGraphClient), or the low-level type used to access any Azure AD-secured REST API (AadHttpClient).
Note
To get the source code for this solution, see the api-scopes GitHub repo.
If you're already familiar with how to create SharePoint Framework solutions, you can continue to Configure the API permissions requests.
Create the initial solution
If you have an old version of the SharePoint Framework generator, you need to update it to v1.4.1 or later. To do that, run the following command to globally install the latest version of the package.
npm install -g @microsoft/generator-sharepoint
Next, create a new SharePoint Framework solution:
Create a folder in your file system. You'll store the solution source code and move the current path into this folder.
Run the Yeoman generator to scaffold a new solution.
yo @microsoft/sharepointWhen prompted, enter the following values (select the default option for all prompts omitted below):
- What is your solution name? spfx-api-scopes-tutorial
- Which baseline packages do you want to target for your component(s)? SharePoint Online only (latest)
- Which type of client-side component to create? Web Part
- What is your Web part name? GraphConsumer
- Which framework would you like to use? React
Start Visual Studio Code (or your favorite code editor) within the context of the current folder.
code .
Configure the base web part elements
Next, configure the initial elements of the client-side web part.
Configure the custom properties
Create a new source code file under the ./src/webparts/graphConsumer/components folder of the solution
Call the new file ClientMode.ts and use it to declare a TypeScript
enumwith the available options for theClientModeproperty of the web part.export enum ClientMode { aad, graph, }Open the GraphConsumerWebPart.ts file in the ./src/webparts/graphConsumer folder of the solution.
Change the definition of the
IGraphConsumerWebPartPropsinterface to accept a value of type ClientMode.export interface IGraphConsumerWebPartProps { clientMode: ClientMode; }Update the
getPropertyPaneConfiguration()method of the client-side web part to support the choice selection in the property pane. The following example shows the new implementation of the method.protected getPropertyPaneConfiguration(): IPropertyPaneConfiguration { return { pages: [ { header: { description: strings.PropertyPaneDescription }, groups: [ { groupName: strings.BasicGroupName, groupFields: [ PropertyPaneChoiceGroup('clientMode', { label: strings.ClientModeLabel, options: [ { key: ClientMode.aad, text: "AadHttpClient"}, { key: ClientMode.graph, text: "MSGraphClient"}, ] }), ] } ] } ] }; }You need to update the
render()method of the client-side web part to create a properly configured instance of the React component for rendering. The following code shows the updated method definition.public render(): void { const element: React.ReactElement<IGraphConsumerProps > = React.createElement( GraphConsumer, { clientMode: this.properties.clientMode, context: this.context, } ); ReactDom.render(element, this.domElement); }For this code to work, you need to add some import statements at the beginning of the GraphConsumerWebPart.ts file, as shown in the following example. Note the import for the
PropertyPaneChoiceGroupcontrol, and the import of theClientModeenum.import * as React from "react"; import * as ReactDom from "react-dom"; import { Version } from "@microsoft/sp-core-library"; import { BaseClientSideWebPart, IPropertyPaneConfiguration, PropertyPaneChoiceGroup, } from "@microsoft/sp-webpart-base"; import * as strings from "GraphConsumerWebPartStrings"; import GraphConsumer from "./components/GraphConsumer"; import { IGraphConsumerProps } from "./components/IGraphConsumerProps"; import { ClientMode } from "./components/ClientMode";
Update the resource strings
To compile the solution, you need to update the mystrings.d.ts file under the ./src/webparts/graphConsumer/loc folder of the solution.
Rewrite the interface that defines the resource strings with the following code.
declare interface IGraphConsumerWebPartStrings {
  PropertyPaneDescription: string;
  BasicGroupName: string;
  ClientModeLabel: string;
  SearchFor: string;
  SearchForValidationErrorMessage: string;
}
Configure proper values for the newly created resource strings by updating the en-us.js file within the same folder.
define([], function () {
  return {
    PropertyPaneDescription: "Description",
    BasicGroupName: "Group Name",
    ClientModeLabel: "Client Mode",
    SearchFor: "Search for",
    SearchForValidationErrorMessage: "Invalid value for 'Search for' field",
  };
});
Update the style for the client-side web part
You also need to update the SCSS style file.
Open the GraphConsumer.module.scss under the ./src/webparts/graphConsumer/components folder of the solution. Add the following style classes, right after the .title class:
.form {
  @include ms-font-l;
  @include ms-fontColor-white;
}

label {
  @include ms-fontColor-white;
}
Update the React component rendering the web part
Now you can update the GraphConsumer React component under the ./src/webparts/graphConsumer/components folder of the solution.
Update the IGraphConsumerProps.ts file to accept the custom properties required by the web part implementation. The following example shows the updated content of the IGraphConsumerProps.ts file. Notice the import of the
ClientModeenum definition, and the import of theWebPartContexttype. You'll use that later.import { WebPartContext } from "@microsoft/sp-webpart-base"; import { ClientMode } from "./ClientMode"; export interface IGraphConsumerProps { clientMode: ClientMode; context: WebPartContext; }Create a new interface to hold the React component state. Create a new file in the ./src/webparts/graphConsumer/components folder, and call it IGraphConsumerState.ts. The following is the interface definition.
import { IUserItem } from "./IUserItem";

export interface IGraphConsumerState {
  users: Array<IUserItem>;
  searchFor: string;
}
Define the
IUserIteminterface (within a file called IUserItem.ts stored in the ./src/webparts/graphConsumer/components folder). That interface is imported in the state file. The interface is used to define the outline of the users retrieved from the current tenant and bound to theDetailsListin the UI.export interface IUserItem { displayName: string; mail: string; userPrincipalName: string; }Update the GraphConsumer.tsx file. First, add some import statements to import the types you defined earlier. Notice the import for
IGraphConsumerProps,IGraphConsumerState,ClientMode, andIUserItem. There are also some imports for the Office UI Fabric components used to render the UI of the React component.import * as strings from "GraphConsumerWebPartStrings"; import { BaseButton, Button, CheckboxVisibility, DetailsList, DetailsListLayoutMode, PrimaryButton, SelectionMode, TextField, } from "office-ui-fabric-react"; import * as React from "react"; import { AadHttpClient, MSGraphClientV3 } from "@microsoft/sp-http"; import { escape } from "@microsoft/sp-lodash-subset"; import { ClientMode } from "./ClientMode"; import styles from "./GraphConsumer.module.scss"; import { IGraphConsumerProps } from "./IGraphConsumerProps"; import { IGraphConsumerState } from "./IGraphConsumerState"; import { IUserItem } from "./IUserItem";After the imports, define the outline of the columns for the
DetailsListcomponent of Office UI Fabric.// Configure the columns for the DetailsList component let _usersListColumns = [ { key: "displayName", name: "Display name", fieldName: "displayName", minWidth: 50, maxWidth: 100, isResizable: true, }, { key: "mail", name: "Mail", fieldName: "mail", minWidth: 50, maxWidth: 100, isResizable: true, }, { key: "userPrincipalName", name: "User Principal Name", fieldName: "userPrincipalName", minWidth: 100, maxWidth: 200, isResizable: true, }, ];This array is used in the settings of the
DetailsListcomponent, as you can see in therender()method of the React component.Replace this component with the following code.
public render(): React.ReactElement<IGraphConsumerProps> {
  return (
    <div className={ styles.graphConsumer }>
      <div className={ styles.container }>
        <div className={ styles.row }>
          <div className={ styles.column }>
            <span className={ styles.title }>Search for a user!</span>
            <p className={ styles.form }>
              <TextField
                  label={ strings.SearchFor }
                  required={ true }
                  onChange={ this._onSearchForChanged }
                  onGetErrorMessage={ this._getSearchForErrorMessage }
                  value={ this.state.searchFor }
                />
            </p>
            <p className={ styles.form }>
              <PrimaryButton
                  text='Search'
                  title='Search'
                  onClick={ this._search }
                />
            </p>
            {
              (this.state.users != null && this.state.users.length > 0) ?
                <p className={ styles.form }>
                <DetailsList
                    items={ this.state.users }
                    columns={ _usersListColumns }
                    setKey='set'
                    checkboxVisibility={ CheckboxVisibility.hidden }
                    selectionMode={ SelectionMode.none }
                    layoutMode={ DetailsListLayoutMode.fixedColumns }
                    compact={ true }
                />
              </p>
              : null
            }
          </div>
        </div>
      </div>
    </div>
  );
}
Update the React component type declaration and add a constructor, as shown in the following example:
export default class GraphConsumer extends React.Component<IGraphConsumerProps, IGraphConsumerState> {

  constructor(props: IGraphConsumerProps, state: IGraphConsumerState) {
    super(props);

    // Initialize the state of the component
    this.state = {
      users: [],
      searchFor: ""
    };
  }
There are some validation rules and handling events for the
TextFieldcomponent to collect the search criteria. The following are the method implementations.Add these two methods to the end of the
GraphConsumerclass:private _onSearchForChanged = (event: React.FormEvent<HTMLInputElement | HTMLTextAreaElement>, newValue?: string): void => { // Update the component state accordingly to the current user's input this.setState({ searchFor: newValue, }); } private _getSearchForErrorMessage = (value: string): string => { // The search for text cannot contain spaces return (value == null || value.length == 0 || value.indexOf(" ") < 0) ? '' : `${strings.SearchForValidationErrorMessage}`; }The
PrimaryButtonfires a\_search()function, which determines what client technology to use to consume Microsoft Graph. Add this method to the end of theGraphConsumerclass:private _search = (event: React.MouseEvent<HTMLAnchorElement | HTMLButtonElement | HTMLDivElement | BaseButton | Button, MouseEvent>) : void => { console.log(this.props.clientMode); // Based on the clientMode value search users switch (this.props.clientMode) { case ClientMode.aad: this._searchWithAad(); break; case ClientMode.graph: this._searchWithGraph(); break; } }
The DetailsList component instance is rendered in the render() method, in case there are items in the users property of the component's state.
Configure the API permissions requests
To consume Microsoft Graph or any other third-party REST API, you need to explicitly declare the permission requirements from an OAuth perspective in the manifest of your solution.
In the SharePoint Framework v1.4.1 or later, you can do that by configuring the webApiPermissionRequests property in the package-solution.json under the config folder of the solution. The following example shows an excerpt of that file for the current solution.
Copy the declaration of the webApiPermissionRequests property.
{
  "$schema": "https://developer.microsoft.com/json-schemas/spfx-build/package-solution.schema.json",
  "solution": {
    "name": "spfx-api-scopes-tutorial-client-side-solution",
    "id": "841cd609-d821-468d-a6e4-2d207b966cd8",
    "version": "1.0.0.0",
    "includeClientSideAssets": true,
    "skipFeatureDeployment": true,
    "webApiPermissionRequests": [
      {
        "resource": "Microsoft Graph",
        "scope": "User.ReadBasic.All"
      }
    ]
  },
  "paths": {
    "zippedPackage": "solution/spfx-api-scopes-tutorial.sppkg"
  }
}
Notice the webApiPermissionRequests, which is an array of webApiPermissionRequest items. Each item defines the resource and the scope of the permission request.
The resource can be the name or the ObjectId (in Azure AD) of the resource for which you want to configure the permission request. For Microsoft Graph, the name is Microsoft Graph. The ObjectId isn't unique and varies on a per tenant basis.
The scope can be the name of the permission, or the unique ID of that permission. You can get the permission name from the API documentation. You can get the permission ID from the API manifest file.
Note
For a list of the permissions that are available in Microsoft Graph, see Microsoft Graph permissions reference.
By default, the service principal has no explicit permissions granted to access Microsoft Graph. However, if you request an access token for Microsoft Graph, you get a token with the user_impersonation permission that you can use to read information about the users (User.Read.All). You can request additional permissions to be granted by tenant administrators. For more information, see Connect to Azure AD-secured APIs in SharePoint Framework solutions.
The User.ReadBasic.All permission is sufficient for searching for users and getting their displayName, mail, and userPrincipalName.
When you package and deploy your solution, you (or an admin) will have to grant the requested permissions to your solution. For details, see Deploy the solution and grant permissions.
Consume Microsoft Graph
You can now implement the methods to consume the Microsoft Graph. You have two options:
- Use the AadHttpClient client object
- Use the MSGraphClientV3 client object
The AadHttpClient client object is useful for consuming any REST API. You can use it to consume Microsoft Graph or any other third-party (or first-party) REST API.
The MSGraphClientV3 client object can consume the Microsoft Graph only. Internally it uses the AadHttpClient client object and supports the fluent syntax of the Microsoft Graph SDK.
Using AadHttpClient
To consume any REST API using the AadHttpClient client object, create a new instance of the AadHttpClient type by calling the context.aadHttpClientFactory.getClient() method and providing the URI of the target service.
The object created provides methods to make the following requests:
get(): makes an HTTP GET requestpost(): makes an HTTP POST requestfetch(): makes any other kind of HTTP request, based on theHttpClientConfigurationandIHttpClientOptionsarguments provided.
Because all these methods support the asynchronous development model of JavaScript/TypeScript, you can handle their result with promises.
The following example shows the \_searchWithAad() method of the sample solution.
private _searchWithAad = (): void => {
  // Log the current operation
  console.log("Using _searchWithAad() method");

  // Using Graph here, but any 1st or 3rd party REST API that requires Azure AD auth can be used here.
  this.props.context.aadHttpClientFactory
    .getClient("https://graph.microsoft.com")
    .then((client: AadHttpClient) => {
      // Search for the users with givenName, surname, or displayName equal to the searchFor value
      return client
        .get(
          `https://graph.microsoft.com/v1.0/users?$select=displayName,mail,userPrincipalName&$filter=(givenName%20eq%20'${escape(this.state.searchFor)}')%20or%20(surname%20eq%20'${escape(this.state.searchFor)}')%20or%20(displayName%20eq%20'${escape(this.state.searchFor)}')`,
          AadHttpClient.configurations.v1
        );
    })
    .then(response => {
      return response.json();
    })
    .then(json => {

      // Prepare the output array
      var users: Array<IUserItem> = new Array<IUserItem>();

      // Log the result in the console for testing purposes
      console.log(json);

      // Map the JSON response to the output array
      json.value.map((item: any) => {
        users.push( {
          displayName: item.displayName,
          mail: item.mail,
          userPrincipalName: item.userPrincipalName,
        });
      });

      // Update the component state accordingly to the result
      this.setState(
        {
          users: users,
        }
      );
    })
    .catch(error => {
      console.error(error);
    });
}
The get() method gets the URL of the OData request as the input argument. A successful request returns a JSON object with the response.
Using MSGraphClientV3
If you're targeting Microsoft Graph, you can use the MSGraphClientV3 client object, which provides a more fluent syntax.
The following example shows the implementation of the _searchWithGraph() method of the sample solution.
private _searchWithGraph = () : void => {

  // Log the current operation
  console.log("Using _searchWithGraph() method");

  this.props.context.msGraphClientFactory
    .getClient('3')
    .then((client: MSGraphClientV3) => {
      // From https://github.com/microsoftgraph/msgraph-sdk-javascript sample
      client
        .api("users")
        .version("v1.0")
        .select("displayName,mail,userPrincipalName")
        .filter(`(givenName eq '${escape(this.state.searchFor)}') or (surname eq '${escape(this.state.searchFor)}') or (displayName eq '${escape(this.state.searchFor)}')`)
        .get((err, res) => {

          if (err) {
            console.error(err);
            return;
          }

          // Prepare the output array
          var users: Array<IUserItem> = new Array<IUserItem>();

          // Map the JSON response to the output array
          res.value.map((item: any) => {
            users.push( {
              displayName: item.displayName,
              mail: item.mail,
              userPrincipalName: item.userPrincipalName,
            });
          });

          // Update the component state accordingly to the result
          this.setState(
            {
              users: users,
            }
          );
        });
    });
}
You get an instance of the MSGraphClientV3 type by calling the context.msGraphClientFactory.getClient('3') method.
You then use the fluent API of the Microsoft Graph SDK to define the OData query that runs against the target Microsoft Graph endpoint.
The result is a JSON response that you have to decode and map to the typed result.
Note
You can use a fully typed approach by using the Microsoft Graph TypeScript types.
Deploy the solution and grant permissions
You're now ready to build, bundle, package, and deploy the solution.
Run the gulp commands to verify that the solution builds correctly.
gulp buildUse the following command to bundle and package the solution.
gulp bundle
gulp package-solution
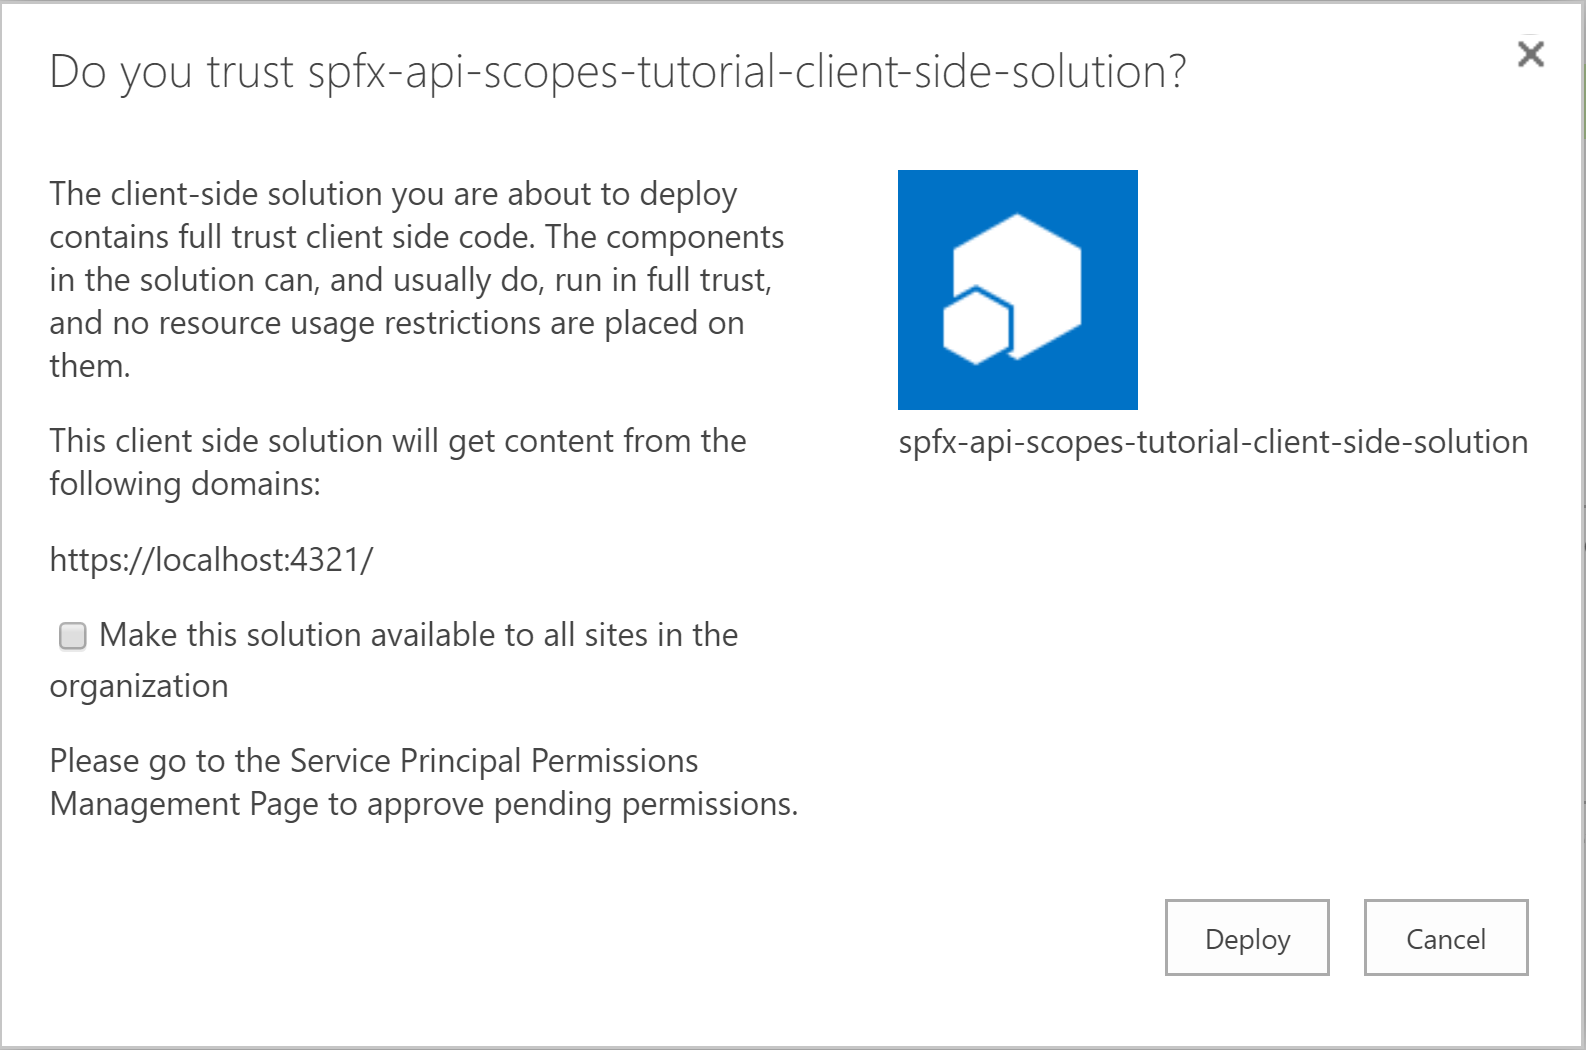
Browse to the app catalog of your target tenant and upload the solution package. You can find the solution package under the sharepoint/solution folder of your solution. It's the .sppkg file. After you upload the solution package, the app catalog prompts you with a dialog box, similar to the one shown in the following screenshot.

A message in the lower part of the screen tells you that the solution package requires permissions approval. This is because of the
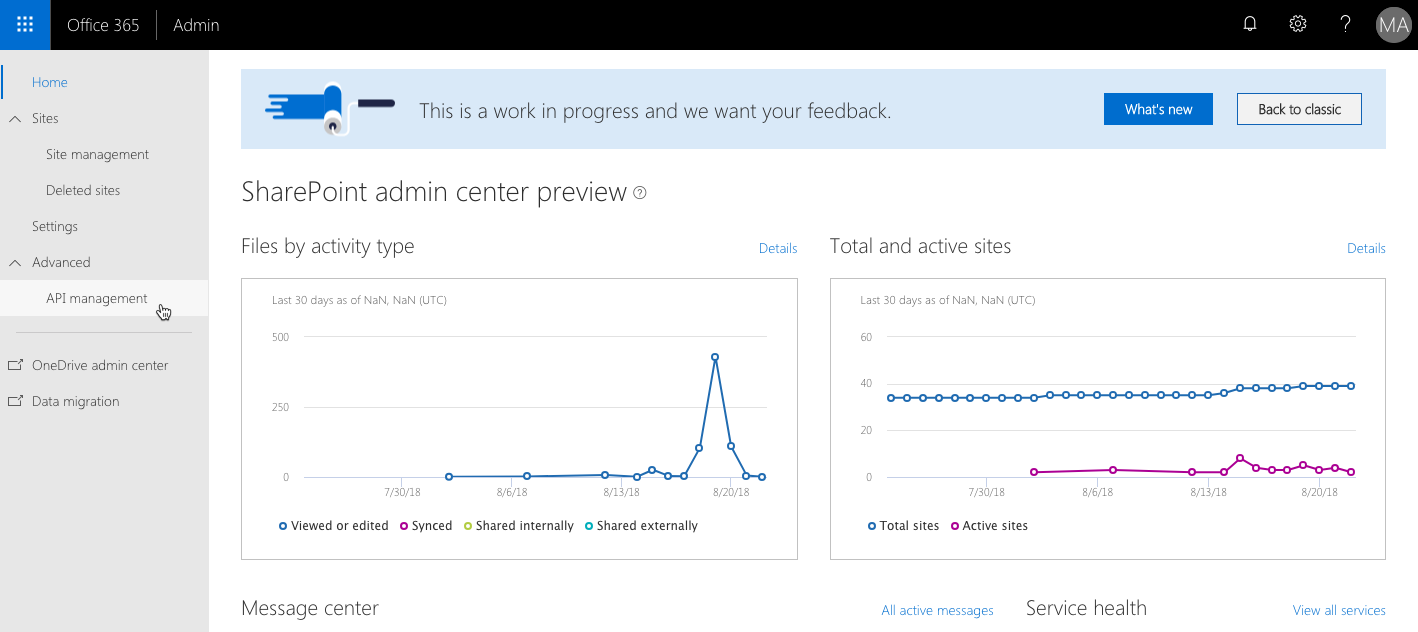
webApiPermissionRequestsproperty in the package-solution.json file.In the modern SharePoint Online Admin Center, in the left quick launch menu, under Advanced select the API access menu item. You'll see a page similar to the following.

Using this page, you (or any other admin of your SharePoint Online tenant) can approve or deny any pending permission request. You don't see which solution package is requesting which permission because the permissions are defined at the tenant level and for a unique application.
Note
For more information about how the tenant-level permission scopes work internally, see the articles in the See also section.
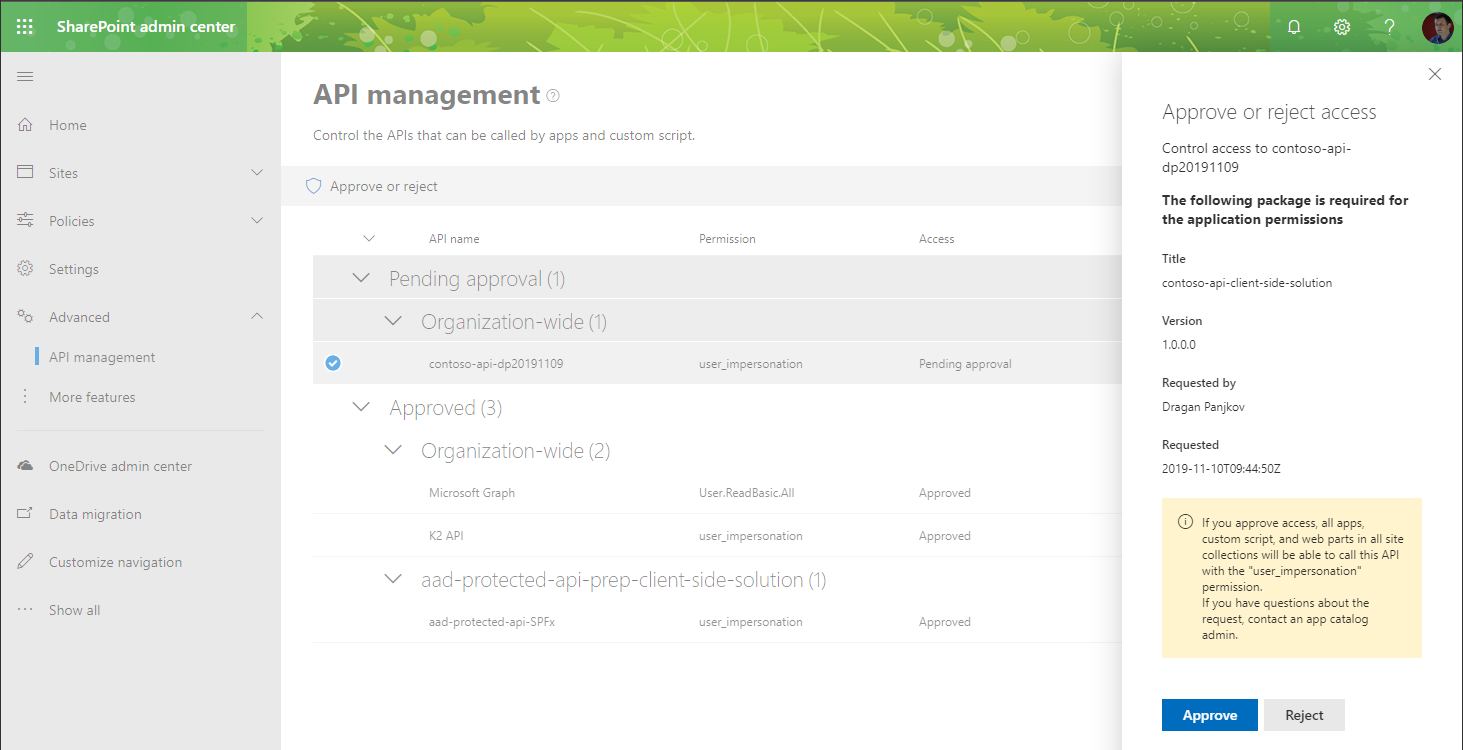
Choose the permission that you requested in the package-solution.json file of your solution, select Approve or reject access, and then select Approve. The following screenshot shows the panel in the Admin UI.

Warning
If you are getting an unexpected exception when trying to approve the permission ([HTTP]:400 - [CorrelationId]), update the resource attribute in your package-solution.json to use the value Microsoft.Azure.AgregatorService rather than Microsoft Graph, which was instructed earlier in this tutorial. Reject the existing request and update the solution package in the app catalog with the update value.
Test the solution
Run your solution by using the following gulp command.
gulp serve --nobrowserOpen the browser and go to the following URL to go to the SharePoint Framework Workbench page:
https://<your-tenant>.sharepoint.com/_layouts/15/Workbench.aspxAdd the GraphConsumer client-side web part, configure the Client Mode, and search for users.
When you make your first request, you'll see a pop-up window appear and disappear. That's the sign-in window used by ADAL JS, which is used internally by the SharePoint Framework to get the access token from Azure AD by using an OAuth implicit flow.

And that's it! Now you can build enterprise-level solutions that use Azure AD-secured REST APIs.